

There is a large selection of predefined shapes and icons that you can use in PowerPoint to add into your slides. However, I often find that none of them is quite right for what I’m looking for. That’s when I use the Merge Shapes tool – it gives me the power to create exactly the right shape for the job at hand.
It’s a simple process – you just use a bunch of the built-in shapes and then add them together or subtract one from another or generally mess around with them in combination with each other until you’ve got the shape you need.
This functionality has been around since Office 2013 but is new to Mac in Office 2016 and more functionality was recently added in Office 365 for Windows.
Merging shapes can sometimes look the same as grouping shapes, but there are a few significant differences. For starters, with a group of shapes, you can still select one of the individual shapes that makes up the group and move it – merging will prevent this from happening accidentally. And other formatting options like outlines and shadows will give different results based on whether you are working with individual, grouped, or merged shapes.
Take a look at the table I’ve created below (Figure 1) – in the first column are three individual shapes, the second column shows those shapes grouped and in the third column, the shapes are merged. Notice how applying different formatting affects each differently and that you can retain different colors/formats for individual or grouped shapes but not for a merged shape.
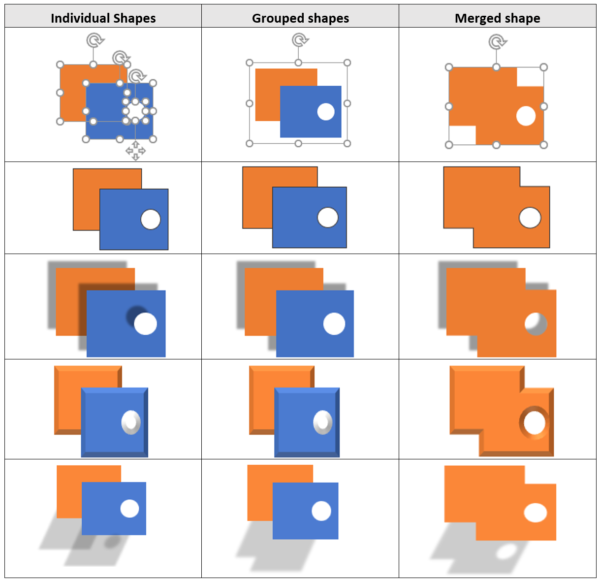
Figure 1: Individual shapes, grouped shapes, and merged shapes react differently when selecting or applying formats.
Obviously, if you’re merging shapes, you’ll need to select at least two shapes to get started (otherwise the Merge Shapes button will be ghosted). To show the different types of merge, I’m using an orange rectangle and a blue circle – Pair 1 has the rectangle in front and Pair 2 has the circle in front.

Figure 2: The shapes we’re merging. If you’re selecting using shift-click, it doesn’t matter which shape is in front.
Be careful how you select the shapes you want to merge. If you’re using the Shift-click method, the order that you select the shapes will influence how they are merged together – generally, the first shape you select will determine the color and style of the merged shape and, in the case of Subtract, the shape you select second will be subtracted from the first. The table in Figure 3 below shows the merge results for each merge type. Except for Subtracting, the results are the same regardless of whether I merge Pair 1 or Pair 2 (Results 1 and 2) as the stacking order doesn’t matter, it’s the selection order that counts. But if you’re using a marquee to select the shapes (Results 3 and 4), the uppermost shape (the one closest to the front) will dictate the format of the merged shape and when subtracting, the front shape will be subtracted from the rear one.
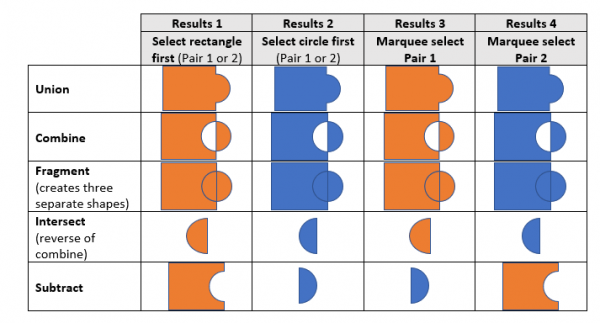
Figure 3: The results achieved when applying different merge options to the two shapes above. Note that the style of the shape you select first will determine the style of the completed shape. If you click and drag to select, the front shape is the one that determines format.
Sometimes it can take a little bit of lateral thinking to work out how best to achieve the shape you’re after, but think carefully because once the merge is done, unless you undo immediately, the merge is not reversible.
If you want to get exactly the right shape when using the Intersect or Fragment option, try making one or both of the shapes semi-transparent so you can check it out before you merge and get the shape of the intersecting area just right before you commit.
Figure 4: Add transparency to the front shape to preview the intersecting area.
And if you have created a grouped shape that you know will never need to be ungrouped, merging two or more non-overlapping shapes will keep them locked together for eternity.

Figure 5: To stop the pup from losing an ear, merge the shapes into one instead of grouping them.
Once you’ve got the hang of merging shapes, why not do some experimenting of your own? Give it a try using text or pictures and try it with more than two shapes and see what effects you can create. I’ve created some as inspiration to get you started. And if you want to work with icons (like I have below when I converted the regular Labrador into a service dog), right-click the icon and select Convert to Shape before you start.


This article was last modified on January 30, 2021
This article was first published on August 18, 2019
Commenting is easier and faster when you're logged in!

Recommended for you

How to Set a Default Theme in PowerPoint
Want to save time and aggravation in PowerPoint? Instead of having to change you...

How to Create Alternatives to Bullet Points in PowerPoint
See how “chunking” can be a great alternative to bullet points in a presentation...

How to Use Summary Zoom for Better Navigation in PowerPoint
Learn how to set up a navigation system to jump into sections of your PowerPoint...