
A colleague contacted me recently with an issue that was stumping her. She was trying to place a PDF inside her InDesign document before sending the whole thing off to a printer, except only part of the PDF would place. She could open the PDF in Acrobat and see there was more to it than what was showing in InDesign, but she couldn’t figure out why only part of it was being placed. Did I have any idea what might be going on?
As we dug into the problem, we discovered what I had expected: InDesign’s Place PDF options had been set to use a different cropping option than what she was expecting.
Viewing Place PDF options
To view the Place PDF options, either select the Show Import Options checkbox in the Place dialog box (which will always show the Place options for all placed files until this option is deselected) or hold the Shift key when you select the text or image you want to place, which shows the Place options for just that file, even if the Show Import Options isn’t selected.
The Place PDF options feature gives you a preview of your PDF, allowing you to scroll through the PDF’s pages. Whichever page is showing in the Preview (which, unfortunately can’t be made larger) will be the page that is imported unless you change the value in the Pages section to either a different page, a range of pages, or all pages. (You can place a multiple-page PDF if you don’t mind the manual process of clicking to place each page. Search InDesignSecrets for multiple options to automatically place all pages of a PDF.)
See also: Placing All the Pages of a PDF Inside InDesign
Crop To Options
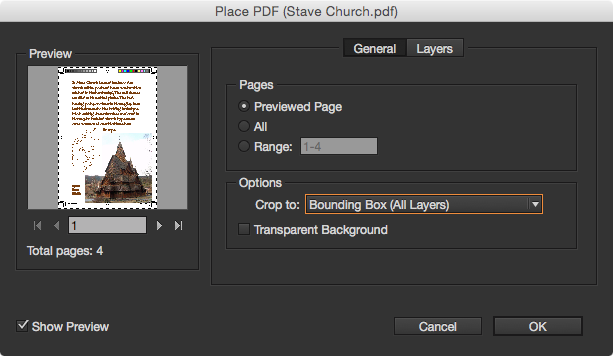
The Crop To option allows you to specify which portion of the PDF page to place, as defined by six boxes: Bounding (the default), Art, Crop, Trim, Bleed, or Media.
Bounding Box: Places the PDF page’s bounding box, or the minimum area that encloses the objects on the page, including page marks. If the PDF you want to place was created using layers (achievable, for example, by selecting the “Create Acrobat Layers” option of the PDF Export options for InDesign files), you can use the “Bounding Box (Visible Layers Only)” option, which uses the bounding box only of the visible layers of the PDF file. The “Bounding Box (All Layers)” option places the bounding box of the entire layer area of the PDF file, even if layers are hidden.
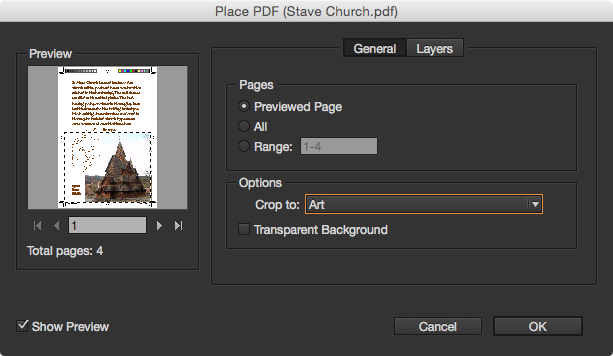
Art: Places only the area defined by a rectangle that the author created as placeable artwork, which can be designated in Acrobat with the “Set Page Boxes” command. If no Art Box is designated, it’s the same as your page dimensions.
Crop: Places the area that is displayed or printed by Adobe Acrobat (or can be designated in Acrobat with the “Set Page Boxes” command). Basically, the same area as you see when opening the PDF in Acrobat.

Trim: Identifies the edges where the final produced page will be physically cut in the production process, if trim marks are present. Trim can also be designated in Acrobat with the “Set Page Boxes” command. If no Trim Box is designated, Trim is the same as your page dimensions.

Bleed: Places only the area that represents where all page content should be clipped, if a bleed area is present. This information is useful if the page is being output in a production environment. Note that the printed page may include page marks that fall outside the bleed area.

Media: Places the area that represents the physical paper size of the original PDF document (for example, the dimensions of an A4 sheet of paper), including page marks.

See also: Place Multiple Pages of a PDF In a Grid in InDesign
Background Options
The Transparent Background option does just that—makes the background of the placed PDF transparent, revealing text or graphics that fall beneath the PDF page in the InDesign layout. Deselect this option to place the PDF page with an opaque white background.

See also: A Script to Show Options for Placed Files
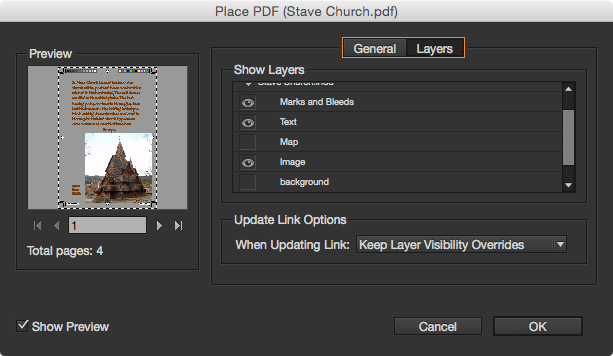
Layer Options
If the PDF you’re placing includes layers, you can choose the Layers tab to turn on or off which layers to show, and how those layers are handled if the PDF’s layers are updated.
Parting Thoughts
Finally, as my colleague found out, these options are “sticky” so InDesign will remember what you set the next time you import a PDF file, even after a restart.
This article was last modified on August 8, 2019
This article was first published on October 7, 2015
Commenting is easier and faster when you're logged in!

Recommended for you

A Fix For InDesign’s Email Hyperlink Problem
It’s simple to create an email hyperlink with InDesign, but did you ever n...

dot-font: Acrobatics—Putting the Story on the Screen
dot-font was a collection of short articles written by editor and typographer Jo...

TIFF vs PSD vs EPS vs PDF vs…
What file format should you use when using InDesign? Which ones to avoid?