Two of My Favorite Microsoft Word Track Changes Tips
I have a love/hate relationship with Word. On the one hand, it’s bloated and annoying. But on the other hand, it has a number of great features that I rely on heavily. One of those features is Track Changes.
So, I want to quickly offer two of my favorite Word Track Changes tips (plus a bonus one for InDesign!), in case they can help you like they’ve helped me. Before you read this, I’m assuming that you already basically know how to use Track Changes in Word.
Keyboard Shortcut for Show/Hide Changes
First, a keyboard shortcut I use daily… you know that in the Review tab in Word, there is a popup menu that shows “All Markup,” right?
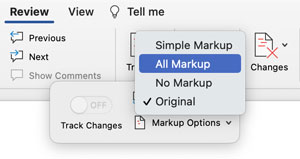
There are three other choices in the menu: “Simple Markup,” “No Markup,” and “Original.”
I find that I am forever switching between two of these:
- All Markup: I need to see the text that has been changed.
- No Markup: I need to see how the final document will look, without any strikethroughs and underlines.
The problem is that it’s a major pain to choose from the menu each time you want to switch! I’d rather use a keyboard shortcut. And fortunately, after quite a bit of searching, I found one. First, choose Tools > Customize Keyboard, then choose All Commands from the Categories list and then, in the list of Commands on the right, choose View Changes. You can use the search field to quickly locate any command instead of scrolling to find it.
Now give it a shortcut in the “Press new keyboard shortcut” field and click Assign. (I use Control+R on the Mac.)

That’s it! The shortcut you assign now toggles between these two common settings. Simple but awesome!
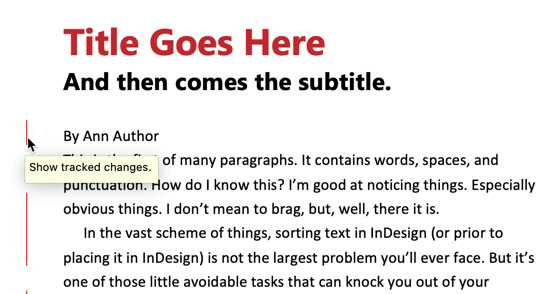
There’s also a nifty shortcut (though not of the keyboard variety) that you can use to toggle between All Markup and Simple Markup. Just click one of the change bars on the left side of the text.
Accept/Reject All by Author
We sometimes have four or more people editing a single document, and trying to figure out who did what can get crazy. Often we need to accept all the changes by one author or editor but leave the rest, and Word doesn’t make it obvious how to do that. Fortunately, the solution is pretty simple.
First, you need to realize that Word lets you show (or hide!) comments from individual reviewers. To find that, look inside the Reviewers submenu, in the Markup Options menu:
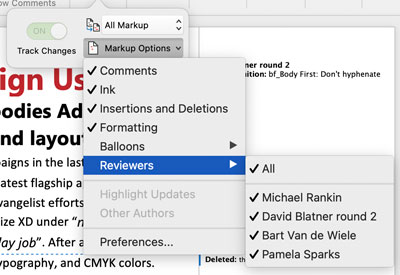
If you choose All, it toggles them all on or off. Make sure the checkmark is on only next to the reviewers that you want to accept (or reject).

Now, go to the Changes menu and choose Accept (or Reject) > All Changes Shown:
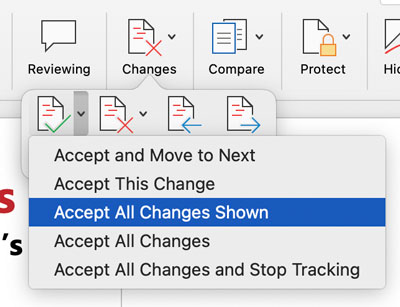
Now you can select All Reviewers from the Markup Options menu again, so you can see the changes the other reviewers have made.
Targeting Changes by Specific Users in InDesign
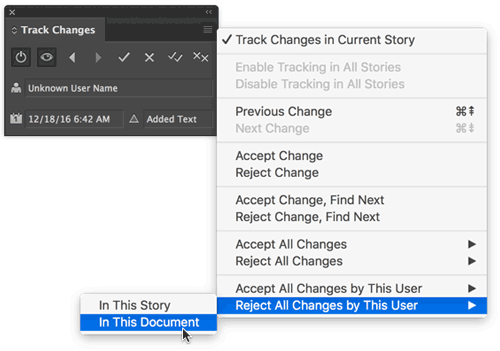
By the way, targeting changes by specific users is one of the few Track Changes features that’s easier to accomplish in InDesign. If you use Track Changes in InDesign and you want to accept or reject just one person’s edits, just place your cursor in one of their edits and then choose Accept/Reject All Changes by This User from the Track Changes menu:
These little tricks aren’t going to save you hours, but they will shave off seconds and minutes here and there (and they certainly make the process of working with tracked changes easier).


I can summarize your article in two words: Awesome!
Thanks
THANK YOU for your tip on setting up a keystroke for view changes (I have missed it sorely since switching from a PC to a Mac). May you be blessed into eternity!
Do you know how to view tracked changes in InDesign? With TC on, IDD only shows notes, not tracked changes, in Galley mode. I have InCopy, but other editors on the team don’t, and they’d balk at the extra layer. What are we missing here?
@Pamela: Yes, the trick is to use Edit > Edit in Story Editor:
https://indesignsecrets.com/tip-of-the-week-tracking-changes.php
Hey, just wanted to thank you for this. I’m attempting to proof a 150k book in one day containing a few of my developmental changes. This has been a huge aid. Thanks for taking the time!
Dex!
Is there any way you’ve found out how to designate a shortcut to Original? That’s eluding me every way I’ve tried.
Many thanks,
Ariela
That is really useful, thanks. But is there anyway to make a shortcut key to change between Simple and All (markup)?? I use that far more than No markup because it is basically the same as “No markup” except the Comments show (which isn’t a nuisance). Thanks. (I’ve just seen someone else ask a similar thing but between Original and All! But there’s no reply.)
Really excellent – many thanks!
THANK YOU! I could not find the correct function description (toggle ViewComment) to make keyboard shortcut to save my life.
Thank you! All my shortcuts were reset recently and I could not remember how I made some of them, namely toggle between clean doc and changes visible.