

With all the hoopla about the second coming the announcement of Adobe Creative Suite 4, you may be wondering … hey, what about InCopy? Where’s the press release? Where’s the live webcast? It’s part of the Creative Suite, isn’t it?
Well, yes and no. It’s called “InCopy CS3” (or whatever version you have) because it’s designed to work with the same version of InDesign. But it’s not bundled with any of the Creative Suite packages, it’s always sold separately. (If you want them to include a copy, as I do, let Adobe know.)
Luckily, you’ve got me, and I’m here to give you the scoop. I want to start with the top three new features. I’ll write about additional new features in upcoming blog posts.
Table Editing in Story/Galley
There may be new feature that will have more long-range impact, but I believe this baby will be the most welcome to any editor or writer who works with tables in InCopy. You’ve always been able to edit table content in Layout view. In CS4, you can now see and edit the text content of tables — every cell, every row — in Story view and Galley view too.
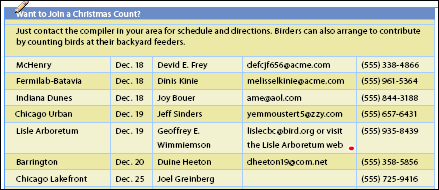
Here’s a sample table in Layout view (note the overset cell, the one with the red dot):
And here are the first few rows from that same table in Story view:
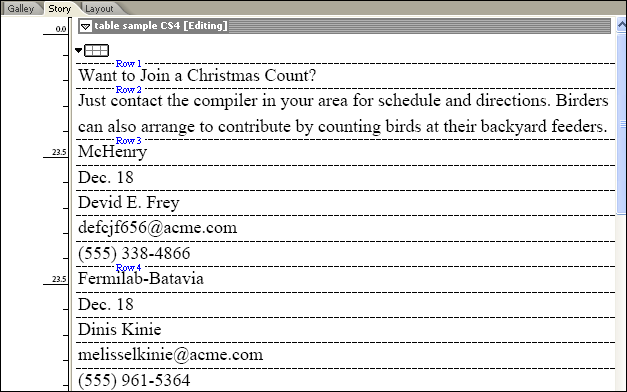
The start of every row is indicated by a blue text label (Row 1, Row 2, etc.) and the contents of each cell in that row is marked off with a horizontal dashed line. (Seems strange at first, but you get used to it.)
Since table text is now accessible in Story/Galley, it means you can now track changes in tables, access overset cell text, and insert inline notes in cells — none of which was possible in InCopy CS3. Hallelujah!
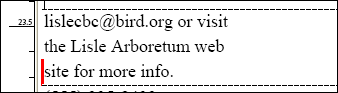
Remember the evil red dot? Here’s the culprit — the overset cell text— in Galley view, completely accessible and editable without messing up the table formatting:
Alas, Adobe hasn’t figured out how to show the contents of anchored text frames in Story/Galley yet. Maybe in CS5?
Dynamic Cross-References
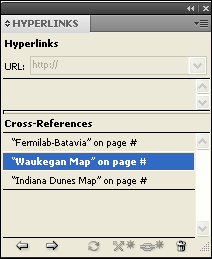
In CS4, InDesign and InCopy share a powerful new automatic cross-referencing feature, complete with its own panel (which it shares with the Hyperlinks panel, also new to InCopy), dialog boxes and menu commands.
To create a cross-reference in InCopy, you select some text in a story you’ve checked out, click the Insert New Cross-Reference button in the panel, and then use the New Cross-Reference dialog box to link it to other text in the current document or in any InDesign layout available to you.
Most of the cross-references you’ll likely create will be dynamic, meaning the software will take care of keeping it up to date. For example, the source text “See the Indiana Dunes Map on page 14” will automatically update as the destination (the page number on which the map appears) changes. Woo-hoo!
The Cross-References panel shown above tracks all your cross-references and lets you know if and when destinations are missing or need to be updated.
Conditional Text
Instead of creating duplicate layouts or even duplicating text frames onto multiple layers, use the Conditional Text panel in InCopy CS4 to create multiple editions or versions of a single document meant for different audiences: Teacher/Student textbook editions, English/French/Spanish magazine versions, Windows/Mac help files, and so on.
Each of these editions or versions would be called a “condition,” and using the Conditional Text panel, you can hide and show conditions at will.
First, you create the conditions in the Conditional Text panel. (Probably the InDesign users will be doing this—like text styles, InCopy users can only apply conditions, not modify them, in a managed document). When you open a layout or assignment in InCopy, the conditions saved with the INDD file are available to you to apply to text.
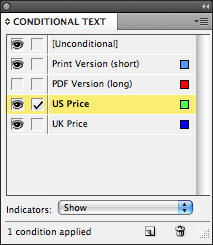
Text that remains the same throughout each version is called “unconditional” and nothing special needs to be done to it (it’s the default, starting state for all text). Unconditional text is always visible in PDFs and printouts.
When you have some text that should only appear in a certain edition/version, you select it in a checked-out story and click the condition name in the panel. (In some cases, you can use Find/Change to apply conditions automatically; but that’s a topic for another post!)
The end result is that you can then use the Show/Hide icons (the eyeballs next to each condition) to show and hide text with that conditioned applied. Hide all the UK conditions, and the US version of the document is ready to be printed or PDF’d. To create the UK version of the document, hide the US condition(s). Coolness.
More to Come
There’s more to write about each of these new features, and of course the other ones as well. Stay tuned!
This article was last modified on January 18, 2023
This article was first published on October 14, 2008
Commenting is easier and faster when you're logged in!

Recommended for you

Paragraph Indents in Story/Galley
You can identify paragraph starts and ends in Galley/Story view by turning on Hi...
Get the Nesting Instinct: InDesign's Nested Styles Auto-Format Multiple Paragraphs
This article is excerpted from Adobe InDesign CS4 Styles: How to Create Better,...
Non-contiguous Text Formatting in InCopy?
How to use InCopy's Eyedropper tool to apply formatting to any range of text.