


When using Illustrator, you want to get to a point where basic functions become instinct — you do them without thinking about it. That’s a power move. In this article, you’ll learn some of the top time-saving Illustrator shortcuts, broken down into ten specific feature areas.
If you’re serious about becoming an Illustrator speed demon, learn these power moves. Don’t just read them — practice them again and again. Force yourself to use them — even if it takes longer the first few times you do it. Trust me, you’ll thank me later.
1. Master the Nudge
In Illustrator, using the arrow keys on your keyboard (up, down, left, right) to move your objects in small increments is called “nudging”. The default increment amount is 1pt (.0139 inches), but you can choose a value more relevant to your task at hand. For example, if you’re working in scale, use a number that is easily divisible. Or use specific amounts, like .0625 inches, so you can tap the arrow key 4 times in quick succession and know you’ve moved the object exactly .25 inches. I’ll often adjust the increment value several times a day, as needed.
Command/Ctrl+K: Opens the preferences panel and highlights the keyboard increment field. Just enter a numeric value and hit the Enter key to change it.

Command/Ctrl+K opens the preferences panel and highlights the keyboard increment field.
Arrow: Nudges selected artwork the amount specified in the Preferences dialog.
Shift+Arrow: Nudges selected artwork 10x the amount specified in the Preferences dialog.
Option/Alt+Arrow: Nudges a copy of the selected artwork by the amount specified in the Preferences dialog.
Shift+Option+Arrow/Shift+Alt+Arrow: Nudges a copy of the selected artwork 10x the amount specified in the Preferences dialog.
2. Align with Intelligence
In Illustrator, you can snap an object’s boundaries to other objects or guides using the Smart Guides feature, which can be toggled on and off using Cmd/Ctrl+U.
Some people may find the default highlighting from the Smart Guides feature to be too “in your face”. The good news is that you can customize the Smart Guides experience by going to the preferences panel, (Edit > Preferences > Smart Guides.) You can choose exactly which types of elements you’d like to have highlighted. You can also change the color of the Object Guides and Glyph Guides which can be quite handy if the default colors are difficult to see in a particular file.
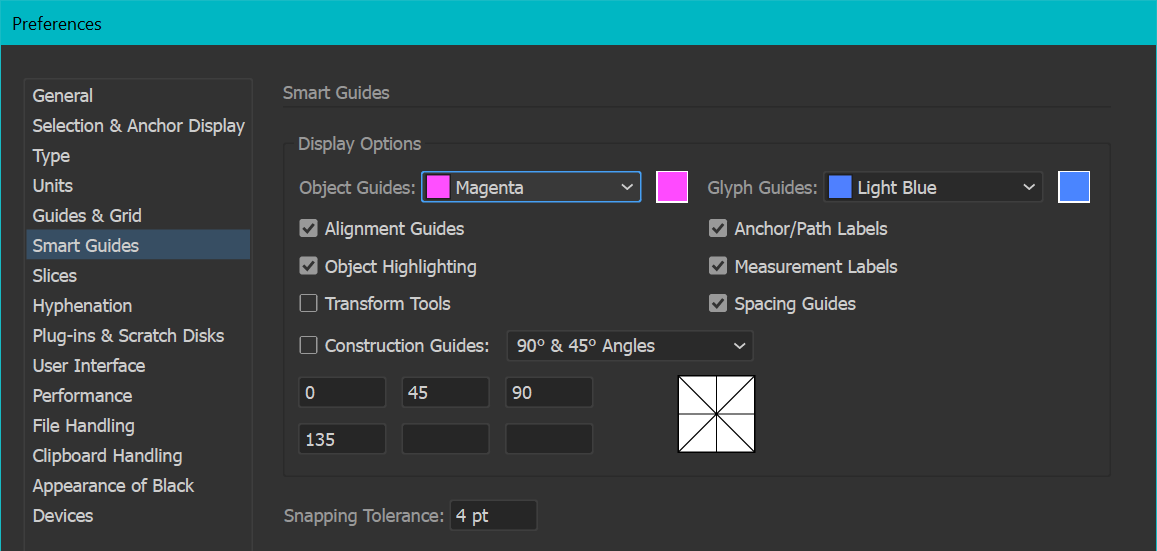
Customize your Smart Guides experience.
3. Select Faster
We probably make use of the Selection tools in Illustrator more than anything else, so it’s important to get familiar with NOT constantly switching between them. Instead, learn to use the shortcuts to make them all behave as one cohesive unit.
V: Selection tool (Solid arrow) — the inverted “V” looks like an arrow.
A: Direct Selection tool (Hollow arrow) — the “A” looks like an arrow with a hollow center.
Rather than constantly switch between the two arrow tools, most power users use the Direct Selection tool most often and use these shortcuts:
Command/Ctrl: Temporarily toggles to the Selection tool.
Option/Alt: Temporarily toggles to the Group Selection tool.
On the subject of making selections, it can often be easier to select art without using tools at all:
Command/Ctrl+A: Select all.
Command+Shift+A/Ctrl+Shift+A: Deselect all.
4. Change Object Attributes
How often do you apply a color only to realize you adjusted the stroke when you meant the fill? How many times do you just want to get an object back to a white fill and a black stroke? Don’t answer — just learn the power moves:
D: Resets an object’s appearance to white fill, 1pt black stroke.
X: Toggles the focus between Fill and Stroke.
Shift+X: Swaps the colors of an object’s fill and stroke.
/: Applies the None attribute.
5. Adjust Object Stacking Order
If you have been using the Object menu every time you want to bring an object to the front or send it to the back, these shortcuts will save you tons of time. While there are four possible settings here, the most important ones to remember are Bring to Front and Send to Back.
Command+Shift+]/Ctrl+Shift+]: Bring to front.
Command+Shift+[/Ctrl+Shift+[: Send to back.
Command+]/Ctrl+]: Bring forward.
Command+[/Ctrl+[: Send backward.
6. Lock and Load (and Hide)
Complex artwork — especially those laden with multiple masks — can make for difficult selections. While you can isolate objects and groups by double-clicking to temporarily lock them and bring them to the top of the stacking order, there are still many times when locking or hiding elements can be useful, especially when spending a lot of time focusing on smaller parts of a larger overall illustration.
Command/Ctrl+2: Lock selected object(s).
Command+Option+2/Ctrl+Alt+2: Unlock all.
Command+3/Ctrl+3: Hide selected object(s).
Command+Option+3/Ctrl+Alt+3: Show all.
Since there’s no way to unlock a specific object via keyboard shortcuts, most pros will Unlock all, Shift-click on the object they want to be unlocked (which deselects it), and then Lock in quick succession. The same tip applies for Hide/Show.
7. Better Pasting
The Paste command in Illustrator places art in the center of your screen, but you can also paste objects in place — either in front or in back. Paste in Front and Paste in Back are also helpful when you want pasted objects to be placed within groups or masks.
Command/Ctrl+V: Paste.
Command/Ctrl+F: Paste in place in front of the copied object.
Command/Ctrl+B: Paste in place behind the copied object.
8. Pan and Zoom
The Zoom tool and the Hand tool should be treated like museum artifacts — they can be looked at, but are not to be touched. Truth be told, those scroll bars along the bottom and right edge of your document are also off-limits. Learn the power moves to quickly navigate within your documents.
Spacebar: Temporarily toggles the Hand tool.
Command/Ctrl+Spacebar: Temporarily toggles the Zoom tool. (You can click and drag to the left to zoom out or to the right to zoom in.)
A particular problem one runs into is that when you’re editing text, you can’t press Spacebar to switch to the Hand tool, as doing so will actually add space characters to your text string. In those cases, this secret handshake will give you joy: Press Command/Ctrl+Space to access the Zoom tool, and then release just the Command/Ctrl key, while still holding Spacebar. This will give you the Hand tool. Release to return to editing your text with the Type tool.
Since we’re talking about navigating within documents, these are helpful as well:
Command/Ctrl+`: That’s a Tilde, which appears just over your Tab key on US keyboards, and allows you to toggle between open tabbed documents.
9. Effective Effects
You want to quickly add a few drop shadows, but you need to make sure they all use the same settings. Sure, you could define a Graphic Style, but that’s too much of a bother, right? Instead, use a quick power move.
Command+Shift+E/Ctrl+Shift+E: Apply the last-used effect with the same settings.
Command+Shift+Option+E/Ctrl+Shift+Alt+E: Bring up the dialog box of the last-used effect.
10. Pathfinder, Rinse, Repeat
The Pathfinder functions — specifically Unite (Add), Minus Front (Subtract), and Divide — are used constantly when creating artwork in Illustrator. True, I’m a big fan of the newer Live Paint functionality in Illustrator, but for quick fixes here and there, Pathfinder proves valuable. While there aren’t keyboard shortcuts for the Pathfinder functions (in theory, you could always define an Action for them and apply a shortcut to the Action), there is a power move to re-apply a Pathfinder function — helpful for when you’re performing lots of shape editing — especially since you don’t have to shuttle your cursor between your art and a floating panel.
Command/Ctrl+4: Repeat the last-applied Pathfinder function.
Got your own favorite power moves to share? Post them in the comments!
This tutorial is courtesy of the Real World Illustrator blog.
This article was last modified on July 25, 2023
This article was first published on February 28, 2010
Commenting is easier and faster when you're logged in!

Recommended for you
Before&After Design Tip: Position Text for Quicker Reading
When words are critical, put them at the center of the design.

Extract Embedded Media in PowerPoint with the “Unzip Trick”
With a simple trick, you can gain easy access to all media assets within a Power...
How to Create an Iris Transition in PowerPoint
Learn how to create a cinematic transition in a presentation by customizing buil...