


This article appears in Issue 29 of CreativePro Magazine.
It’s that time again, when we comb through our arsenal of tips and tricks from our network of CreativePro experts and share them with you, dear reader. Whether you’re looking for ideas on presenting your information in a more compelling way, wanting to create effects quicker, or needing answers to your burning questions about Creative Cloud Libraries, you’re sure to find the perfect informational nugget.
Save PowerPoint Charts for Use in InDesign (and Beyond)
Sure, you could just use Copy and Paste to get a PowerPoint chart into InDesign, but please don’t do that. If you do, the content is going to be rasterized and become uneditable. And it’s just an icky workflow. The better route is to save the chart as a PNG or better yet, an SVG or PDF. You can do that with the whole slide, but you can also just select the chart (along with any other items you want on the slide), right-click, and choose Save As Picture (Figure 1).

Figure 1. Save an individual chart as SVG (or PDF or PNG) to place it into InDesign.
From here, you’ll see a number of file format options, but again, I recommend SVG.
—Nolan Haims
Add an Image to a Bar Graph in Illustrator
To change the appearance of an Illustrator bar graph’s bars by adding a background image, you first need to ungroup the graph’s elements. Note that you may need to ungroup (Command/Ctrl+Shift+G) multiple times. Bonus Tip: For faster ungrouping, use the ExtUngroup script included in the 10 Great Scripts for
Illustrator collection.
Select just the bars of the graph, and choose Object > Compound Path > Make.
Place the image and position it below the compound path in the stacking order. Select the compound path and image, and choose Object > Clipping Mask > Make (Figure 2). If necessary, adjust the crop of the image within the masking shape.
—Nigel French

Figure 2. Add visual interest to bar charts by adding an image.
Find Different Ways to Present Data and Insights
Nobody wants to see a big list of numbers in a presentation, which is why we generally use our old friend the chart. Whether it’s a bar, pie, or scatter chart, charts are often dry and at a glance don’t really tell you much, unless you stare at them awhile to understand what you’re actually looking at. I’m not anti-chart, I just believe there are different ways to use them more effectively.
Take for example the waffle chart, which conveys percentages visually. It’s much more interesting to see what 67% of households looks like visually rather than just seeing it in a pie chart or reading a number off the screen (Figure 3).

Figure 3. A waffle chart
Donut charts are the more attractive cousin of the pie chart. They’re good for showing percentages while being able to display data in the middle of the chart. And they just look cool when animated in.
Treemaps are the blockier nephews of the pie chart, basically displaying percentages as blocks instead of triangular slices in a circle. These are great for showing data through the use of pictures, text, or even video. You can create one directly in PowerPoint by choosing Insert > Chart > Treemap.
And don’t be afraid of a good old bar chart, either. They’re great for showing relational data. I like to recreate a bar chart using shapes and animate them in one by one. Anything is going to be more attention-getting than a regular old built-in PowerPoint chart, so be creative!
—Jole Simmons
Four Tips for Better Mood Board Construction
1. Use gutters to your advantage
Don’t forget about the space between images. Changing the “paper” color to something that isn’t white can have a dramatic impact, unifying the color system throughout or introducing some additional energy and drama. To do this in InDesign, go to the Swatches panel and double-click the Paper swatch to redefine it.
2. Add color swatches
Even if the colors don’t show up in your photos, you can add areas of solid colors to show your desired combinations (Figure 4). Don’t be afraid to use your layout tools in assembling your mood board. Not everything has to be from research.

Figure 4. Include solid colors in your mood board, in addition to samples of type and graphics.
3. Crop tightly
To make the clearest visual impression, get close to the subject. Focus on the most important elements of each image, even at the risk of obscuring the overall scene, cropping words, or forcing your audience to ask, “What is that?” Doesn’t matter, as long as it looks cool.
4. Keep it non-verbal/non-specific
Typographic research is important, but spelling actual words isn’t. Don’t be afraid to focus on a single character or part of a word. It’s not necessary to add captions or commentary to your mood board, as this forces the viewer to become a reader and puts us right back in abstract territory.
—Prescott Perez-Fox
Extract All Images in a PDF with Acrobat
There are times when you might want to have all the images from a PDF as standalone items. Luckily there is a way to export images from a PDF all at once. Using this export option will export all images individually rather than export the pages as images, which is what happens when you choose File > Export To > Images. Note: You can export raster images only, not vector objects.
In the old Acrobat (Figure 5):
- Go to the Tools tab and search for export under the Help menu, or select Export PDF from the righthand toolbar (if added there already).
- Select Image, a file type, and the option to export all images.
- Click Export to choose a save destination and to set any file type specific settings.

Figure 5. Exporting all images from a PDF in the old Acrobat experience.
In the new Acrobat (Figure 6):
- Select All Tools.
- Select Export a PDF.
- In the Convert panel, choose your desired format.
- Turn on the Export All Images option, and click the Convert button.

Figure 6. Exporting all images in the new Acrobat experience.
—Colleen Gratzer
Make Realistic Cast Shadows in Photoshop
Most of us are familiar with drop shadows and how to easily add this effect in Photoshop using a layer style. But sometimes you might prefer a more realistic cast shadow effect. Here’s how to do it.
- Put the shadow-casting object on its own silhouetted layer.
- Add a Drop Shadow layer style from the Fx icon at the bottom of the Layers panel, and adjust the settings to your taste.
- Right-click the Drop Shadow name and choose Create Layer.
- Select the new independent layer containing the rasterized drop shadow.
- Press Command/Ctrl+T to transform the shape. Hold Command/Ctrl while dragging the control handles around the shadow to skew or distort it.
- Choose Filter > Blur Gallery > Field Blur to apply some extra blurring.
- Add a layer mask, and drag with the Gradient tool to fade out the shadow as it gets farther from the object (Figure 7).

Figure 7. Use a gradient layer mask to fade out a shadow as it gets farther from the object casting it.
—Colin Smith
Changing the Thumbnail Preview in PowerPoint’s Slide Zoom
PowerPoint’s Slide Zoom option allows you to insert thumbnails of individual slides, which, in Presentation mode, will take you directly to that slide (Figure 8).

Figure 8. Place a single Slide Zoom onto a slide for a quick hyperlink to that slide should you need it.
By default, the clickable thumbnail is simply an image of your entire destination slide. But by right-clicking the thumbnail and choosing Change Image, you can change that thumbnail into anything you want—an individual image from the destination slide, a text title card you’ve created, a transparent icon, or just about anything.
The ability to change the thumbnail opens up a world of possibilities for creative navigation. You can lay these thumbnails into an infographic, an org chart, a timeline, a part of a data chart, or just about anything. Pair Zoom with clever Morph transitions, and you can really create a seamless Prezi-like presentation in which you audience may never recognize individual slides.
—Nolan Haims
Avoiding Problems with Shared Hyperlink Destinations in InDesign
If I could wave a magic wand and make one InDesign feature disappear, it would be Shared Hyperlink Destinations. Or, to be more accurate, the ability to choose a shared destination from another InDesign document (Figure 9).

Figure 9. Turn off (uncheck) Shared Hyperlink Destination, which is on by default.
If you do this, you better be sure that you don’t rename, delete, or move that document. Otherwise, you’ll break all the hyperlinks that reference it in other documents.
If you put the source document back, things will be okay as long as you didn’t attempt to edit any of the hyperlinks while they were broken. But if you did, you’ll have to recreate them from scratch. Gross.
To be fair, it’s true that shared destinations within the same document rarely cause problems. And they offer some convenience, since you can edit all instances at once by selecting any of them and choosing Hyperlink Destination Options from the panel menu.
Unfortunately, Shared Destinations is turned on by default, and there’s no way to change that. So, you’ll have to uncheck the box every time you make a new hyperlink.
Fix: Restore the source document of the shared hyperlinks.
Prevention: Never use shared hyperlinks when the source is in another document. And if you come across those, replace them with regular hyperlinks, either manually or all at once with a script by Keith Gilbert called (you guessed it) Remove Shared Destinations. You can download it from the scripts page on Gilbertconsulting.com.
Bonus Tip: If you need to replace a shared destination with a regular hyperlink, select it in the panel first and copy the URL. That way you can paste it into the Address field, which goes blank when you choose Link To: URL.
—Mike Rankin
Burning Questions About CC Libraries, Answered
Getting your head around what Creative Cloud Libraries can and can’t do is a tad overwhelming. Here are a few answers to help (Figure 10).
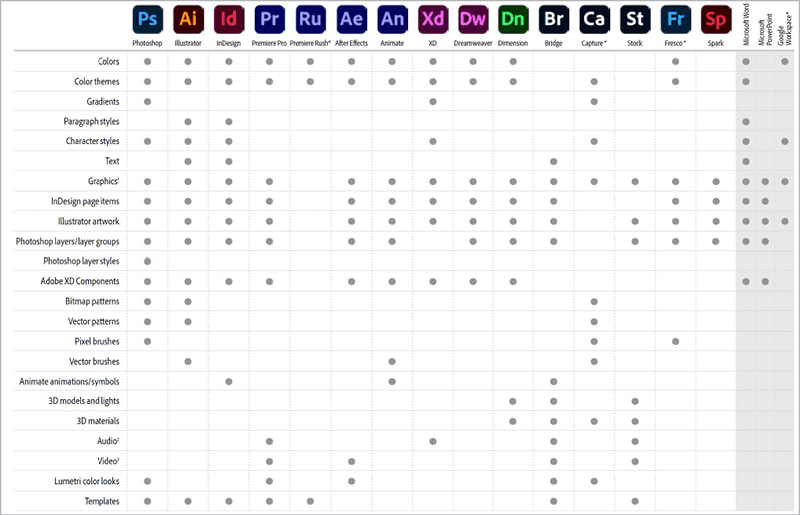
Figure 10. An overview of which asset types are supported across Adobe’s apps
How many Creative Cloud Libraries can I create?
You can create as many libraries as you want, as long as you have storage available in your Creative Cloud account.
Can the library ever be full?
You can store up to 10,000 items per library.
Do I have to be online to use them?
You can use library items while being offline. But triggering updates and uploading new assets requires you to be online.
Do I need Creative Cloud to use them?
Free trial users get 2 GB of storage with their Adobe account. But a subscription is required to take advantage of all features.
Can I use CS6?
No, you can’t use the Libraries panel in CS6 to access Creative Cloud Libraries.
Is everything I use always linked online?
No, you can choose to unlink library items when using them in your design.
Can I export or back up my libraries somewhere locally?
Yes, you can back up the entire library from the CC Libraries panel or an individual item from the Creative Cloud desktop app. Click the panel menu and choose Export Library.
—Bart Van de Wiele
Be Smarter About Text Warp Effects in Photoshop
Like most tasks, there are several ways you can approach the job of warping text in Photoshop.
Good: Use the Options bar when you have the Type tool selected (Figure 11).
Figure 11. The Option bar with the Text tool selected and the Warp icon highlighted
Better: Access additional warp options by choosing Edit > Free Transform with a type layer selected (Figure 12).
Figure 12. The Option bar with a text layer selected after entering the Free Transform mode; Warp icon and Style menu highlighted
Best: Convert text layers to Smart Objects for access to all possible warp and transform effects. A Smart Object text layer can be transformed like an image layer without damaging the text. Double-click the Smart Object layer to edit the original text content. See Issue 3 for a deep dive into Smart Objects.
—Theresa Jackson
GREP Expression to “Ignore Everything Before”
Tell InDesign to “ignore everything before this point” using \K. This “keep” function gives you the ability to find a longer string but only style the portion after the \K trigger. This is super helpful when building a GREP style into a paragraph style, since a character style must be applied to all text found by the GREP expression (Figure 13).
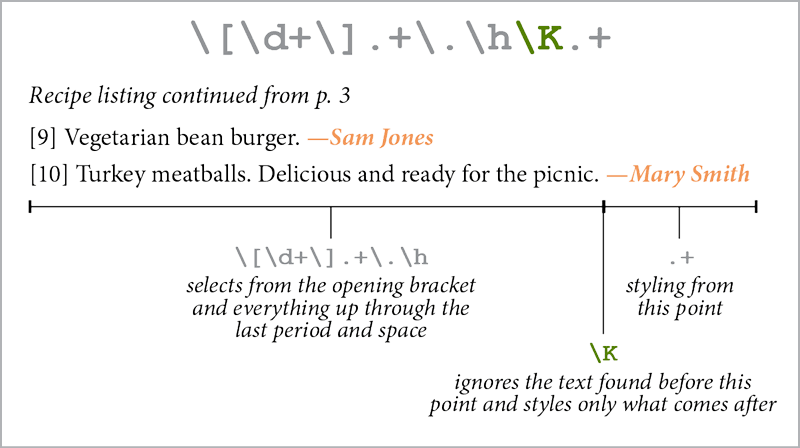
Figure 13. “Ignore everything before” gives you the flexibility to format just a portion of the matching text.
—Erica Gamet
How to Outline Fonts… the Right Way
Don’t outline fonts in InDesign unless you really have to! If your printer is asking for all fonts to be outlined, or you want to remove all reference to the font, it’s far better to export a PDF with live text. Then open the PDF in Acrobat and follow these steps.
- Open the Preflight panel:
- In the old Acrobat, use the Search Tools feature to search for Preflight.
- In the new Acrobat, select All Tools. Select Use Print Production, then Preflight.
- In the Preflight panel, use the Find field to search for Convert fonts to outlines.
- Double-click the fix-up to run it.
Read more:
Outlining Fonts: Is It Necessary?
The Best Method for Outlining Fonts
—David Blatner
Commenting is easier and faster when you're logged in!

Recommended for you

InStep: Borrowed Design Elements
A systematic approach for turning inspiration into items you can use in your lay...
Transforming Type
You can make some nifty type effects with InDesign alone, but for unlimited crea...

Swap Names Around with GREP and Find/Change
Joe needs to convert all his captions in the form LastName_FirstName.jpg into "F...