
Tips for Working with Object Styles
David Blatner reveals the power of ten Object Styles tricks and techniques to lay out documents quickly and make global changes simple.


This article appears in Issue 40 of InDesign Magazine.
Do you want a sure way to become more efficient than your colleagues, ensuring you’ll get a raise and promotion? It’s not hard: Just get into the habit of using one of InDesign’s most-powerful and least-used features: Object styles. (In case you don’t know much about object styles, I’ve included a lightning primer on how they work; see “Object Styles 101” below.) Even basic object styles are great time-savers. But once you get the hang of them, you’re going to be hungry for more. That’s where this article comes in. Here are ten tips for getting the most out of your object styles.
Making Styles by Example
Let’s start with the simplest trick first: When you want to make an object style, don’t head directly for the Object Styles panel. First, format one frame or path on your page so that it to appears the way you want the style to be defined. Then, while that object is selected, hold down the Option/Alt key and click the New Object Style button in the panel. (Holding down Option/Alt forces InDesign to open the New Object Style dialog box, instead of just making a style with a generic name.)
InDesign uses the formatting of the selected object as an example to set up the object style, which is far faster than having to painstakingly fill out the New Object Style dialog box yourself.
If there was already an object style applied to the item, InDesign chooses that for you from the Based On pop-up menu. You may want to set this to None, unless you intended to create a “based on” relationship. For example, perhaps you want one basic kind of image frame style, but two or three
minor variations on that one. In that case, base the variations on the basic one.
Now all you need to do is name your style and click OK.
InDesign documents start with two object styles in the Object Styles panel (in CS5, you can find this in Window > Styles > Object Styles, or press Command/Ctrl-F7). Make a new object style by choosing New Object Style from the panel menu, or by holding down the Option/Alt key and clicking the New Object Style button at the bottom of the panel. An object style can include virtually every kind of formatting or effect you could apply to a path or frame in InDesign. However, some things are excluded, such as which layer the object is on, whether the object is locked or hidden, or if the object should contain text or graphics.
Turn Off the Checkboxes
By default, when you make a new object style, all but two of the checkboxes in the Basic Attributes section are selected. A selected checkbox tells InDesign to apply that formatting. If turn off the checkbox (Figure 1), you’re telling InDesign to ignore the formatting of the object for this attribute. For example, if you apply an object style to a yellow-filled frame, but the Fill checkbox is disabled, then InDesign leaves the yellow fill alone.

Figure 1: When you click a checkbox, it changes to a dash, meaning ignore it, or leave this formatting as is.
Setting Your Defaults
When you create a text frame with the Type tool, InDesign automatically assigns an object style to it normally, the one called [Basic Text Frame]. Having a default text frame style is helpful when you want all your new frames to have the same attributes (such as two-columns, 3mm text inset, with a .25pt stroke). InDesign lets you pick which of your object styles you want to be the default text frame style by clicking on any object style while the Type tool is selected in the Tool panel. Or, drag the little icon with a T in it (on the right side of the Object Styles panel) to the style you want to become the default. The Object Styles panel comes preloaded with another default style: The [Basic Graphics Frame] style. Unfortunately, this is misnamed, as it has nothing to do with graphic frames! InDesign automatically assigns this style to unassigned objects, such as paths you draw with the Pen tool or ovals you make with the Ellipse tool (Figure 2). Nevertheless, you can set the default “graphic frame style” to your own custom object style by clicking the style when the Selection tool is active in the Tool panel (and no objects are selected on your page), or by dragging the “default” icon from [Basic Graphics Frame] to your style.

Figure 2: You can change the default style applied to “unassigned” objects, such as paths and empty frames, by dragging the little icon next to the Basic Graphic Frame style.
Applying Styles When Placing Images
In the previous tip, I mentioned that InDesign automatically applies the default graphics frame style to unassigned frames, but not to graphic frames. By default, InDesign applies None to graphic frames, so you need to apply styles manually to graphic frames already in your file. But you can trick InDesign into automatically applying a style to every graphic you import using File > Place. Make a new object style and name it “Place Gun Frame” (without the quotes). Now InDesign will apply the custom object style Place Gun Frame to any image you place using the place cursor. Serbian InDesign User Group leader Marijan Tompa has come up with a free script called TomaxxiPlace2 that applies the default graphic object style to placed graphics. In other words, this script makes InDesign work the way you would expect it to.
Applying Paragraph Styles
Object styles are usually used for applying object formatting: fill, stroke, and so on. But an object style can also apply a paragraph style to the text inside the frame. For example, you might have an object style that you apply to all text frames that contain image captions. The object style would format the frame itself and change the text inside the frame to the caption paragraph style. To tell an object style to apply a paragraph style, select the Paragraph Styles pane inside the New or Edit Object Style dialog (Figure 3), and choose the desired paragraph style.
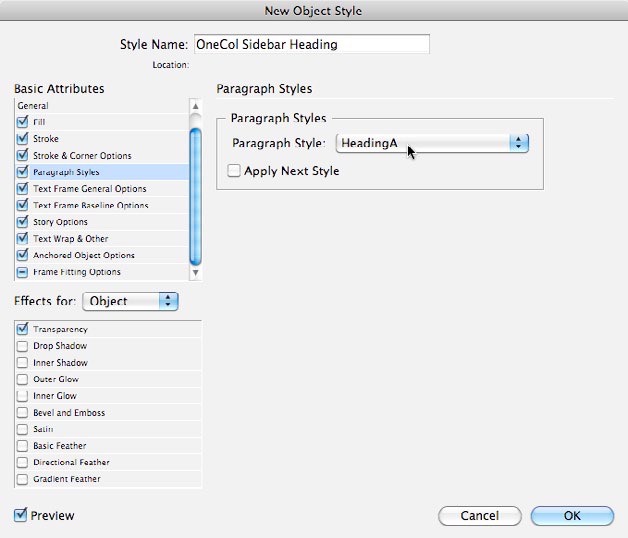
Figure 3: You can tell an object style to apply a paragraph style to all the text in the object, as long as it’s an unthreaded frame.
Controlling Object Position
If you ask advanced InDesign users what they wish object styles could do, they often reply, “Set the size and location of an object.” For example, you might want to apply an object style that automatically sizes and positions a logo at the correct place on your page. However, until InDesign can apply this kind of page geometry to a selected object, we’ll have to make do with two tricks. The first trick is to specify where an object sits on a page with an object style if that object is anchored in text somewhere. Create an object style that you’ll apply to your object. In the Anchored Object Options pane of the object style dialog box, set the Position to Custom (Figure 4). Now, apply this object style to the page item you want to control, cut it to the clipboard with the Selection tool, and paste it into a text frame (even a tiny one with no other text in it) with the Type tool. Now you can edit the Anchored Object Options dialog box to specify exactly where you want it to go on the page. Hint: you probably want to set the X and y Relative To pop-up menus to Page Edge or Page Margin for best results.

Figure 4: Objects anchored in text can be positioned on your page!
Set Text Frame Width
Here’s the second trick that lets you control the position and size of an object with a style. During an InDesignSecrets podcast, Anne-Marie Concepción pointed out that while you cannot change the height of a text frame with an object style, you can specify its width. How? In the Text Frame General Options pane of the object style definition, turn on the Fixed Column Width checkbox, then type a measurement into the Width field (Figure 5).

Figure 5: you can specify the width of a text frame in your object style, even if it’s only a single column.
Applying Object Styles to All Frames in a Story
Let’s say you have a story that spans 50 pages in your document. you suddenly realize you need to apply or change the object style applied to each of those text frames. Do you need to click 50 times? No, you can use the Object tab of the Find/Change dialog box to apply object styles—one click of Change All and you’re done! But the search-and-replace gets a little trickier if you have lots of other text frames in your document that you don’t want changed, such as captions under figures or headers/footers. To apply an object style just to the frames that contain the story, do the following:
- Place the text cursor inside your story by clicking with the Type tool and pressing Command/Ctrl-A.
- Open Find/Change (Command/Ctrl-F) and switch to the Object tab.
- Click in the Change Object Format field to open the Change Object Format Options dialog box. This is where you can specify frame appearance. If you already have an object style, choose it in the Style Options pane of this dialog box. Click OK to return to the main Find/Change dialog box.
- Set the Type pop-up menu to Text Frames (Figure 6).
- Click the Change All button.
- Alternatively, if you select just a portion of the text, InDesign applies the object formatting only to the frames that contain that selection (instead of all the frames in the thread).

Figure 6: The Find/Change dialog box lets you apply object styles to the frames that contain the selected text.
Object Styles Turn to DIVS
If you’ve been exporting EPUB files, you’re likely already aware that EPUB is basically HTML with a little CSS, and that InDesign converts all its paragraph and character styles to CSS classes. For example, if you have a paragraph style called “para intro,” then the exported xhtml file is written as <pclass="para-intro">. Similarly, character styles are converted into span classes. So if paragraph and character styles should be converted, then why not object styles, too? Indeed, they are: Object styles applied to a frame are converted ito DIV classes in the XHTML and are added to the CSS file, too. This turns out to be very helpful in some situations; when formatting images and captions, for example. You can group an image and a caption together and give the group an object style. The object style doesn’t have to look like anything in InDesign (it could be “empty” in its definition), but when you export the EPUB file and crack it open, you’ll see the div class, with the same name as your object style (Figure 7).
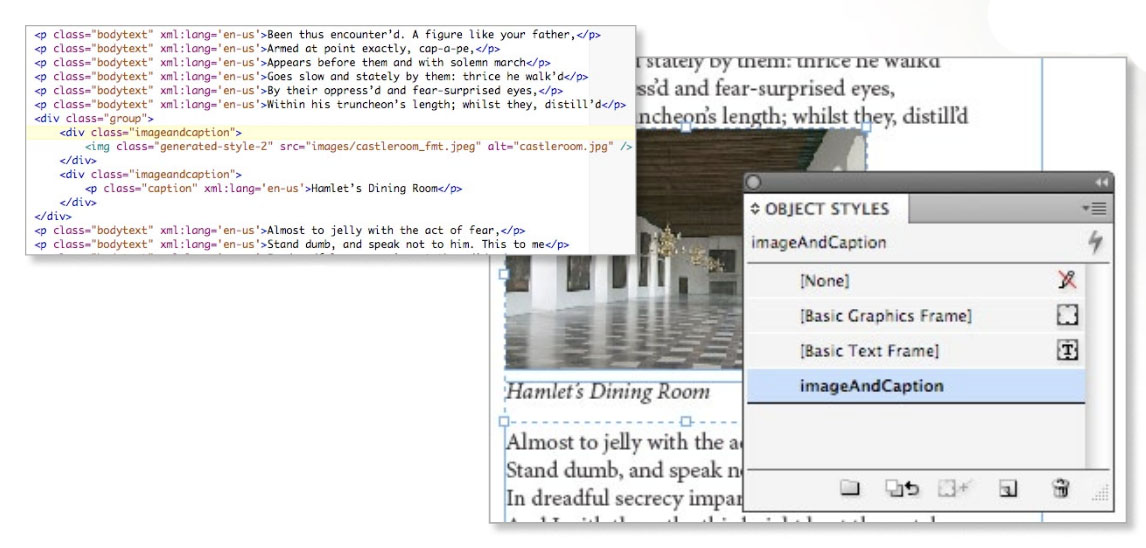
Figure 7: When you assign an object style in InDesign, it shows up as a DIV class in the XHTML. In this case, the object style is applied to a group.
Be Careful with Groups
My last tip is more of a warning than a technique: Beware the group. InDesign’s ability to create groups of objects is wonderful, but if you apply an object style to a group, be aware that InDesign applies the style to both the group as a whole and to each individual object inside the group. If you’re applying formatting such as stroke or fill, that may be no big deal; but if you include a transparency effect such as outer glow, you may get double the effect you bargained for. That also means that if you had applied object styles to the individual items inside the group, those objects will lose their individual styles—possibly messing up your layout. Object styles are a very powerful way to lay out your documents quickly and manage them when global changes must be made. By making use of these ten tips, you’ll find yourself cruising past your colleagues on the page-layout highway.
Commenting is easier and faster when you're logged in!

Recommended for you

InDesign How-To: Make a Grid from Photos on a Page
See an amazingly quick and easy way to arrange scattered objects into neatly-ord...

Ultimate Overset Fix Contest Answer and Winners!
It’s time to reveal the solution—and the winner—for this month’s InD...

How to Build an Org Chart From a List in InDesign
Learn an easy way to automate creating an org chart in InDesign.