
Tips and Tricks Every InDesign User Should Know
Top experts share their favorite InDesign techniques, from the super to the sublime

This article appears in Issue 48 of InDesign Magazine.
How many things are there to know about InDesign? If you listed every feature, every keyboard shortcut, every tip and trick, how long would that list be? Too long to cover in one article, that’s for sure! And too big to fit in any one person’s brain. Nobody, and we mean nobody knows it all. And that’s OK. You wouldn’t want to have every last bit of obscure InDesign trivia cluttering up your brain. You need to leave some brain cells free to remember important things like where you left your car keys, your favorite flavor of ice cream, and how to beat that insane level of your favorite game. So we don’t think you can or even should try to be a walking Encyclopedia InDesignica. But we also believe that somewhere in the cosmos lies a body of indispensable facts that every InDesign user should know. Note: This list is not in numerical order, so the first item isn’t any more or less important than the last one. To organize the list we’ve grouped the items into topics: User Interface, Layout, Text and Tables, Images, and Color. With this list in your cranium you can get your InDesign work done with maximum speed and satisfaction, and still manage to find your car keys. But when it comes to Angry Birds, you’re on your own. Since the cosmos is a pretty big place to search for that list, we instead put out the call to our CreativePro authors and experts and asked them what items would be on their list of the things every InDesign user should know. We took the results of that survey and whittled it down to one hundred items. So without further ado, on to the list!
Text and Tables
- With your cursor inserted in
a table cell, tapping the Escape key once toggles between select- ing the entire cell and the contents of the cell. —SC - When you have your cursor in a text frame (or a selection of text), you can press the Escape key to Switch to the Selection Tool and select the frame instead of the text. —MR
- If you need to prevent a word from being hyphenated, don’t use a force line break. Instead use one of theses five methods. 1) Select the word and apply a No Break character attributes; 2) Select the word and apply the No Language character attribute; 3) Add a Discretionary Hyphen in front of the word; 4) Add the word with a tilde (~) in front of it in the user dictionary; 5) Use a paragraph grep style to search the word and apply either methods 1 or 2 as a character style.—JCT
- You can (and probably should) tweak InDesign’s default Justification settings to get better looking justified text. From the Control Panel menu select Justification and try these settings: 80%, 100%, 120% Word Spacing; -5%, 0%, 5% Letter Spacing; 98%, 100%, 102% Glyph Scaling (Figure 1). —KG

Figure 1. Tweak your Justification settings for better looking type.
- NEVER TYPE ANYTHING IN ALL CAPS. Instead, type your information in the proper mix of upper and lower case, then use the All Caps attribute (Cmd+Shift-K, macOS or Ctrl+Shift+K, Windows) to format the text as all caps. This provides much more flexibility for future reformatting and reuse of the text. —KG
- You can prevent undesired hyphenation by deselecting Options to Hyphenate Across Column and Hyphenate Last Word in the Hyphenations Settings dialog box, which you can access via the Control panel menu. —KG
- Suffering from an inconsistent leading problem when changing the leading of a paragraph? Or does the last line in a paragraph have a too big/small leading? InDesign’s default leading behavior is line based and can be applied to a single character—even the invisible last “paragraph return” character. To change this behavior and alleviate these paragraph leading issues, select Apply Leading To Entire Paragraph in the Preferences dialog box. —CJ
- If you accidentally type a bunch of text with the Caps Lock enabled, you don’t need to re-type the text. Select the text and choose Change Case from the Type menu. —CJ
- The fastest way to adjust a paragraph style is to make the desired change in a paragraph with that style applied to it. Then with your cursor still in that paragraph press Cmd +Option+Shift+R to redefine the style. Likewise, you can redefine a character style based on selected text by pressing Cmd+Option+Shift+C—MR
- You can adjust the spacing of text by holding Option/Alt and using the arrow keys. With a selection of text, press Option/Alt+left arrow to decrease tracking, Option/Alt+right arrow to increase tracking. Press Option/Alt+up arrow to decrease leading, and Option/ Alt+down arrow to increase leading. With your cursor between two characters, press Option/Alt+left or right arrow keys to decrease or increase kerning. —MN
- Never apply a character style to an entire paragraph. (At least not if you can avoid it.) That’s what paragraph styles are for. —DB
- If you want to remove local overrides from text, don’t Opt/Alt click on a style. Instead, click the Remove Local Overrides button in the Paragraph Styles panel. This way is more flexible, because if you select text first, it removes overrides just from the selected text. If you have the cursor flashing, it removes overrides from the whole paragraph. If you have a frame selected, it removes overrides from all text in the frame. —DB
- To paste InDesign text without formatting (and have it take on the formatting that’s used where you’re pasting it), press Command+Shift+V. —MR
- You can customize the text that InDesign uses when you select Fill With Placeholder Text. Just put the text you want to use in a file called Placeholder.txt and put that file in your InDesign application folder. You can hold the Command/Ctrl key while choosing Fill With Placeholder Text to select a language. —DB
- To quickly open the Text Frame Options dialog box: Command/Ctrl + Option/Alt as you double-click a text frame with Selection Tool (or press Command/Ctrl+B). —MR
- Want to know exactly how many words, lines, or paragraphs there are in a range of text? Select the text and look in the Info panel. Or, if the text cursor is flashing inside the text, the Info panel displays information about the whole story (Figure 2). —MR
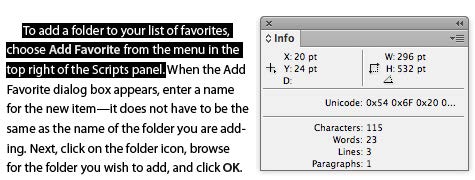
Figure 2. The Info panel can show you how much text you have selected, in characters, words, lines, and paragraphs.
- To quickly add rows to the bottom of a table, start dragging the bottom border of the table down, then hold Option/Alt. To add columns to a table, start dragging the right border and then hold Option/Alt. —ET
- You can make a Tab leader go right to the edge of a frame by inserting a Right Indent Tab. You can find that in the Type > Insert Special Character > Other menu, but it’s faster to just press Shift+Tab. —ET
- To prevent a word from ever being flagged as a misspelling by the spell checker, or ever hyphenated, select it and apply [No Language] from the language menu in the Control panel. —ET
- You don’t have to enlarge a text frame to see and edit overset text. View the story in the Story Editor (Command/Ctrl+Y)—editable overset text appears at the end of the story next to a red vertical line. —AMC
- Don’t use the Type > Font menu to select a font! Instead, when the Control panel is set to Character Formatting mode, press Command/Ctrl+6 to jump the cursor to the Font field, then just start typing the font name. You can also use the up and down arrow keys on your keyboard to navigate the list of fonts one at a time. —DB
- In general, it’s not a good idea to change the definition of the Basic Paragraph Style. If you do, text with that style will change its appearance when you cut and paste it into a new document created with the InDesign defaults! Instead, if you want to change your default text style, create a new style and, while nothing is selected in your document, click on it in the Paragraph Styles panel. That way it becomes the new default for your file. —DB
Images
- To edit a placed graphic in the default application on your computer, Option/Alt double-click the graphic. If you want to edit the graphic with a dif- ferent application, right-click on it and choose Edit With to select the desired application. —KG
- Where is that graphic saved on disk? To quickly jump to the file, right-click on the file name in the Links panel and choose Reveal in Finder (Mac OS) or Reveal in Explorer (Windows). —CJ
- If you are creating a template with placeholder frames for graphics, be sure to set your desired Frame Fitting Options for each placeholder frame. That way, when you place images in the placeholder frames, they’ll automatically fit the frame, fill the frame, or whatever. —CJ
- You can use the Place dialog box to select more than one graphic at a time. After clicking the first one, Shift-click to select contiguous items in the list, or Command/Ctrl-click to select individual files. Bonus: After you load the Place cursor, you can see the file names (and other link info) for all the items in your loaded cursor in the Links panel, even before clicking. The one that is currently “loaded” has an LP next to it, where the page number usually is; the others have no page number listed. —DB
- When you’re placing an image, you can Option/Alt-click an existing image in your layout to replace it with the one in your loaded cursor. —MN
- In the Place dialog box, hold the Shift key when you double-click a file (or when you press the Open button) to display the Import Options for the file format you’re placing. —MR
- When you have a placed graphic, you can double-click with the Selection tool to toggle between selecting the frame and selecting the graphic inside the frame. —MR
- Hate the “donut” in the middle of images? Banish it by choosing View > Extras> Hide Content Grabber. —AMC
Color
- Use keyboard shortcuts to quickly change the attributes of your object’s fill or stroke. —JF
D |
Default (no fill, black stroke) |
X |
|
?Shift+X |
Exchange (swaps the fill/stroke values) |
?/ |
None (sets fill/stroke to none) |
?, |
Applies last used color |
?. |
Applies last used gradient |
- When you have a text frame selected, pressing
jtoggles between Formatting Affects Text and Formatting Affects Container in the Swatches panel. In other words, if you want to set the color of all the text in a frame, select it with the Selection tool, pressj, then set the fill color. (That way, the text is colored instead of the frame.) —MR - You can share color swatches between InDesign, Photoshop, and Illustrator by saving the swatches in Adobe Swatch Exchange (.ASE) format. To share InDesign swatches, select them in the Swatches panel and choose Save Swatches from the panel menu. —MR
- The Gradient and Color panels are great ways to work on the fly, interactively choosing the color or gradient. But to preserve your work, saving it so you can use it on another object, right-click the preview thumbnail in those panels and choose Add to Swatches. —JCT
Layout
- Hold the Shift key when dragging out a guide to snap it to ruler tick marks. Double-click on the ruler to quickly create a guide where you clicked. Also, holding shift while you double click the ruler snaps the guide to the nearest tick mark. —JF
- Are you trying to set a caption below an image and finding that the text is being pushed away by text wrap? Select the text frame with the Selection tool, choose Text Frame Options from the Object menu, and turn on the Ignore Text Wrap checkbox. The caption text frame will now display the caption text as intended (Figure 3). —CJ

Figure 3. Select Ignore Text Wrap in Text Frame Options to keep your photo captions in place.
- You can reposition frames while you’re creating them by pressing and holding the spacebar. —MR
- You should memorize the keyboard shortcuts for constraining page items as you create, resize, or scale them: Shift constrains height and width, Option/Alt centers the object on the position where you first click, and holding Shift and Option/Alt does both (centers and constrains). The most important of them all: You can proportionally scale a frame and its content at the same time by holding Command+Shift/Ctrl+Shift while you drag. —MR
- If you already know the size frame you want, don’t bother trying to drag it out to just the right size or edit its size later; instead, just click with a tool! Clicking with any of the frame tools opens a dialog box that lets you specify the size exactly. —DB
- When you’re creating a polygon, you can use keyboard shortcuts to determine the number of sides and the star inset. First, start dragging with the Polygon tool, then press the spacebar to get out of Gridify mode. Now pressing the up or down arrow keys will change the number of sides of the polygon. Pressing the left and right arrow keys will change the star inset. —MN
- Want to move a selected object or change its size by a specific amount? Let InDesign do the math for you. In the Control panel, edit the X or Y value, for example, by typing “+ 0.125 in” after the current setting. Press Enter/Return, and InDesign will calculate and apply the new position or size! This works with subtraction, multiplication, and division (-, *, and /), in any panel or dialog box field that contains a number or measurement. You can use more than one math symbol in the equation; for instance, you could type
3p + 3in/4to add three-quarters-inch to 3 picas. —CJ - To automatically number your document pages, in the Pages panel double-click the parent page that is associated with your document pages. Next insert a text frame on the master page, and choose Type > Insert Special Character > Markers > Current Page Number. —CJ
- Want to start your document on a left-hand page (so that the first two pages make a two-page spread)? One way is to double-click the little black triangle over the first page in the Pages panel and set its page number to 2 (or any other even number). Another way is to disable Allow Document Pages to Shuffle in the Pages panel menu, then drag the page thumbnail for page 2 up and position it next to the first page. —DB
- To reshape the Bézier points on a frame or path, select it with the Direct Selection tool, then press Command + Option (macOS) or Ctrl + Alt (Windows). This temporarily gives you the Convert Direction Point tool. Drag an anchor point to make it a smooth point. Click on an anchor point to make it a corner point. Drag a direction handle to reshape a curved path. Click on a direction handle to delete it. —MR
- You would think that the Gap tool would let you set a specific amount of space between objects, but it can’t do that! Instead, select the objects and use the Distribute Spacing option in the Align panel (Figure 4). —DB

Figure 4. Use the Align Panel to set a specific amount of space between objects.
- When you paste an object, it is positioned in the center of the current view. So to paste an object in the center of the page, copy the object, press Command/Ctrl+0 to fit the page in the window, then paste. —MR
- You know you want to scale that object (text frame, graphic frame, path, or group) to a particular width or height, but what percentage should you type in the X% or Y% fields of the Control panel to achieve that size? It’s easy: replace the 100% in one of those fields with an absolute value—the size you want it to be. For example, if you type 10cm, InDesign will do the math for you, figuring out what percentage it should scale the object(s). —DB
- You can borrow paths from Illustrator and have them be editable paths. This ability to copy and paste vectors between the two programs is incredibly helpful! But to make it work, in the Clipboard Handling section of InDesign’s Preferences dialog box, make sure Prefer PDF When Pasting is deselected. —DB
- The quickest way to insert a page into a document is by pressing Command+Shift+P. The page is added after the currently selected page. If you want to insert pages elsewhere in the document and/or use a different parent page, Option/Alt + click on the New Page icon at the bottom of the Pages panel. —MR
- You may know that to override a parent page item you need to Command+Shift-click it. But did you also know that you can Command+Shift-drag over several items to override them all at once? Furthermore, you can override all parent page items on a range of pages by selecting those pages in the Pages panel and then pressing Command+Shift+Option (macOS) or Ctrl+Shift+Alt-L (Windows), or by choosing Override All Parent Page Items from the Pages panel menu. (Even better, you can set any of those objects back to their original parent-page state, un-overriding them, by selecting them and choosing Remove Selected Local Overrides from the Pages panel menu. —MR
- The quickest way to apply a parent page to range of pages is to select the page thumbnails in the Pages panel and then Option/Alt-click on the parent page icon. —MR
- In a facing-pages document, you can align text (including anchored objects) towards or away from the spine using the Align Options in the paragraph style. This is very useful for running heads. Create a text frame the width of the margin and set the alignment to Away from Spine. When you copy that frame to the opposite side of the spread, the text will automatically move flush to the other side of the frame. —ET
- Be lazy! Don’t draw a frame before placing text or images. Just choose File > Place, then click or drag on the page and a frame will be created for you. —KG
- Okay, so you rotated and scaled an item on your page. Now you want to apply the same two transforms to another item in your document. Just press Command+Option+4 (macOS) or Ctrl+Alt+4 (Windows) Or if you have a bunch of objects to change, select them all and choose Object > Transform> Transform Sequence Again Individually. —DB
- You can fit a text frame to the size of the text by double clicking on one of the frame handles. Note that this doesn’t work if you have Auto-Size enabled on the frame. —KV
- To create a guide that goes over only one page, drag from the ruler and release the mouse button when it’s over the page. To create a guide that goes over the entire spread, including the pasteboard, drag from the ruler and release over the pasteboard or hold Command/Ctrl while you release the guide over the page. —MR
<<Begin Sidebar>>
Bonus Tip!
For a visual guide to all the Control Panel shortcuts, see Secrets of the Control Panel Revealed. <<End Sidebar>>
UI
- When making changes in most dialog boxes, you can change the Cancel button into a Reset button by holding down the Option/Alt key. —JF
- You can jump to a specific page by pressing Command/Ctrl+J, entering the page number or parent page prefix (such as “A”) and pressing Return/Enter. You can jump to an absolute page (regardless of the page numbering) by adding + before the number. For example, to jump to the 5th page of a document, enter +5. You can also jump to a parent page by entering the parent page prefix instead of a page number. —JF
- Option/Alt clicking on many items in the Control panel is a shortcut to open dialog boxes where you can tweak settings. For example, Option/Alt clicking on the X or Y location will open the Move dialog box, where you can move a selected object (or a copy of it) by an exact distance and angle. Option/Alt-clicking on the Underline character formatting button opens the Underline Options dialog box. —DKB
- Try double-clicking on various tools in the Tool panel for additional options. Some tools (like the Selection tool or the Rotate tool) open a dialog box that offer more options. Some (like the Measurement tool) open a panel. Others change your view (double-click the Hand tool to Fit Page in Window). —DB
- If you have an item that needs to be rotated 90° to fit on the page, you don’t need to un-rotate it (or rotate your head) to comfortably edit it. Instead, select the spread containing the rotated table in the Pages panel and choose Rotate Spread View from the Pages panel menu. That just changes the view on screen for that spread; it doesn’t affect how it prints. —CJ
- If you’re working with a long document, right-click in the thumbnails area of the Pages panel and choose View Pages > Horizontally. This way you can generally see many more pages in the same space. —MR
- You can (and should) customize the arrangement of panels by creating your own workspace. Show the panels you commonly use. Hide the ones you don’t often need. Customize panels like the Links panel to display the information you want. Then group the visible panels in a way that makes sense to you and choose New Workspace from the Application Bar. That way you can always return to this saved view by choosing your workspace or choosing Reset from the Workspace menu. —MR
- What’s the difference between the “frame” tools (Rectangle Frame, Ellipse Frame, and Polygon Frame) and the “plain” Rectangle, Ellipse, and Polygon tools? Technically, the plain ones are “unassigned” frames and the “frame” tools are graphic frames. But more importantly: You can define default formatting for the plain tools; the frame tools always start out with no stroke and no fill. You can convert either of these to text frames, or you can create a text frame from scratch by dragging with the Type tool. —MR
- Did you ever notice the long delay that can occur when you open the Font menu? It happens because InDesign is drawing the font previews. If you know your fonts well and don’t need the previews, go to the Type section of the Preferences dialog box and deselect Font Preview Size. No more previews… and no more delays. —KV
- You should have the most common single-key tool shortcuts ingrained on your brain: V = Selection tool, A = Direct Selection tool, T = Type tool, M = Rectangle tool, L = Ellipse tool. But remember that these work only when you’re not editing text in a text frame! (Otherwise, you’ll just type the character.) —MN
- Try hard to memorize the most common zoom shortcuts: Command/Ctrl+1 = 100%, Command/Ctrl+2 = 200%, Command/Ctrl+0 = Fit Page in Window, Command/Ctrl+Option+0 = Fit Spread in Window, Command+Plus = Zoom In, Command+Minus = Zoom Out. —DB
- Most people double-click on paragraph styles, character styles, and color swatches to edit them. Don’t. For example, if you double-click on a character style when no text is selected, you have unexpectedly changed your default style, and it will be applied to all new text you create! That’s bad. Instead, right-click (or Control-click with a one-button mouse) and choose Edit Style or Swatch Options. This way you don’t accidentally apply them to text, or set the defaults. —DB
- Great InDesign users view their documents in a variety of ways while they’re working. Press W every so often to enter Preview mode and see how the final version will appear (it makes all the non-printing objects disappear, including anything on the pasteboard). Press W again to leave Preview mode. Then check out your page in Presentation mode by pressing Shift+W, where all the menus and panels disappear; it’s a great way to present your document to your boss or client! Press Esc or Shift+W again to exit. —DB
- Can’t remember which menu contains a particular command? Let Quick Apply be your guide. Press Command+Return (macOS) or Ctrl+Enter (Windows), and start typing the name of the command you’re looking for (Figure 5). This also works for applying text styles, and if you enable it in the Quick Apply panel menu, you can even run scripts. —MR

Figure 5. Use Quick Apply to locate and use any menu command.
- You can cycle through open documents by pressing Command+~, Command+Shift+~ . —MR
- To scroll one screen at a time, press Page Up or Page Down; to scroll one page at a time press Shift+Page Up or Shift + Page Down, to scroll one spread at a time: Fit Spread to Window, then press Option/Alt+Page Up or Option/Alt + Page Down. —MN
- To switch to the Hand Tool (to scroll or pan around) while editing text, hold down the Option/ Alt key. When you’re not editing text, you can press the spacebar key. However, to avoid confu- sion, just use Option/Alt-spacebar anytime. —DB
- If you’re editing text and need to move or resize the text frame, hold the Command key to temporarily switch to the Selection Tool. —MR
- To deselect everything on your page, press Command+Shift+A (macOS) or Ctrl+Shift+A (Windows). You might want to do this before creating a new color swatch, for example; otherwise, the color is applied to any selected objects. —MR
- To select all items on a Layer: Option/Alt-Click on the layer name in the Layers panel. —MN
- To select an individual item within a group, double-click it with the Selection tool. Once you have one item selected, you can click on any of them to select them, or use the next object/previous object buttons in the Control Panel. Press the Esc key to select the group again. Alternatively, you can use the Layers panel to select an object inside a group: click on the triangle to the left of the layer to expand it, then click on the triangle next to the group to reveal the items in the group. Finally, click on the square to the right of the item you want to select. —DB
- If you want to scale items on your page but keep their stroke weights the same, go to the Control panel menu and deselect Adjust Stroke Weight When Scaling. —MR
- You can name objects in the Layers panel to make them easier to identify. In the panel, click on the object you want to name, pause, then click again. That highlights the object name, and lets you start typing (Figure 6). —DB
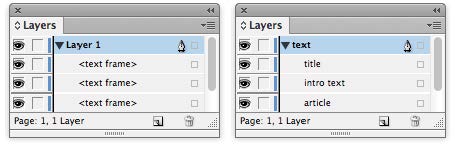
Figure 6. When you name items in the layers panel, it’s easy to tell at a glance what they are.
- You can drag items in the Layers panel in and out of groups. You can also change the stacking order of items in a group by dragging them up or down. —MN
- You know you can increase the point size of text by pressing Command+ Shift+ >, but that always jumps in 2-point increments. What if you prefer 1-point increments? You can make the keyboard shortcuts for adjusting point size, baseline shift, kerning, and tracking, even more convenient by setting your preferred values for each. Edit the Keyboard Increments settings in the Units and Increments section of the Preferences dialog box. —ET
- Press Shift+Cmd/Ctrl + left/right arrow to nudge objects .10 of their normal increment. — SC
- You can customize InDesign’s menus by hiding commands or assigning highlight colors to commands. To create a menu customization, choose Edit > Menus. Custom menus can be saved inside your custom workspaces. —ET
- You may know that you can create your own Keyboard Shortcuts by choosing Edit > Keyboard Shortcuts. But did you also know that you can set your shortcuts to work only in certain situations by choosing a context in the Keyboard Shortcuts dialog box? This way, you can use the same shortcut for multiple uses. For example, I use Command/Ctrl+M to merge table cells, but I assigned it to work only in Context of Tables, since I generally want Ctrl+M to bring up the Paragraph panel. —ET
- To select all guides on a spread press Cmd+Option+G (macOS) or Ctrl+Alt+G (Windows). —JCT
- Are Smart Guides or Snap To behaviors getting in your way? On the Mac, you can temporarily disable Smart Guides, Snap to Guides, and Snap to Document Grid by holding down the Ctrl key after you start dragging an object. —JCT
- Recognize that some dialog boxes and panels ship with only some of the options visible. Look for “More Options” and “Show Options.” You paid for the whole program. You might as well use it. —SVC
- Before you transform an object, make sure you set the desired Reference point in the Control panel (Figure 7). The reference point is the point that is locked in place; the rest of the object scales, rotates, or skews around it. Also, you’re not restricted to those nine points when rotating or scaling: You can click with the Rotate, Scale, or Shear tool to set any arbitrary location of the crosshairs. —MR
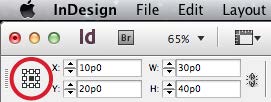
Figure 7. The Reference Point in the Control panel is the point that’s locked down when you transform an object.
- The more you customize InDesign to the way you like to work, the more efficient you’ll be! For example, here’s a change I make in every new installation of InDesign: I open the Preferences dialog box, choose the Display Performance section, and set the Greek Type Below field to 2 pt. That’s because I really don’t like seeing text greeked on screen in most cases. But watch out: You have to change this twice! Once when Typical is selected in the Adjust View Settings menu, and again when High Quality is selected. —DB
…And More!
- Here’s where to go to file bug reports and feature requests. —SVC
- Here’s where to go to access the InDesign user forums at Adobe.com and CreativePro.com.— SVC
- To reset the preferences when opening InDesign, press Cmd+Option+Shift (macOS) or Ctrl+Alt+Shift (Windows) during launch. If you don’t see a dialog box asking “Rebuild Preferences?” then you didn’t hold down the keys soon enough or long enough. This is particularly helpful when InDesign is acting strangely, such as when features are missing from a panel. —DB
- Some preferences apply to all documents, while others are document-specific and apply only to (and travel with) the current document. This PDF guide for CreativePro members reveals which preferences are application-wide and which are document specific. —MR
- If a document is acting strange and you can’t tell why, you might want to take a look at its history. Hold Cmd/Ctrl and choose About InDesign from the InDesign menu. In the dialog box, you can see if the document was converted from another application, if it was recovered from a crash, which versions of InDesign have been used to edit the document, which plug-ins were used with the document, and more (Figure 8). —MR

Figure 8. The Adobe InDesign Component Information dialog box shows the major events in a document’s history.
- One of the best troubleshooting techniques, when you think something is wrong with your document, is to use File > Export or File > Save As to create an IDML version of your file. When you open the fresh, new IDML file, it should look identical to the original, but the conversion will often clear up any corruption that may have crept in. This also gets rid of old metadata and those messages you’ll sometimes see that say “such-and-such plug-in was used when creating this file.” —DB
- InDesign has more features than you think! For example, did you know it has a feature that can sort paragraphs alphabetically? Or split threaded frames up into unthreaded ones? Or apply crop marks to any selected objects? You can find all these “features” in the Scripts panel (Window > Utilities > Scripts). Just double-click a script to run it. —DB
- To reduce file size of a document by removing unnecessary data (aka cruft), create a fresh copy with the Save As command. —MR
Contributors: Anne-Marie Concepcion (AMC); Cari Jansen (CJ) ; Diane Burns (DKB); David Blatner (DB ); Eugene Tyson (ET) ; James Fritz (JF) ; Jean-Claude Tremblay (JCT); Keith Gilbert (KG); Kelly Vaughn (KV); Mike Rankin (MR); Michael Ninness (MN); Scott Citron (SC); Sandee “Vectorbabe” Cohen (SVC).
Commenting is easier and faster when you're logged in!

Recommended for you
25 Type Tricks for InDesign
Great tips to set stellar type and create beautiful typography in InDesign
Tips and Tricks: Winter 2023
Time for another round-up of tips and tricks from your favorite creative pros

CreativePro Week Conference Speaker Spotlight: Jesús Ramirez, the YouTube Photoshop King
Welcome to our Speaker Spotlight series, designed to highlight some of our Creat...