
Tiny Type Posters
Mike Rankin shows how to make an amazing poster from the text of an entire book.


This article appears in Issue 116 of InDesign Magazine.
The deeper we get into this age of digital marvels, the more I notice a certain nostalgia bordering on reverence for the classics. Something inside us longs for the days when an apple was just something you ate, the Amazon was a river, and googol was a really big number known only to math nerds (10100). Or maybe I’m getting old. But it’s not just me. Vinyl records sell at premium prices. Hollywood is obsessed with remakes and reboots. And independent bookstores are thriving again with shelves stuffed with titles right off the Lit 101 syllabus.
If you happen to browse through such a bookstore, you’ll also see countless items seeking to borrow a little cultural cache from the classics. An Alice in Wonderland “Drink Me” coffee mug. “2B or not 2B” pencils in the Shakespeare section. If you look hard enough, you can probably find Holden Caulfield’s red hat and Gatsby’s cocktail shaker. But you know what would be even cooler? How about something made from the actual text of a classic book? Something like a poster that you can hang on your wall or give as a gift. That’s what we’re going to create in this tutorial. Here are a few different examples to whet your appetite. 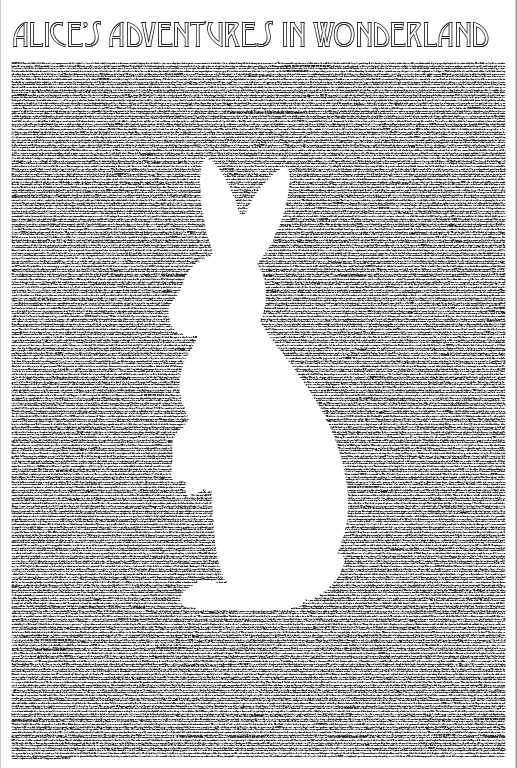


 Admittedly, it’s impossible to
get the full effect onscreen in such a reduced size, but you get the idea: the entire text of the book is visible in one shot. (You may need to include a magnifying glass with it!) If you want to see the full PDF files, you can download them here. Once you get the hang of creating one of these things, you can explore many variations and create something uniquely wonderful.
Creating a Simple Silhouette Poster
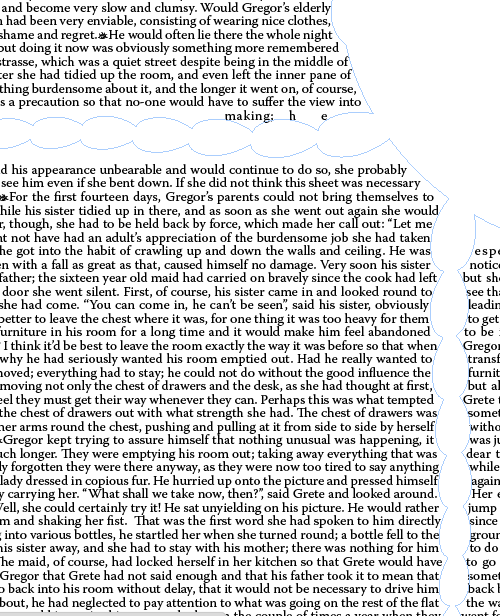
Let’s start with the simplest method, shown in the Mockingbird and Alice posters above. The idea here is to create a poster-sized document, fill it with all the text of the book in one enormous block of text, and then use an object with text wrap to punch a hole in the text to create an interesting silhouette.
Choose your poster size
The exact dimensions are up to you, but you might want to choose them based on the length of the book you plan to use and where you’ll get the poster printed. Start by shopping around so you know what your options are. Big companies like Vistaprint offer sizes ranging from 11″ × 17″ (for something small, like The Old Man and the Sea) to 35″ × 48″ (think Moby Dick). There are many other sites that offer poster printing, so poke around to find the best combination of quality and price. Costco offers a 20″ x 30″ poster for about $10. Mail order, you can get a 24″ × 36″ poster for about $20 plus shipping.
Create the InDesign document
In the New Document dialog box, set up the dimensions, orientation, and margins that you want. In this example, I’ll make my poster 24″ × 36″. If you think you’ll be making several posters (you will; they are addictive!), you might as well save a preset so you don’t have to keep entering in the same values each time. 

Get the text
There are various online sources for the full text of classic books. None are better than the venerable Project Gutenberg. With over 58,000 free ebooks to download, you can find plenty of poster fodder there by searching and/or browsing. 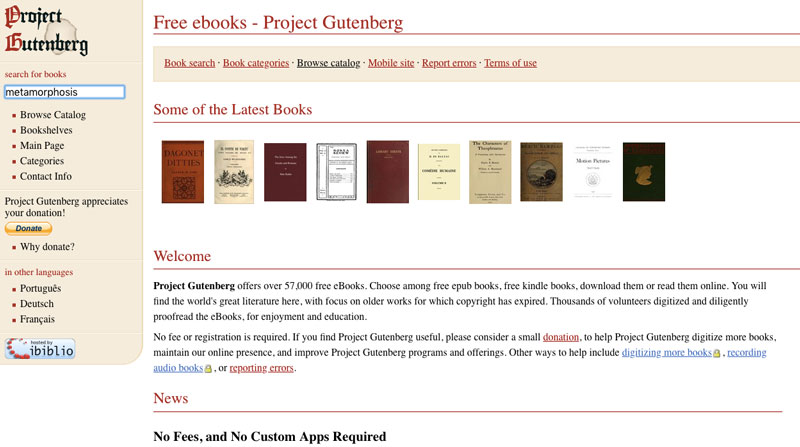 When you’ve found the book you want, right-click on the plain text version and save it to your computer.
  Then place the text in InDesign in a frame that stretches to the margins.
Choose your font(s)
Classic literature deserves to be displayed in a good typeface, preferably one that’s appropriate for the time period when the book was published. In my example, I’m using Franz Kafka’s Metamorphosis, which was first published in 1915. So setting the type in something modern, such as Helvetica or Gotham, is not going to do. Instead, I searched for images of the first edition of Metamorphosis to see what the original type looked like. I found an image of the original German title (Verwandlung) and uploaded it to Adobe Fonts (the new name for Typekit) to find the closest matches in the library of fonts available to me.  I ended up choosing Warnock Pro for my project. For more details on matching a particular font, see Steve Werner’s article “What’s That Font?!” in issue #111.
Clean up the text
Book text from Project Gutenberg comes with a bunch of legalese and metadata added to the beginning and end. Select all extraneous text and delete it. You’ll probably also need to use Find/Change to remove things like double spaces after sentences, replace double hyphens with em dashes, and so on. Use the query presets that come with InDesign to speed up the process.  But don’t remove consecutive paragraph returns. We’ll deal with them next.
Create the big text block
Now it’s time to combine all those paragraphs into one big chunk of text. Again, Find/Change is your friend. Create and run a query in the Text tab that will find consecutive paragraph returns. Either ^b^b (two end of paragraphs) or ^p^p (two standard carriage returns) will work. Replace them with a glyph that’s not found anywhere in the story. In my example, I used a dollar sign.
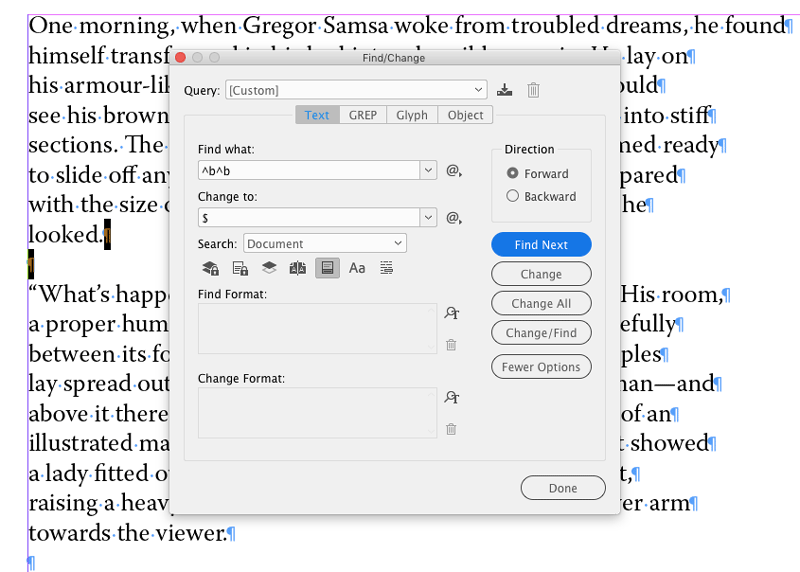

Then switch to the Glyph tab, and make another query to replace the glyph you inserted in the last step with something fun. This mark will show where the paragraph breaks used to be once you’ve combined all the text. A pilcrow (¶) is a natural choice, but don’t be afraid to choose something out of the ordinary. Warnock Pro has a cool/creepy eyeball that perfectly matches the tone of Metamorphosis, so I went with that.


Then go back to the Text tab, and run another Find/Change to replace all paragraph returns with spaces so you end up with one enormous paragraph.

 Lastly, justify the text and turn off hyphenation so you get a nice even block.
  Don’t worry if some lines seem bolder when you’re zoomed out; it’s just a screen artifact.
Make it fit
You’ll probably have overset text at this point, so you need to reduce the point size and leading to make it fit.  Be careful not to go too small or you might end up with type that’s not printable, especially if you plan to use process colors other than black (see sidebar “OK, But Will It Print?”). If you really have your heart set on something like War and Peace, you’re either going to have to settle for a single chapter, or use the entire room as your canvas by printing on wallpaper.
Add a title
Close up the text frame to make room for the book title. Put the title in its own frame wherever you want: top, bottom, or sides. 
Add a silhouette
Now it’s time to find the perfect shape to punch out of the text. You need a vector object for this job, so you can create your own using Illustrator or find one online from a site like Adobe Stock.  Copy the vector shape from Illustrator and paste it into InDesign.
  Position and scale as desired.
  Apply no stroke, no fill, and a text wrap that’s based on the object shape.
Tidy up
Zoom in to take a close look at the way the text wraps around the vector object. If necessary, tweak the justification settings (found in the Control panel menu when you have your cursor in the paragraph), and be sure that Single Word Justification is set to Align Left. 
 If you have overset text again, reduce the type size to fix it. To make the text fill the entire space within the margins, set the text to vertically justify (Object > Text Frame Options).
  Be careful to prevent ascenders and descenders from crashing. Tweak the text wrap and/or position of the vector object to avoid major justification problems. In some cases, the easiest fix is to cheat by adding a small frame with text wrap and no stroke and no fill.
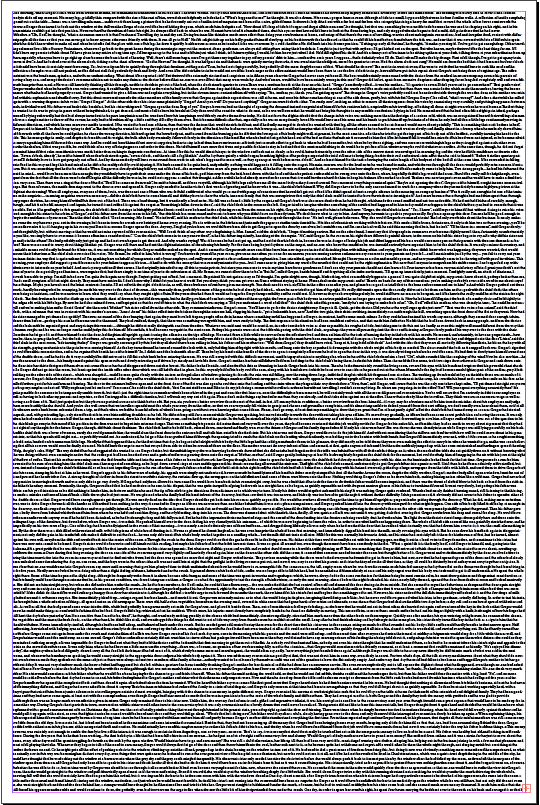
 Here’s the final result (remember you can download the PDF for a better look).
Alternative Method: Creating Multi-colored Text With Paste Into
The simple silhouette method is great for making a striking design out of one shape and a whole lot of text. But when you’re ready to try something with even more sizzle, you can fill the silhouette with text and achieve a multi-colored effect. To do this, follow all the steps of the simple silhouette method to the point where you position and size the vector object. But this time, but don’t apply any text wrap. Instead, you’re going to use the vector object as a mask for a copy of the text frame. With the text frame selected, copy it and choose Edit > Paste in Place. Select the text in the duplicate frame and change its fill color (you could also add a fill color to the text frame itself). Then select the text frame again. Cut it, and paste into the vector object (Edit > Paste Into). You can achieve all kinds of cool effects by playing with fill colors for the text frame or even applying gradients to the text. To apply a gradient fill to text, select the text frame with the Selection tool. Then go to the Swatches panel, and click the Formatting Affects Text button (or use the keyboard shortcut, J). Click a gradient swatch to apply it. Then drag with the Gradient tool on the text to reposition the starting and end points of the gradient.  To adjust the color of the text after you’ve pasted the text frame into the vector object, you’ll need to select the vector object first, then click the Select Content button in the Control panel to grab the text frame.
 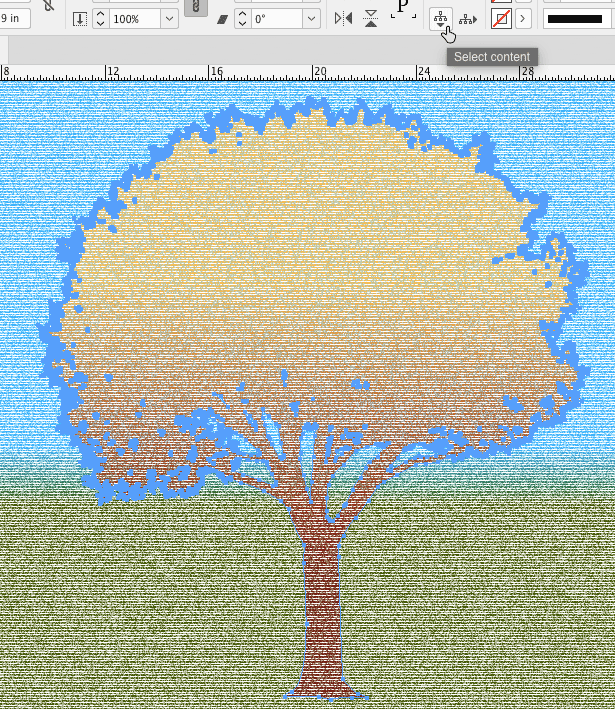 At this point, you can go to the Swatches panel to target the text to change its color.
Well-read walls
Making tiny type posters is a great project for so many reasons. It’s a fun creative exercise. You get to play with the text of your favorite great books. You get to show off your design chops and your fine taste in literature at the same time. And you can actually use InDesign to decorate your house! If you try it, I bet you’ll find it’s impossible to stop at just one. And who knows? Your next career could be InteriorDesign.
Commenting is easier and faster when you're logged in!

Recommended for you

The Mystery of the Moving Overset Contest Answer and Winner
Solve this InDesign mystery for a chance at winning a great prize.
Tip of the Week: Repeating Tabs
There are three new Links panel icons in InDesign CC that you'll see when workin...
How to Preserve the Appearance of Text When Updating Tables
It is always frustrating when a table formatted in InDesign needs to have its co...