
Thinking Outside the (Picture) Box in QuarkXPress

Creativepro.com readers can subscribe to Element K Journals at a discount. Click here to learn more.
Although it’s true that graphics are contained within picture boxes in QuarkXPress, you have the ability to release them. All graphics can be liberated from their confines with the help of the Clipping feature. To be more specific, the Restrict To Box option holds the key that can set your graphics free.
You’ll have far more creative leverage by not restricting a graphic to its picture box. Some graphics intuitively call to be let out of their four walls and allowed to breathe. For example, look at the graphic shown in Figure A. The tulip lends itself perfectly to this technique.

Figure A: Releasing graphics from their confines will breathe new life into your layout.
The Mission
There’s more than one way you can let a graphic break out of its picture box perimeter and explore new areas of your page layout. One way makes use of specific features in QuarkXPress; the other way is a workaround for designers who don’t know any better. In this article, we’ll show you how to do this technique using the proper tools in the most proficient way.
We’ll begin by showing you what our graphic looked like when it was restricted to its picture box and why it wasn’t the best solution. Then we’ll show you how we enabled part of our graphic to extend beyond its container to create a more attractive effect.
Pardon Us
Not all graphics render themselves worthy of a pardon. Those with elements that branch out work the best. Although our graphic has an embedded clipping path to separate the tulip from its background, it isn’t necessary. A graphic with a solid-color background – preferably white – works just as well.
Tip: A really nice touch that will enhance any graphic is to incorporate its color into the rest of the layout. To do this, we sampled the two main colors in our image while in Adobe Photoshop to get the CMYK color break information for each. Then, we defined two new colors in QuarkXPress using the same CMYK definitions. We used the color sampled from the tulip for the frame and applied the color sampled from the stalk to the text.
To create an effect similar to ours, find a graphic suitable for this technique. Next, launch QuarkXPress and create a new document in which to work. On the document page, click and drag the Rectangle Picture Box tool to create a picture box about the size of the picture you’ll import into it. Now, choose File > Get Picture. In the Get Picture dialog box, navigate to where your graphic is stored, then select it and click Open to import it into the picture box.
Next, using either the Content tool or Item tool, resize your picture box so that the parts of the graphic you want to keep are visible and the parts of the graphic you don’t want to keep are hidden. For example, we reduced the height of our picture box to crop out the bottom of the stalk of our tulip and increased the width to make sure the entire tulip was inside the visible area of the picture box.
While the picture box is still selected, choose Item > Frame to access the Frame tab in the Modify dialog box. Choose 4 pt from the Width pop-up menu and Solid from the Style pop-up menu. Then, choose a frame color from the Color pop-up menu. Finally, click Apply.
As you can see in Figure B, once we did this and then added our text, it became apparent that we had a lot of negative white space. Just adding a frame wasn’t making the most of our graphic.

Figure B: Keeping this graphic contained creates negative white space and doesn’t flatter its shape.
How Does Your Garden Grow?
The method you use to release a graphic from its container will depend on the graphic. That is, it makes a difference if it’s a rasterized TIFF file or a vector EPS file. It also makes a difference if the image has an embedded clipping path.
Using an Embedded Clipping Path
With your graphic still selected and the Modify dialog box still open, click on the Clipping tab. If your graphic contains a clipping path, it will be selected from the Type and Path pop-up menus, as shown in Figure C. Now, click the Crop To Box button and deselect the Restrict To Box check box. Then click OK.
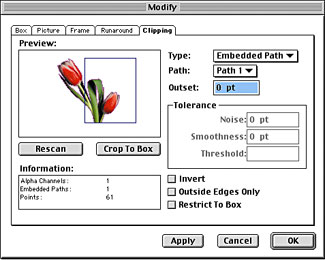
Figure C: Click Crop To Box and deselect the Restrict To Box check box.
Generating a Clipping Path
If your graphic doesn’t have an embedded clipping path, your clipping tab will look a little different. Instead of Embedded Path, Item is automatically chosen from the Type pop-up menu. However, if you have a nice white background, such as in our graphic, you can easily generate a clipping path in QuarkXPress.
To do so, choose Non-White Areas from the Type pop-up menu, as shown in Figure D. Next, click the Crop To Box button and deselect the Restrict To Box check box. Now look at your graphic in the Preview window. If there are any areas in your graphic that are very light, you may need to adjust the tolerance level to prevent those areas from being included in the clipping path. We changed the tolerance level of our clipping path by adjusting the Threshold from 10% to 5% for this reason. You can also adjust the Noise and Smoothness levels to create a cleaner path around your graphic. If you make changes to the Tolerance settings, you’ll need to click the Crop To Box button again. Then, click OK.

Figure D: A solid white background enables QuarkXPress to generate a decent clipping path.
Moving on Out
Back on the document page, reduce the picture box until your graphic extends beyond the frame. You can make the picture box as small as you want, but you can’t delete it entirely with-out deleting the graphic too.
Free at Last
It’s amazing how simple techniques such as this can make so much difference in your layout. It just takes a little ingenuity and the ability to think outside the box.
Creativepro.com readers can subscribe to Element K Journals at a discount. Click here to learn more.
This article was last modified on February 22, 2022
This article was first published on May 8, 2002
Commenting is easier and faster when you're logged in!

Recommended for you

Lightbox Photography Cards
In the past, we’ve seen plenty of cool Kickstarter projects to create deck...

Convert Text to Lowercase with a GREP Utility
InDesign's GREP cannot convert text to lowercase... but that doesn't mean you ca...

How to Incorporate Chapter Thumbnail Images into an Auto-Generating Table of Contents
How you can make a table of contents with thumbnail images (and avoid a horrible...