

As my last column indicated, I am effusive about the joys of working with vectors. They scale up nicely, you can tug and twist them into myriad shapes, and they hop lightly between graphics programs. But you can take vectors into page layout programs, too. And I’m not talking about saving some line-art illustration as an EPS and dropping it into a layout. I’m talking about using the power of vector paths, which means you can add masks and clipping paths to a page layout. It means you can wrap text around the paths or, even better, use those paths to hold text or images.
Say I want to incorporate Photoshop 6‘s snazzy new warp text effect as paths in a page layout. It’s no problem to convert the text into paths in Photoshop. Once you create the warp text, you can easily convert it to a path by choosing Layer>Type>Create Work Path command. The challenge is to get those paths into QuarkXPress or Adobe InDesign and then convert them into editable objects.
Find the Clipping Paths
In the Dark Ages of desktop publishing (before QuarkXPress 4) there were very few choices for working with clipping paths in a page layout program. The only way to mask part of a raster image with a vector path was to save the file as an EPS with a clipping path. If you wanted to modify the shape of the clipping path, however, you had to jump back into Photoshop, make changes, resave, and then update the image in XPress.
Then, QuarkXPress 4 threw away the need for EPS files with clipping paths. You could now use a TIFF file with any number of paths — any one of which is available to be used as either a clipping path or a runaround for text. And you can easily modify the shape of these paths within the XPress document. (If you’re one of the Luddites who is still using XPress 3.3, this feature alone is reason enough to upgrade to XPress 4.)
For instance, once you create some warped text in Photoshop, you simply need to convert it to a path in Photoshop. Then you can save it as a TIFF file and import it into XPress 4. At that point, you can go to the Clipping Path options in XPress, and choose Embedded Path. The warped text path is automatically set as the clipping path for the image. Better still, you can then edit the clipping path right in XPress. This makes it much easier to make a last-minute change to the position of the image or the shape of the clipping path.
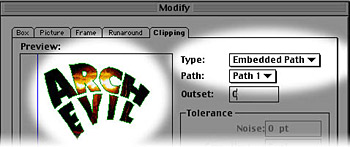
QuarkXPress 4 and later let you create clipping paths from imported text paths, by choosing Clipping Path options and then Embedded Path. The left pane provides a preview.
But there’s a nasty bug for anyone working with the new Photoshop 6. Somehow, even though there’s been no official change in the file type, paths saved with TIFF images in Photoshop 6 can’t be seen in QuarkXPress. As of now, anyone working with XPress who wants to use the embedded paths in TIFF images has to resave the file using Photoshop 5.5 or earlier (or, worse, go back to saving the file as an EPS, which means ugly previews and no editability in XPress). The only way that XPress will be able to see the embedded paths is if Quark Inc. develops a new import filter for TIFF images.
Getting Real Paths
Unfortunately, clipping paths aren’t real XPress objects, so although you can edit their shapes, you can’t convert them into text boxes, or separate them from the image they came from.
Fortunately there’s a powerful route to translate Photoshop paths into discrete XPress objects — QX-VectorEdit, part of QX-Tools by Extensis (sister company of Creativepro.com). QX-VectorEdit can convert any PostScript or PDF file into actual XPress objects. Start by dragging the paths from Photoshop into Illustrator 9. Then just save the artwork as an Illustrator file. (Illustrator 9’s native file format is actually PDF.) Then, in XPress, use VectorEdit to convert any vector objects into XPress objects.
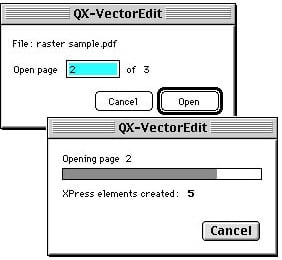
QX-VectorEdit lets you choose a page of a multi-page PDF file, and then it converts the page’s elements into QuarkXPress objects.
My favorite use of QX-VectorEdit has nothing to do with Photoshop or Illustrator, though. It’s to convert graphs and tables from Microsoft Excel or Word into XPress objects. For instance, start with a pie graph in Excel. Using PDF Writer, you can easily convert it into an Acrobat file. Then, QX-VectorEdit can open the file as XPress objects. Finally, you can convert the objects into picture boxes to customize the graph.
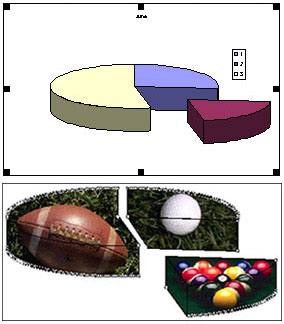
Above, we used Acrobat PDF Writer to convert an Excel graph into a PDF file. Then we used QX-VectorEdit to convert the PDF into QuarkXPress elements. Once the objects are in Xpress, it’s relatively simple to change them, such as by converting them into picture boxes and adding images.
Another useful tool for working with Photoshop paths is the ImagePort Xtension from ALAP. It allows you to import native Photoshop documents into XPress and then select which paths should be used for clipping or text wrap.
Into InDesign
Some would argue (certainly Adobe marketing would) that the best way to move vectors out of Illustrator or Photoshop into a page layout is to stay within the Adobe family of products, and that means using InDesign. So how good is the integration between InDesign and the rest of the Adobe family? Well there’s good news and bad. The bad news is that InDesign doesn’t recognize Photoshop paths at all — not as a drag and drop, not as a copy and paste. (And not even from Photoshop 5.5 files.)
The good news is that Illustrator 9 is the bridge from Photoshop into InDesign. Just drag the paths from Photoshop into Illustrator and then from Illustrator into InDesign. There’s just one silly little caveat: After you bring the path from Photoshop into Illustrator, you have to add either a fill or stroke; InDesign can’t see Illustrator objects if they don’t have some sort of color applied.
Outside the Box
Whatever page layout, image-editing, and illustration packages you use, the bottom line is that you’ll get more out of today’s software if you stop thinking of each program as a separate entity — especially when it comes to vectors. Vectors are one of the basic building blocks of page layout and design. The more flexibility you exercise in working with them, the more creative you will become.
Read more by Sandee Cohen.
This article was last modified on January 3, 2023
This article was first published on December 14, 2000
Commenting is easier and faster when you're logged in!

Recommended for you

Creating a Pop Out Effect with Photoshop and InDesign
At the 2016 InDesign Conference in Washington, D.C., Nigel French reminded me of...
Scanning Around With Gene: Five Years on a Flatbed
When I discovered that today marks my five-year anniversary writing a column her...

How to Open Doors in Photoshop
Opening closed doors is a useful Photoshop technique, and you can use it to open...