
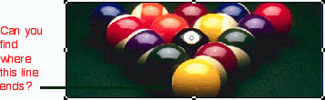
Check out the following picture. Can you find where the green line ends? It’s difficult because the line gets lost as it passes over the green shadows.
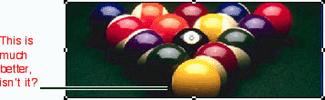
Now, look at this next picture. It’s very easy to see where the line ends. The white knockout area around the green line provides a buffer to keep the green line from getting lost in the shadows.
It’s a Knock Out
In the publishing biz, the above are examples of “callouts” and at times they have been the bane of my existence. I use callouts constantly as illustrations in my books, when I need to comment on and point to a specific feature of a software product. Many years ago, the production department at Peachpit Press requested that all the callout lines I use in my books have a white outline or knockout area around them in order to prevent the lines from getting lost in the background as they pass over graphics. It’s the kind of thing we used to do all the time for traditional mechanicals, but somehow the technique got lost in the world of digital layouts.
Adding the white outline wasn’t easy back in the old days of QuarkXPress 3.x. First I drew a 1-point white line, positioned it, then duplicated it with 0-point offsets. Then I changed the line color to black. And then changed the point size to 0.5. (Whew!) I’d have to do the same thing if I had to draw a circle around an area. If I needed to change the line, I would then delete the black line, make changes to the white line, then duplicate it, and then change the color and weight. (No wonder I went insane when someone asked for changes.) I suppose someone could have created a script to make the duplicates. But since I don’t know scripting, I couldn’t.
XPress 4.x to the Rescue
When QuarkXPress 4 came out, a new feature called Dashes & Stripes changed all that. I don’t think the people at Quark Inc. actually thought of using the Dashes & Stripes to create automatic outlines, because I never saw any promotional material on it. But Kate at Peachpit showed me how to use the custom stripes to create the knockout.
Start by choosing Edit > Dashes & Stripes. This opens the Dashes & Stripes dialog box. Choose Stripe from the New list (see Figure 1).
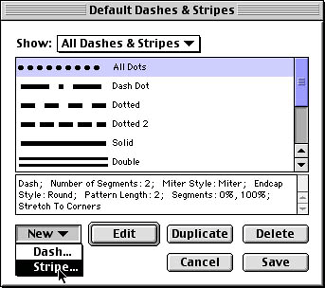
Figure 1: Open the Dashes & Stripes dialog box in QuarkXPress 4.x
This opens the Edit Stripe dialog box (see Figure 2). Give the stripe a name. (I like “White Knockout.”) Drag the bottom of the current line from 100 to 25 percent. You can then create a second line by dragging from the 100 mark to the 75-percent mark. The two black lines represent the color. The middle area is the gap.
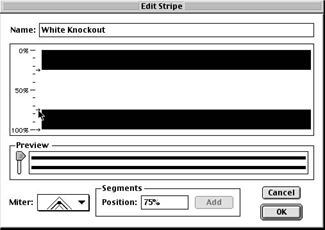
Figure 2: The Edit Stripe dialog box lets you control line width and color.
Then click OK. This adds the line style to the choices for lines as well as frames.
A Different Stripe
Now that you’ve created the knockout stripe, follow these steps to use it in your documents:
- Draw a line in XPress.
- With the line selected, choose Item > Modify.
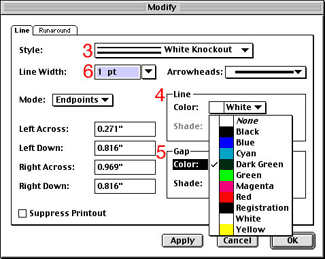
Figure 3: Use the Modify dialog box to customize lines, as shown in steps 3 to 6. - Choose the White Knockout style from the Style list.
- Set the Line color to White. Remember, the “color” refers to the two black lines in the Edit Stripe dialog box, so you want those stripes to be white.
- Set the Gap color to the color that you want the line to be. In the illustration of the pool balls above, I chose Dark Green.
- Set the point size for the line thickness. If you created two stripes at 25 percent each in the Edit Stripe dialog box, set the point size for twice the width you would actually want. For instance, 2 points for the width leaves you with a visible line of 1 point and two half-point white stripes on either side.
- Click OK to apply the style to the selected line. The white knockout outline is applied to the line.
The Default Style
You don’t have to repeat all that for every line you create, of course. You can set the knockout outline to be the default style for all new lines. Double-click the line tool in the Toolbox. This opens the Document Preferences.
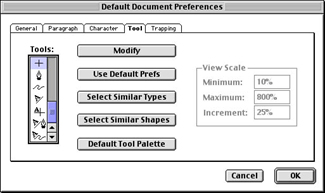
Figure 4: Double click the line tool to set the knockout style as your default.
Click the Modify button to set the preferences so all new lines have the stripe correctly assembled.
Of course, you don’t have to limit yourself to just lines. This knockout style can be applied to the frames applied to picture boxes. This gives you an automatic buffer zone to keep the image slightly separated from its frame. I also use the knockout style for circles that are used to highlight areas of an image. Once again, the white knockout outline keeps the black frame from getting lost.
My Must-Have Feature
I recently caused a stir on the Blue World InDesign list serve when I mentioned that this knockout-stripe capability is the one feature I cannot do without. And since InDesign doesn’t have a similar feature, I still can’t use InDesign to lay out my Visual Quickstart books. However, it shouldn’t be too difficult for Adobe to add the feature to the next version of InDesign, if it’s sibling is any indication. Although not labeled as such, the multi-strokes capability in Illustrator 9 give me the same functionality as Quark’s knockout stripes.
As the Appearance palette shows (Figure 5), Illustrator lets you apply two different strokes to one path. The bottom stroke, set to White with a width of 1 point, becomes the knockout outline of the path. The top stroke, set to Black with a width of 1 point, becomes the top line of the path.
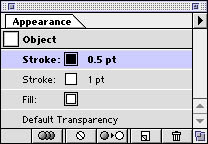
Figure 5: Illustrator 9’s multi-stripes function lets you apply multiple strokes to one path.
So, if the next version of InDesign has a multi-stripes feature, I can finally use InDesign instead of QuarkXPress to lay out my InDesign book.
Read more by Sandee Cohen.
This article was last modified on March 12, 2022
This article was first published on January 10, 2001
Commenting is easier and faster when you're logged in!

Recommended for you

Cacidi LiveMerge Significantly Expands Adobe InDesign's Functionality
Newly developed software from Cacidi Systems connects documents in Adobe InDesig...
Before&After: Design a Showroom-Style Presentation
This auto magazine feature layout is a fair illusion of walking page by page thr...

Type OFF A Path
Moving text between paths and/or frames is easy, once you know the "in" and "out...