

Adobe InDesign has developed into a very capable, versatile print-publishing application of its own right. However, InDesign’s publishing feats do not stop at print. Adobe made certain that InDesign CS would meet most cross-media publishing needs as well, such as Acrobat PDFs, eBooks, and the Web. Earlier versions of InDesign included an export command to HTML, which saved out your document’s pages as HTML along with converting any images to Web-friendly formats.
With InDesign CS, Adobe decided to not include this handy feature in favor of concentrating their efforts on tighter integration with GoLive CS. Good news for those of you who are GoLive users or those considering becoming one. If you’re not a GoLive user and come to rely on the direct HTML Export, then this isn’t such great news. Nevertheless, Adobe has baked in some innovative features integrating InDesign and GoLive. Here I’ll detail how to go about moving your content effortlessly from InDesign CS into GoLive CS and point out some of the interesting features that aren’t so obvious at first.
InDesign CS: Pack Up and Move Out
Although vacations are usually something to look forward to, packing up and hopping onto a plane is an aspect of the trip we often dread. You might think packaging your InDesign CS documents for use in GoLive is just as tedious. The truth is that it’s actually very painless and easy. You just have to make some decisions. Let me quickly go over the steps:
- With your target document open, look under the File menu of InDesign CS for a new command, “Package for GoLive.” Select this and decide on a location on your hard drive or elsewhere to save your package.
- Once you decide on a location, a subsequent Package for GoLive options dialog appears:
- The General tab is straightforward, asking whether you wish to view the resulting package in GoLive or your browser of choice (see Figure 1). Since the most compelling option here is to choose GoLive, select this. If you have a site created in GoLive that you’re already working with, save the package file to the Web-dataWeb-packages folder in the site.
- The General tab is straightforward, asking whether you wish to view the resulting package in GoLive or your browser of choice (see Figure 1). Since the most compelling option here is to choose GoLive, select this. If you have a site created in GoLive that you’re already working with, save the package file to the Web-dataWeb-packages folder in the site.
Figure 1: The General tab of the Package For GoLive dialog. Here you can decide if you want to view the package when complete in GoLive or a browser.
- The Images tab offers up more choices (see Figure 2). Here you can control what happens to linked images or document formatting within InDesign that may not translate successfully to GoLive unless converted to images.
Figure 2: The Images tab offers up several options for handling linked images in your document and formatted text that will be rasterized.
For ultimate flexibility, you can save files to the Images Sub-Folder with any of the following options:
1. Original Images copies original images so that you may do your optimizing later in GoLive (yes, that’s in GoLive).
2. Optimized Original copies Web-friendly (read low resolution) images without preserving any of the formatting, such as scaling and cropping, you may have applied in InDesign.
3. Optimized Formatted Images copies Web-friendly images with formatting retained.
Of these three options, I suggest going with saving Original Images to a sub-folder. This option allows you to take full advantage of GoLive’s SmartObjects feature later down the line.
- Lastly, the Image Conversion option allows you to decide whether all images convert to GIF or JPEG, or whether InDesign automatically determines the format. The remaining options relate to the image formats themselves and can be left alone or tweaked if you’re knowledgeable about these format subtleties.
- Click the “Package” button. Depending on the complexity and size of your document, package creation may take a while, so now may be a good time to grab some coffee, tea, etc. After InDesign has processed your document by creating or converting images where necessary and collecting stories into XML files, GoLive should load your newly created package automatically (see Figure 3).
Figure 3: All the packages you’ve added can be found in the InDesignPackages folder within the Extras tab in your site window.
GoLive CS: Pick Up Your Package and Go
Once you’ve successfully saved your InDesign document as a package, you’re ready to get to work in GoLive. The package window that pops up in GoLive is your main interface into the package assets. Here you’re able to quickly browse and even zoom in on a particular asset and then drag that asset into your working GoLive page. Here’s a run down of how to get the most out of the Package window.
- To zoom on a particular object, double-click it in the Package preview tab. Double-click the asset again to zoom back out. If the asset you’re attempting to select is obstructed by several other objects, Control-click (Mac) or Right-click (Windows) on the stack of objects and choose Select > {Object Name} from the contextual menu.Alternatively, you can browse through the Inspector palette when you have the Package window focused. The Inspector palette displays all the assets in the package as a list of stories, images, movies, and sounds (see Figure 4). Browse through the list of assets until you find the one you’re looking for. Then double-click the asset name to jump directly to where it exists in the Package window.

Figure 4: An organized listing of all the assets in your package can be found in the Inspector when the Package window is open.
- To add a bitmap image, drag the object from the package window to the page. If the image isn’t already in a Web format, GoLive presents a Save for Web dialog akin to the ones found in Photoshop, ImageReady, and Illustrator. After you’ve decided Web optimization settings and saved the resulting file, GoLive creates a dynamic link between the source image file and the resulting Web-friendly file, referred to as a SmartObject. SmartObjects make it easy for you to freely scale and edit linked fileS without resaving them as new Web-optimized files every time you make changes (or your client does). GoLive automatically recreates these files for you.
- To add vector artwork from an Illustrator file, just drag the artwork from the package window to your page. Since we are dealing with vector artwork, GoLive shows a Conversion Settings dialog (see Figure 5). Here you can decide whether the resulting file format of your SmartObject will be bitmap-based, such as GIF or JPEG, or remain vector-based, such as Flash SWF or SVG. If you decide to convert your artwork to a bitmap format, GoLive pops up the Save for Web dialog, as it does when dragging in bitmap images (see above). However, if you decide to stick with the vector formats, Illustrator CS loads your artwork. Depending on your choice, either the options for Flash SWF or SVG will open. Once you decide on the settings you want, GoLive will complete the SmartObject link to the Illustrator file and the exported file format.
Figure 5: When adding vector artwork to your site, GoLive gives you the option to convert the file to bitmap format or keep it as a vector format.
- To add text or a table, simply drag the object from the package window to the GoLive page. If the text or table is difficult to represent in HTML or you just rather have the element come in as a graphic, hold down the Shift key as you drag the element on to the page. This results in a rasterized, resizable SmartObject graphic (see Figure 6).

Figure 6: The Package window makes it easy to browse, select, and drag and drop your stories, images, artwork, etc.
Since all assets placed from InDesign to GoLive result in SmartObjects by default, you can experience the power of this feature first hand when you perform changes within the InDesign document.
- Make the changes required in the InDesign document. Select Package for GoLive as before and point to the location of your original package.
- InDesign should then ask you if you want to update the package (see Figure 7). Click Update and once the update is complete, all the assets that you placed in your GoLive site as SmartObjects update automatically.

Figure 7: Once changes have been made in InDesign, you can update your package to have the SmartObject in GoLive dynamically update.
Frequent Flyer Miles
Just as people who frequently travel become quite skilled at the art of packing and unpacking, you too should quickly become proficient when it comes to moving your assets from InDesign to GoLive. Adobe went to great lengths to integrate InDesign and GoLive in the Creative Suite release.
Whether you’re an InDesign and GoLive user or considering using them, this great feature highlights how Adobe developed stronger integration between applications while building upon great features such as SmartObjects. This is merely the tip of the iceberg of the kind of trips you can take between the Creative Suite applications. Cross-media publishing never has been so easy and accommodating to changes and creativity.
This article was last modified on January 8, 2023
This article was first published on March 30, 2004
Commenting is easier and faster when you're logged in!

Recommended for you

Illuminated Manuscripts with Decorated Initials
Illuminated manuscripts can be a wealth of inspiration even for modern designers...
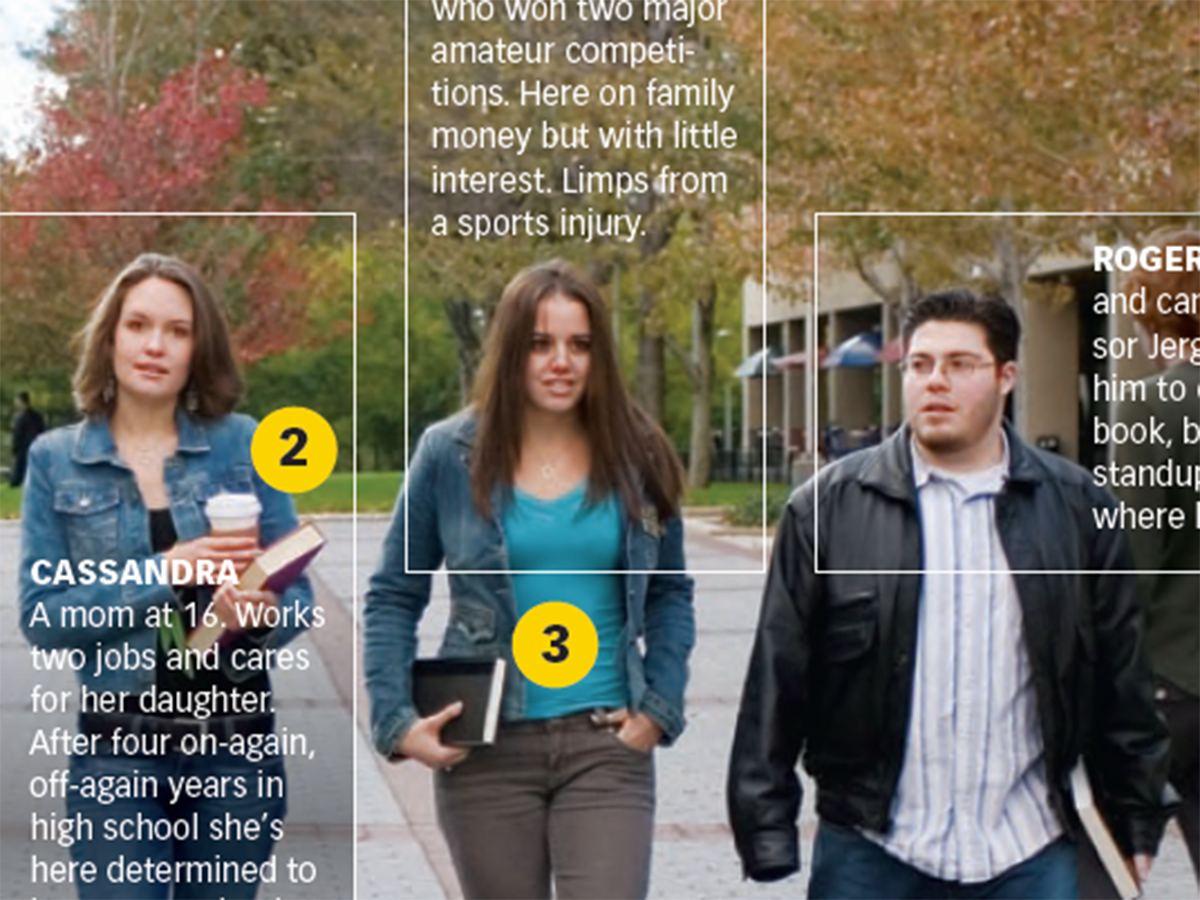
Before&After Design Tip: Multi-Caption Photo Tells Many Stories
Use more than one caption to unpack the detail in an image

Scanning Around With Gene: Getting Things Done in 1961
I haven’t seen the TV series “Mad Men” yet, but several people have...