

Man Who Catch Fly with Chopsticks Can Accomplish Anything
Of course computers are meant to make our lives easier by eliminating the tedium of repetitive tasks and keeping track of details mundane and complex, thus freeing our creative minds for more imaginative and challenging endeavors. Sounds great, no? The sad truth, however, is that we often digress into monotonous drudgery “because that’s the way it’s always been” or simply because we didn’t realize there was an easier way. I can’t tell you how many times I’ve inherited a publication to see that the creator manually placed page numbers on all the pages. It pains me to think how much time was wasted when people could’ve been engaged in much more productive work.
InDesign can help out by automatically numbering pages for you. To set up page numbering in your publications, follow these easy steps:
- Go to the master page on which you wish to setup automatic page numbering.
- Create a text box where you would like the page numbers to reside.
- Enter any text you would like to be a part of the page number, such as the title of the publication or a leading “Page” label.
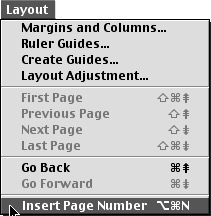
- With the text-insertion point blinking in the text box, select Layout > Insert Page Number from the main menu. A letter should appear that corresponds to the master page’s label.
- Apply any styling to the page number such as font, size, and justification. You can even design a graphic that works with that page number. For instance, you could make a solid circle and then place a reversed-out page number on top of the circle.
- Now any pages associated to that master page will be automatically numbered, regardless of any future reorganization of the individual pages themselves.
You can also have InDesign automatically title your Sections relating to your Section Markers. To begin, make sure you have the text-insertion cursor blinking in your text box. Then follow these steps:
- Using InDesign’s contextual menu, Control-Click (Mac) or Right-Click (Windows) and select “Insert Section Marker.”
- Stylize the just-inserted word “Section” the way you want your Section Titles to appear. Font, point size, color, and other attributes can be modified.
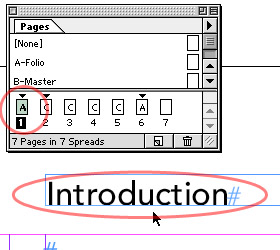
- Now in the Pages palette, select or create a new Section. These pages are represented by triangles above them. Double-clicking the triangle will bring up the Section Options. To create a new Section, select “Section Options” in the Pages pull-down menu. If you haven’t already entered in a Section Marker yet, nothing will appear where you designated the Section Marker.
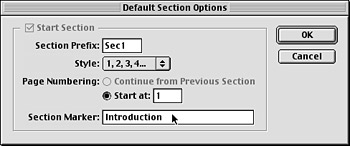
- In the Section Options, enter a new Section Marker title, such as Introduction.
Now any pages that follow in this section will carry the Section Marker Title. And if the need arises to change the title, it’s simply a matter of changing it once within the Section Options.
Building publications to take advantage of InDesign’s master-page features is seldom something you can concentrate on when you’re in a mad dash to design layouts for a client’s approval. But hopefully now you know how to go back and “hook up the wires” to allow your publications to tap into InDesign’s power. Over time you should become comfortable enough with these methods to implement them when you begin work on a publication.
— “Remo Williams: The Adventure Begins”.
This article was last modified on January 18, 2023
This article was first published on February 28, 2001
Commenting is easier and faster when you're logged in!

Recommended for you

Scanning Around With Gene: Magazine Covers that Broke the Rules
Originally posted Jun 26, 2009 When I was in the magazine business, I went to se...

Problems Printing Multiple Copies?
A number of InDesign CS3 users have reported a problem when printing multiple co...
Changing Layer Visibility in an Interactive PDF
Here's a tutorial on how to change layer visibility in an interactive PDF file.