

Every time the folks at Adobe announce a new version of Photoshop, I wonder what could they possibly do to an application so near to perfection other than ruin it. And every time I start using the new update, I can’t imagine how I survived without it. Photoshop 6 follows in the same vein by including a surprising amount of groundbreaking features. There’s no question the new Shape layer, which offers the ability to combine native vector-based artwork with the usual bitmap layers, deserves the limelight of this upgrade. But what about the less-prominent but nonetheless great features meant to dramatically change the way you work in Photoshop? Features such as Fill layers, Layer clipping paths, and Layer sets may not be as alluring as Shape layers, but they could end up being the new tools you click most.
Fill ‘er Up
Fill layers show up in Photoshop 6 as a natural evolution of Photoshop 5’s Adjustment layers. Adjustment layers are a great way to experiment with alternative colors in your Photoshop document without affecting the inherent color quality. This is often referred to as a non-destructive operation, because it doesn’t destroy the color or tone of your image but allows you to dynamically adjust the settings at any time. As you may know, repeatedly performing traditional color or tonal adjustments on an image degrades its color fidelity. Adjustment layers solve this dilemma by allowing you to make multiple color or tonal changes to layers of an image without impacting the properties of the image itself. Better still, Adjustment layers are saved with the file, meaning you can make multiple adjustments to an image no matter how many times you go back to edit it.
Fill layers are similar to Adjustment layers in that you can freely change their contents and settings. They can consist of solid color, gradient fill, or a pattern. Filling a layer dynamically with a solid color doesn’t seem like much — you can easily flood a layer with color the old-school way, with the paint bucket — but consider the time you could save with the ability to make one gradient or pattern and then go back later to adjust its settings. You wouldn’t have to delete the layer and start over to create a new effect. Nice, huh? By the way, solid-color fill layers can be paired with vector shapes to create a Shape layer. They also work well for dynamically swapping out color for rollovers.
To create a new Fill layer, choose Layer > New Fill Layer > and then Solid Color…, Gradient…, or Pattern… in the main menu; then define the properties and options for the layer. (Or press and hold the Adjustment-layer button in the Layers palette, then select Solid Color, Gradient, or Pattern.) To redefine a Fill layer’s content options, double-click the layer thumbnail for the fill layer or choose Layer > Layer Content Options… To change a Fill layer to another type of layer, even Adjustment layer, select Layer > Change Layer Content.
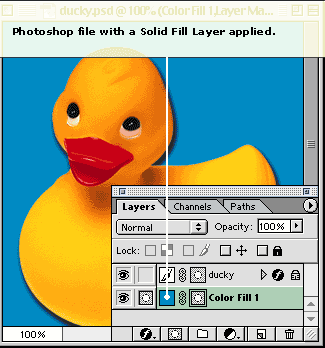
Creating Fill layers has never been easier. Here we switch from gradient to a pattern to a solid color, all from one submenu.
The Hard Edge of Layer Masks
Another smart way of working in Photoshop is to take advantage of Layer masks. Layer masks have been around for some time, but in Photoshop 6 they gain the ability to be vector based as well as pixel based. This means you can finally silhouette a person’s head and have a mask be soft and forgiving around the hair while being crisp and defined around the face. These new vector-based layer masks are called Layer clipping paths. Though not to be confused with the old Clipping Path command found in the Paths palette, Layer clipping paths act in a similar fashion. You create a path and then define it as a clipping path for a particular layer. This affords you easily editable vector-based masking, and you can still create a pixel-based Layer mask on this layer as well. Hard or soft, the choice is yours.
To create a Layer clipping path:
- Target the layer you would like to mask. For best results have something painted on this layer.
- Create a new work path by selecting the Pen tool and pressing the “Create new work path” button found in the Options bar.
- Draw your work path. Don’t press the Confirm checkbox in the Options bar, because doing so this will dismiss your target path.
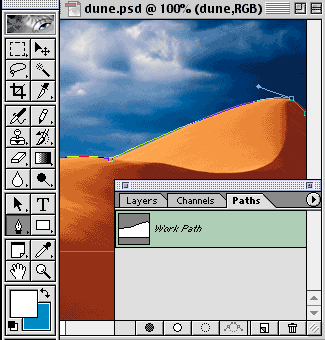
Here we’re on our desired layer, and we’ve used the pen tool to draw our new work path. - Once you’re happy with your path choose Layer > Add Layer Clipping Path > Current Path (see below) from the main menu.

Viola! Now you can go back and adjust your clipping path or add a layer mask.

Now our layer based clipping path is locked to the intended layer.
After a while of experimenting with these two features, you may realize that a Shape layer is nothing more than a Fill layer with a Layer clipping path applied to it. Ah-HA! Now it all starts to makes sense. There actually is method to Adobe’s madness.
New Order
Amidst the bevy of new features found in Photoshop 6, one of my favorites just happens to be Layer sets. Being a neat freak, I’ve longed for the day I could organize and group layers and collapse them into a smaller unit much like now I do in Illustrator 9. Well, that day is finally here. Layer sets aid in the management of Photoshop files that are burdened with multiple Layers, reducing clutter and restoring your sanity. Now that you can have up to 8,000 layers, it’s nice to know you have a method to order and sort those layers.
Layer sets act very much like folders in your operating system. You can move layers in and out of sets, and sets can be collapsed, expanded, duplicated, deleted, and moved in the stacking order. One unfortunate omission: You can’t nest Layer sets within other Layer sets. You can, however, add a Layer mask and/or a Layer clipping path to a Layer set.
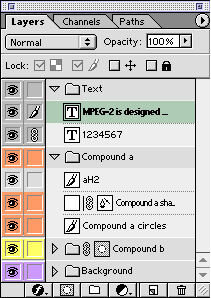
Layer sets are color-coded to make them easily distinguishable from each other.
To create Layer sets in Photoshop 6, do one of the following:
- Choose Layer > New > Layer Set… from the menu bar.
- Press the folder-like, Create new layer set button in the Layers palette.You can save yourself time by first linking all Layers you want in your Layer set and then choosing Layer > New > Layer Set From Linked… from the menu bar. Alternatively, after linking the layers, you can choose New Set From Linked in the Layers palette menu.

Photoshop’s ability to build layer sets from user-defined pre-linked layers can be a huge time saver.Getting acquainted with a new version of a software product that has become as familiar as an old friend can be daunting at first. Many of us simply stick to the “tried and true” and do things the way we know best. Some of us just don’t have time to figure out the new features whether they’re time-savers or not. Hopefully this run down of the more powerful, dynamic new features in Photoshop 6 will give you enough incentive to teach yourself some new tricks.
This article was last modified on January 3, 2023
This article was first published on February 14, 2001
Commenting is easier and faster when you're logged in!

Recommended for you
Using Photoshop’s Generative Fill to Remove Objects
Learn how to simply remove items from an image in Photoshop, without extra conte...

Free Photoshop and Lightroom Webinar
As part of their ongoing Create Now: Ask A Pro webinar series, Adobe is offering...

How to Prepare Raster Images for Use with Illustrator Brushes
In the process of testing Illustrator features released last June in the Creativ...