

LiveMotion’s Masking Revealed!
LiveMotion’s approach to masking is pretty straightforward, very similar to Flash, and, in fact, if you’ve created a mask in Adobe Illustrator you will probably feel right at home with it. Basically, all you have to do is group the objects you wish to mask with the topmost object being considered the masking object.
As with Flash, the masking object must be simple in nature — a geometric or closed path. Anything else may work in LiveMotion, but when exported to SWF it will not play correctly. This is very important to keep in mind, since LiveMotion will allow you to perform many interesting effects with a mask internally that won’t render correctly as an SWF. It is possible that these effects were intended for animated GIFs, hence their availability (but that’s another article). For our purposes here, stick with the guidelines in the above section about Flash to make sure your LiveMotion files remain SWF compatible.
Let’s go through creating a mask step-by-step:
- Create or import some objects for this exercise. Layer them appropriately with your intended mask object at the top. To arrange the layers’ stacking order select Object > Arrange from the main menu.

- Now select all the objects either by selecting them directly within the Composition window or by shift-clicking their names in the Timeline window.
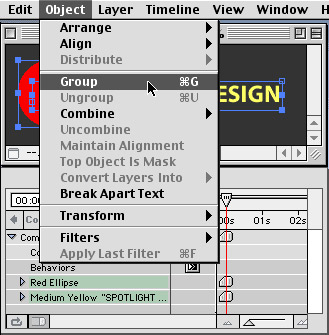
- Group the objects together by choosing Object > Group from the main menu (Command-G on Mac/Control-G on Windows).
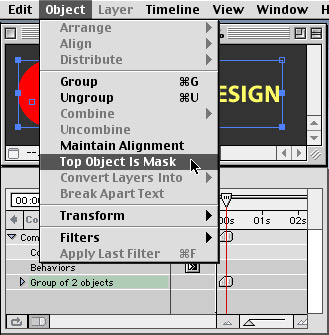
- After grouping the objects together, select Object > Top Object Is Mask from the main menu to assign the top object as the mask of the entire group.
Animating a mask is as easy as animating anything else in LiveMotion, thanks to the AutoKeyframe and AutoTween features. When you set an animation keyframe for an attribute and then edit the attribute at a different point in the Timeline, LiveMotion automatically inserts the end keyframe and creates the Motion Tween between the start and end keyframes for you.
To animate your newly created mask, do the following:
- Ungroup the objects for now to make manipulating easier on you.
- To expand and edit the attributes of the mask object, click the triangle beside its name within the Timeline window (Timeline > Show Timeline Window).
- Now expand the Transform attributes line and click the Position stopwatch to set an initial keyframe position.
- Move the Current Time Marker (CTM) to the desired time. The greater the span of time, the longer it will take for the mask to move from point A to point B. For this exercise 2 to 4 seconds should work fine.
- In the Composition window, drag the mask object to the position you’d like the mask to end up, making sure the mask will pass over the underlying objects. Again, there’s no need to set a keyframe manually. LiveMotion recognizes the change and automatically sets a new position keyframe at the current time. Feel free to animate the objects being masked as well.
- When you’re happy with the animation, turn the top object back into a mask. Select all the objects pertaining to the masks. Group them and select Top Object Is Mask from the Object menu.
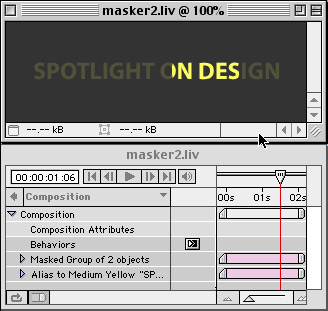
- Your animated mask is complete. Check your masterpiece out in a browser (File > Preview In > [browser]) to ensure everything holds up when exported as a Flash SWF.
It’s human nature to want to completely understand what we are seeing, and when we are only offered a glimpse — for example, via the beam of a flashlight — of the scene we have just entered, we naturally follow it as it reveals more information about the picture being drawn. Using masks and simple animations lets us enhance the appeal of our designs with a small amount of work. Explore these techniques further and you could wind up making Chris Carter and Hitchcock proud.
This article was last modified on January 8, 2023
This article was first published on March 21, 2001
Commenting is easier and faster when you're logged in!

Recommended for you


CreativePro Ask the Expert Video: Diane Burns
In this “Ask the Expert” video, David Blatner chats with InDesign expert Diane B...

How to Work with Stroke Options in Illustrator
Make solid lines dashed or dotted and graphics to either end – all from the Stro...