

Sometimes less is more. There has been many an X-Files episode in which we the viewers are spellbound as we follow Scully and that other guy around, our perspective limited to the beams of their flashlights. As we yell “Somebody just turn on the @#^#!! lights!”, the show’s producers know exactly what they’re doing: Taking a lesson from Alfred Hitchcock, the X-Files creators know that by showing us only little bits of the scene at once they’re subtly compelling us to want to see more, playing on our innate curiosity to see the whole picture. Animated masks in Flash and LiveMotion can produce a similar effect by revealing one portion of the underlying animation at a time, and including masks in your animations can add a sense of complexity and interest with very little effort on your part.
Masks can be used to produce special effects such as a spotlight or a transition. A mask layer is applied to create a hole through which one or more underlying layers are revealed. You can also animate the mask layer for even more sophisticated effects.
The Masked Flasher
Creating masks in Macromedia Flash hasn’t changed much from previous versions. The one notable new masking feature in Flash 5 is the ability to write actionscripts that produce and control masks on the fly. But for now let’s stick to the basics. To make a mask, you really only need two parts: the underlying objects you wish to mask and the object you would like to mask those objects with. Mask layers can contain only a single shape, instance, or type object. Just about any kind of object layer can be used as a mask layer with the exception of layers inside a button.
To create a mask layer in Flash follow these steps:
- Select or create a layer that contains the objects that you want to be visible through the holes of the mask.
- With this layer selected, choose Insert > Layer to add a new layer above it. A mask layer always affects the layer(s) directly below it, so be certain to place your mask layer in the right position.
- Make a filled shape, add some type, or drag a symbol instance out of your Library to the mask layer. Keep in mind that Flash disregards gradients, transparency, colors, line styles, and bitmaps on a mask layer. Filled areas will show the objects below them while non-filled areas will be concealed.
- In the Timeline, Control-click (Mac) or Right-click (Windows) the mask layer’s name and select “Mask” from the contextual menu.
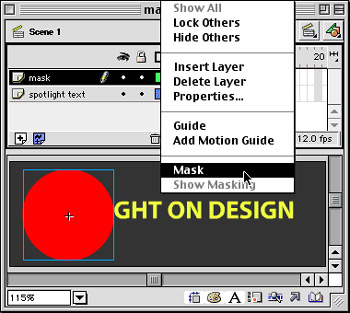
- If everything has worked out OK, the targeted layer should now be indented and should include a down arrow icon indicating that it has indeed been converted to a mask layer. Be sure to lock the mask layer as well as the layer(s) being masked to display the masking effect within Flash.

This article was last modified on January 8, 2023
This article was first published on March 21, 2001
Commenting is easier and faster when you're logged in!

Recommended for you

FSI FontShop International Announces New FontFont Libraries on CD
FSI FontShop International® announces new FontFont® Libraries on CD including th...

How to Export Videos in Different Aspect Ratios from Premiere
Quickly reframe your video for any social media platform with Myra Ferguson.
How to Create Realistic Watercolor Effects in Photoshop
Learn how to use Photoshop to create hand-brushed watercolor effects that don’t...