
The Bitmap to Flash Success

Custom Detailing
One of the biggest challenges when working with traced bitmaps is the rendering of the human face and other areas of fine detail. A simple solution is to make two traced bitmaps — a simple one for the majority of the image and a complicated one for areas of fine detail, like the face of the model in the figure below. After using the Eraser tool to get rid of the parts you don’t need and putting the two together, the result is the best of both worlds — simple where it can afford to be simple and complicated where fine detail is needed. In this case, the output of the combined traced bitmap is about 70 percent the size of the original. To simplify further, you can select View > Outlines and remove unnecessary vectors by hand.

The model on the right is a simplified tracing. Note the lack of detail in her face compared to the face on the left. The face on the left is a detailed traced bitmap and we’ve used the Eraser tool to remove the parts of the figure that are unnecessary.
Animating a Bitmap
A bitmapped image can go a long way when it comes to creating simple frame-by-frame animations. For the snipping scissors movie below, we started out with a PICT file of the scissors that included an embedded alpha channel.
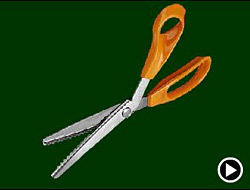
Press play to see the snipping scissors animation.
After importing, we created a new Graphic Symbol and put two copies of the scissors image into the workspace. In order to manipulate these bitmaps, they either must be converted to vectors or Broken Apart. In this case, the image is small and didn’t really need to be converted to vectors, so instead we selected one of the images and used Insert > Break Apart from the menu bar. Then we used the Eraser tool to remove the parts of the image we didn’t need, like in the two figures below. It is also possible to do this sort of separation in an application like Adobe Photoshop, but we’ve found that if you master the limited tools in Flash 5, editing images in the Flash 5 Symbol Editor can simplify and speed up the process.

Breaking Apart the bitmapped image of the scissors makes it possible to erase the parts you don’t need.

After erasing the unnecessary parts of the image, you can animate the two separate halves of the scissors to move independently of each other.
Now that we had two separate objects, we moved the top half of the scissors onto a new layer in the Symbol Editor. We then placed, rotated, and resized the two halves of the scissors to create the second frame of a simple animation. The resulting Flash player file of the snipping scissors, shown earlier, is a mere 16K.


Rotate and resize the top half of the scissors until it looks like it fits together with the bottom half to create the second part of a simple two-frame animation.
Tweening
Unfortunately, the fact still remains that Flash wasn’t designed for animating bitmaps, and nowhere is it more obvious than when you try to interpolate motion between keyframes, or Tween. Performing a simple move, like a zoom, can work well if it happens quickly, but the slower the move on the bitmapped object, the worse it looks. Below are four Flash player movies that illustrate how the apparent quality of the animation changes when you slow down a Tweened zoom.

As you can see by watching these four animations, the faster the Tweened motion, the better it looks.
If you absolutely must have slow-motion Tweens with bitmaps and want them to play smoothly, you’ll need to work at a higher frame rate — 30fps (frames per second) rather than the standard 12fps. This will get rid of wobbly or stuttering motion like in the last of the four animations above, but it will also increase your final file size and it won’t get rid of the grid-like artifacting within the bitmap of the Earth itself.
You can try to get rid of the artifacting by converting the bitmap to vectors, but it’s a trade off: If the converted bitmap is too detailed, the stuttering motion will reappear, no matter how high your frame rate. Of course, if the converted vector image is too simple, it won’t look like a photograph anymore and in the case of the image of the Earth, it loses a lot of its power once it takes on a cartoon-like appearance.
Downsizing
One reason for the grid-like artifacting in the last animation above is that the Earth bitmap is the sort of image that doesn’t compress well. The more variations of color and shape in an image, the harder it is to compress successfully. Leaves and grass are classic examples of hard-to-compress image elements. Flash 5 allows minimal control over how a bitmap is compressed through the Bitmap Properties dialogue box, shown below. After you double-click on the original bitmap file in the Library window, the Bitmap Properties dialogue box will open up.
Here you can select unique compression settings for each bitmap file in your project, with a choice of either JPEG compression or lossless GIF/PNG compression. Lossless means that, although compressed, the bitmap won’t look visibly different than the original because all the original image data is retained. The file size won’t be as small as if you choose the “lossy” JPEG compression option, which streamlines the file by tossing out image data the compression scheme deems unnecessary. You can also check Allow Smoothing to anti-alias the bitmap. The Bitmap Properties window doesn’t offer the same degree of control as a true image-editing application, such as Photoshop, so it’s best if you import already-compressed bitmaps into Flash and keep the Use Document Default Quality box checked in the Bitmap Properties dialogue box.

Compression settings for each bitmap in a project can be set individually in the Bitmap Properties dialogue box.
Less is More
If you’ve taken some of the steps outlined in this article by the time you’re ready to export your final Flash animation, you’ve done most of what you can do to keep down the final animation’s size. You may be able to lower the size a bit more by adjusting the JPEG Quality setting in the Export Flash Player dialogue box shown below. Experimenting with the ouput is the only way to figure out what works best for your needs.

The Export Flash Player dialogue box lets you select the JPEG quality setting for the bitmapped images as you export your project.
Conclusion
Everything you’ll read about Flash will tell you to avoid using bitmaps and, yet, bitmaps animated in Flash are a common sight on the Web. If you take care to prepare the bitmaps properly before you bring them into Flash and take advantage of Flash’s strengths when it comes to animating bitmaps, you’ll find that working with bitmaps can take your Flash animations to a new level.
Read more by Sonja Schenk.
This article was last modified on January 3, 2023
This article was first published on February 2, 2001
Commenting is easier and faster when you're logged in!

Recommended for you

When smart guides turn blue…
Smart Guides were introduced in InDesign CS4. By now most of us have probably en...

TypeTalk: Good-looking Figures
TypeTalk is a regular blog on typography. Post your questions and comments by cl...
P22 Announces the Release of Cézanne Pro
P22’s Cézanne is one of the most intriguing script fonts in recent years....