


Even the most beginner user among us knows that when we create a vector shape in InDesign or Illustrator, we have the option to define a fill and a stroke. We make those selections in one of several places: in the Tools, Color, or Swatches panel. Creating one fill and one stroke per object is as far as you can go in InDesign, but Illustrator lets you take it a step—or rather several steps—further.

An object with a fill and a stroke.

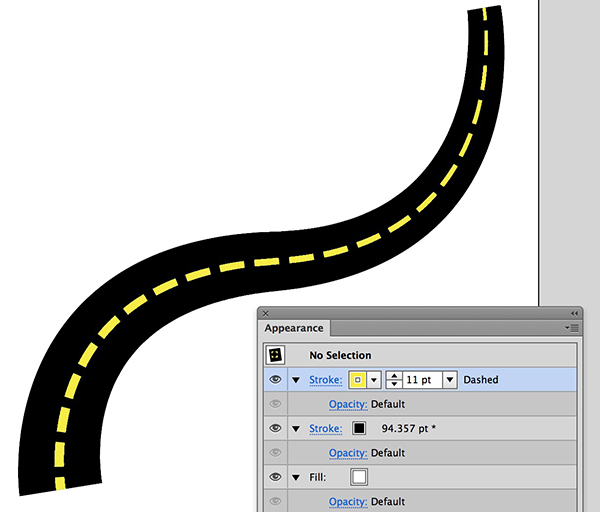
Viewing the object’s elements from the Appearance panel.
Opening Illustrator’s Appearance panel (Window > Appearance) presents you with a whole slew of formatting options. In addition to being able to see the basic appearance of stroke and fill, the Appearance panel gives you the option to set the entire object’s opacity and/or the individual opacity for each attribute. By default, when you create a new object, the new object inherits its basic appearance from the last item you had selected.

Setting the stroke’s opacity. Notice how it interacts with the fill below it.
Using the icons along the bottom of the panel, you can create a new stroke or new fill to be added to the object. These items are stacked from bottom to top in the panel. Each stroke or fill can have its own opacity, color, tint, thickness, and style. The individual elements can be re-arranged in the panel by dragging their order up and down. By using the fx button at the bottom of the panel, you can assign an effect to the entire object—the same result as going directly to the main Effect menu—or you can select an individual stroke or fill and apply an effect individually to that element. You can then selectively turn on or off the visibility of an effect or opacity for a particular element as needed.

Adding a second stroke to the object.

A simple path created with the Pen tool, and assigned two strokes.
The main advantage of creating multiple elements as opposed to using multiple objects is that changes to size, location, and orientation only need to be applied to a single item. The Appearance panel comes in handy when creating a stroke that needs to appear as multiple strokes or when using the Width tool on the individual strokes applied to an object (such as in the striped road lanes example).

Adding an effect to the fill only.
The same simple path with two strokes, after adjusting each stroke with the Width tool.
This article was last modified on October 6, 2015
This article was first published on October 6, 2015
Commenting is easier and faster when you're logged in!

Recommended for you

Illustrator vs. InDesign
In the struggle to choose the right application for a project, which one will pr...
CreativePro Video: Repeat Transformations in Illustrator
In this week’s CreativePro video, Dave Cross shows off the easy way to repeat a...

CreativePro Conference Speaker Spotlight: Michael Ninness, Designer, Dad & Beachcomber.
Welcome to our new series of posts called Speaker Spotlight, designed to highlig...