
No matter how you acquire photos or other images, whether from your own camera, from a client or agency, or by scanning old film or photos, you’ll probably need to review them to decide which ones are worth working with and which ones should be set aside or discarded. Bridge recognizes the special nature of this important process by offering Review Modes and a Slideshow feature to help you sort and separate the keepers from the rejects. Getting to know the pros and cons of each method will help you quickly decide how to tackle this stage in a project.
You might think that using a workspace, such as your custom version of Preview or Light Table, would be all you need to review your photos (if you aren’t comfortable customizing workspaces in Bridge to suit your needs, see my earlier article, Take Charge with Bridge: Tailoring Workspaces to Suit You). These workspaces, however, were designed to serve general tasks involving basic file management, locating photos, adding metadata, and even performing some actions on them.
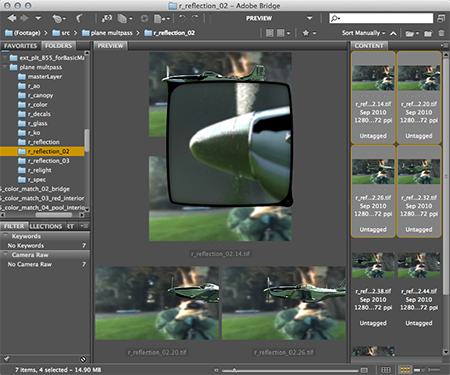
Using a customized Preview workspace for reviewing up to 9 photos at once with loupes.
For close inspection and comparison, however, Adobe developed the flexible Review Mode in Bridge. This mode was designed to make it possible for you to get a close enough look at your photos that you can make decisions about their inclusion in a project without having to launch another application, such as Camera Raw or Photoshop. Review Mode is so easy to enter with any number of photos selected, you’ll even want to memorize a few keyboard shortcuts just so you can use it as efficiently as possible.
Solo Review Mode
If you want to quickly look at a single photo without the distraction of surrounding panels, pressing the Spacebar puts Bridge in Full Screen Mode for solo reviewing. The image is displayed to fit on your monitor, but you can zoom in to the next level of magnification by clicking anywhere on the image. Press the + (plus) key to double your magnification, which is limited to 800%. The zoom is centered around the point where you clicked, or zooms from the center of the screen if you use the keyboard shortcut. After zooming in, click and hold to see the hand cursor, then drag in the image. Quickly zoom back to Fit in View from any magnification level by clicking again on the image, or use the – (minus) key to step back down in increments. Exit Full Screen Mode by pressing the Spacebar again, or by pressing Esc.

A single image is selected and displayed in Review Mode at Fit In Window magnification
Note that if you use the plus key to zoom in beyond 100% and don’t return to 100% magnification before exiting Review Mode, Bridge remembers this as the default zoom level for the next image you click on to zoom in. If the next time you zoom in you think your image has become unexpectedly blurry, check your zoom level. It might be set to 800%. Since by default, soloing an image in Review Mode eliminates all of the interface, the only way to check if your zoom level exceeds 100% is to change it again with either the plus or minus keys. Bridge then briefly displays the zoom level in the top center of your image.

Check the zoom level when an image appears unexpectedly blurry.
Bridge also doesn’t display the file name, label, or star rating when you enter solo Review Mode, nor does anything indicate you can display a caption and rate the image, but you can. There is no context menu when in solo Review Mode, so you’ll need to know the keyboard shortcuts for adding labels and stars (check out the Label menu). Once you do use one of the shortcuts, the filename appears alongside the rating/label icon, and remains there as long as you are in solo Review Mode.

Learn the easy keyboard shortcuts for labels and ratings from the Label menu in Bridge

After adding a rating or label, the filename and rating/label is displayed in the lower left of the screen.
N-Up and Carousel Review Modes
In order to review several photos at once, select all the photos you want to review. Use Shift-click to select contiguous photos, Cmd-click/Ctrl-click to select non-contiguous photos, or Cmd-A/Ctrl-A to select all. If you have nothing selected when you enter Review Mode, everything in the folder is automatically selected, including zip files, text files, and subfolders—a convenience when your folder only contains photos, but not if your folder is a “junk drawer.” Press Cmd-B/Ctrl-B (or choose View > Review Mode from the Menu), and Bridge displays the selected files in Full Screen Mode, removing all distracting clutter from view.

Choose Review Mode from the View menu, or simply press Cmd-B/Ctrl-B
With two to four photos selected, you get a tiled “N-Up” view. More photos than that and Bridge displays the photos as if they were placed in an old Kodak carousel slide viewer, one image in front and all the others stacked in a circle that fades into the background. (If your video card doesn’t support OpenGL and you have enabled Use Software Rendering in the Advanced section of Preferences, you won’t see your slides fade into the background, but that doesn’t affect any other features in Carousel Review Mode.)
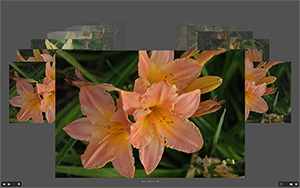
The Carousel view fades into the background when your video card supports OpenGL

Images don’t fade into the background when Use Software rendering is chosen in Preferences.
To advance your “slides” in Carousel view, click on the right or left arrows at the bottom left of the screen, or press the right/left arrow keys on your keyboard. The front photo slides out of the way to be replaced by the next photo in line. If you can see a corner of a photo you want to review, click on it to jump to that spot in the carousel. But merely looking at your photos in Review Mode won’t help you sort the keepers from the rejects. A first step is to “eject” a photo from the carousel, without actively marking it as a Reject. Pressing the down arrow (on screen or on the keyboard) drops the photo out of the carousel and deselects it in the folder. Those that remain in the carousel stay selected in the folder as well.

The down arrow drops a photo from Review Mode, but doesn’t mark it as rejected.
You can also take this opportunity to add a star rating or colored label to each image, or to mark the photo with “Reject.” Bridge makes it easy to filter your files according to their labels and the number of stars, displaying only those you want to see or select. Use keyboard shortcuts for stars and labels i
f you know them, or Control-click/right-click on the photo to bring up the context menu. Remove labels, which are toggles, by pressing their keyboard shortcuts again, and remove a star rating or “Reject” by pressing 0 (zero). Of course, you can also use the context menu to change or remove labels and ratings.
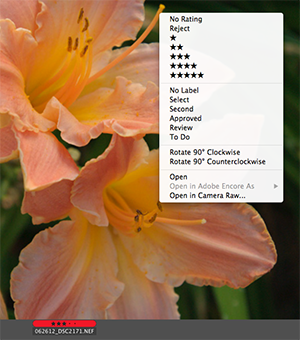
The context menu helps you with options for individual photos if multiple photos are taken into Review Mode.
Exit Review Mode by pressing the Esc key or click on the X in the lower right corner of the screen. The photos that are still in the carousel (you haven’t “ejected” them with the down arrow) remain selected for you to treat them now as a unit. Among many possible actions, group them together (Cmd-G/Ctrl-G) into a stack, add metadata such as keywords to all of them at once, or use the context menu to copy or move them to another folder.

Icons from left to right: Loupe, New Collection, and Exit Review Mode
Loupes and Collections
Next to the X in the lower right of your screen are two more icons: the Loupe icon and the New Collection icon. The Loupe icon is the same Loupe you get in the Preview panel and is the way to zoom in and out on image detail when you have multiple images selected in Review Mode. Click on the Loupe icon to add a loupe, or click on the image directly where you want the loupe (check General > Preferences to see if you need to add the Cmd/Ctrl modifier when activating the Loupe by clicking on the image). The loupe magnifies the area immediately under the pointed corner. You can adjust magnification with the + (plus) and – (minus) keys and doubles (or halves) the zoom level between 100% and 800%. Remember that your last-used magnification level is remembered and used the next time you add a loupe, the same as in solo Review Mode.

Using the Loupe to view a region at 100% magnification and again at 200%
The value of having the loupe really becomes clear when you’ve narrowed down a selection to between two and four images, and want to compare details more critically. Add a loupe to each image, drag it to a critical area, then compare the image in each of the loupes. The Command key (Mac) or Control key (Windows) synchronizes loupe settings. Adding the modifier key as you press the + or – keys (plus or minus) increases or decreases magnification in all the loupes at once. If you are comparing photos that are identical except for possible focus issues, place the loupes in the same place on each image, then press the Command/Control key as you drag one loupe to a new position. All other loupes will automatically move along with it, allowing you to make critical comparisons.
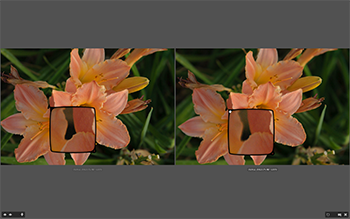
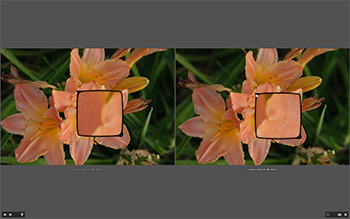
Adding the Cmd/Ctrl key to synchronize loupe views in N-up Review Mode
When you have several images left in your carousel after a review, you can use the New Collection icon to automatically create a new Collection, which is yet another way to display your selected files. Collections store links to files, rather than copies of those files, saving you disk space and keeping the real files in a single location (a future article will cover Collections in greater depth). When you are going to review your selection with clients or colleagues, a Collection is an excellent way to isolate your selection from the rest of your photos without you needing to later locate all those duplicates clogging your hard drives.
However, in order for clicking on the New Collection icon to function in Review Mode, you must have the Collection panel open before you enter Review Mode. If you do this often, consider adding the Collection panel to a custom workspace without tabbing it with any other panel. That way you won’t need to remember to switch from a panel that may be covering it, and your workspace will always be ready to accept a Collection created in Review Mode.
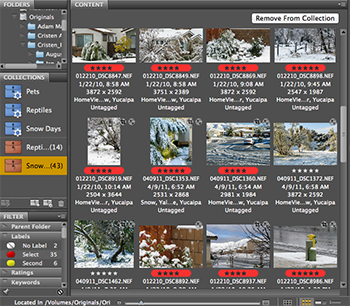
A custom workspace keeps Collections on top ready to use
Once you have used the down arrow to eliminate photos from your carousel in Review Mode, clicking on the New Collection icon leaves Review Mode and jumps to the Collections panel with a new collection created and a generic name highlighted, ready for you to type in your own name. It would be nice if you could then go to another folder, enter Review mode and choose to add this selection to an existing collection, but currently that’s not possible. You can, however, press the Esc key to exit Review Mode with your final selection still highlighted in the Content panel. It’s an easy matter now to drag the selected photos into any existing Collection that’s not a Smart Collection.

A New Collection created by clicking the New Collection icon in Review Mode
A Slideshow Review
Whether you’ve stacked your selection of photos in a folder, created a new collection, or simply rated photos with stars and given them colored labels, Review Mode is still designed primarily for a single user. Once you’re ready to make the final choices with clients or colleagues, Review Mode can feel awkward, even a bit cluttered. Instead, consider running a slideshow to conceal your workspace and desktop during the review. Of course, the Slideshow feature is also useful when you need to review how images will flow in a sequence, whether for a multimedia presentation or a printed piece.
The Slideshow is yet another full screen interface with very few buttons or icons to help you maneuver while in it, but you can select Slideshow Options from the View menu before you start your slideshow. Set slide duration, transitions, caption details, and even a Ken Burns effect for zooming in and out while the slideshow runs. Unlike reviewing an individual photo in solo Review Mode, some metadata is displayed by default, including stars and labels, unless you choose not to display captions, and if you have additional monitors connected, you can choose to black them out to eliminate distractions.

Drop down lists show options for slide duration and their transition
In case you’re wondering about the option to display only page numbers, Slideshow is also able to present a multipage PDF. With familiar Adobe applications such as Photoshop or InDesign, quickly create a static (non-interactive) PDF presentation suitable for casual in-house conferences. In Photoshop, use File > Automate > PDF Presentation and select the files created for your presentation that you want to use. From InDesign, export your multi-page presentation as a PDF. Slideshow will display the pages as if they were individual photos.

Any multipage PDF can become part of a slideshow
When you’re running a slideshow, pressing the Spacebar toggles between ma
nual control and resuming play. Zooming in or navigating with the arrow keys stops the slideshow until you resume play by pressing the Spacebar. However, if you resume the slideshow while still zoomed in, zooming back out doesn’t stop the slideshow. One keyboard shortcut, the “H” key, reveals all the shortcuts you can use in a translucent menu without your having to quit the slideshow. Even your Slideshow Options dialog is accessible via a shortcut when you’re running the slideshow, letting you change options such as slide duration or transitions without quitting the slideshow.

The translucent slideshow menu shows all the keyboard shortcuts
You won’t want to rely on the menu, however, if you have a client with you. For instance, knowing that pressing the “B” key immediately blanks the screen for you if someone unexpectedly comes into the room gives you the control to maintain your company’s or your client’s privacy without having to exit the slideshow or put up a big “No Admittance” sign on the door. Being able to use the keyboard to change ratings and labels on-the-fly when your client changes his or her mind is also very useful, and of course, knowing how to navigate without the menu is a must. The features for pan and zoom, and changing ratings and labels function the same as they do in Review Mode. Adding a label or rating when Caption has been set to OFF automatically turns that feature back on.

The Slideshow functions almost identically to solo Review Mode
The main difference between solo Review Mode and Slideshow mode is convenience, being able to select multiple files for review while eliminating interface clutter. Slideshow is intended for reviewing with others, or checking out a sequence of images by yourself, but is not full-featured enough for an entertaining multimedia presentation. Your options for presentation are all or nothing; there’s no option for adding music timed to the slideshow, or to mix up the duration for individual slides. You can pick only one of the transitions to use for all the images, and displaying the rating for one image displays it for all images. Slideshow in Bridge is informal. If you need a more formal, polished slideshow, take a look at Photoshop’s Timeline features. But for reviewing multiple photos or image sequences, Slideshow is a display option that is easy to set up and easy to use.
Reviews For Designers
While I’ve focused primarily on using these features for getting a closer look at photos, since that’s what most people will use Review Mode and Slideshow for, I’ve also mentioned that Slideshow can be used for casual presentations. If you’re a designer, there’s no reason to think these two major features are useless to you. Consider using N-Up in Review mode to select between, say, three brochure layouts. Review Mode offers you the same ability as Slideshow to look at all the pages in a multipage document, even one still in native InDesign format. Instead of first launching InDesign, opening all the files, then tiling your view and hiding the interface, consider that if you select them in Bridge, you can simply enter N-Up Review Mode and compare them there. One step instead of several.
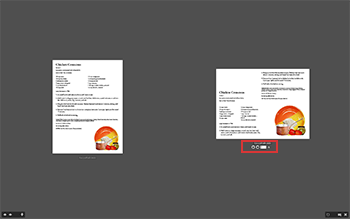
Compare different versions of InDesign files in Bridge without even launching InDesign
So long as you save short InDesign documents with your File Handling Preferences set to save previews for All Pages and the Large or Extra Large Preview Size, you can take advantage of this quick review routine. Review Mode can also display multiple artboards in Illustrator files. If you’re not in solo Review Mode (select at least two), you can compare any documents side-by-side that Bridge can preview. So the next time you want to make visual comparisons of your files, remember you have Review Mode and Slideshow in Bridge. Get rid of the clutter quickly and get a really good look.
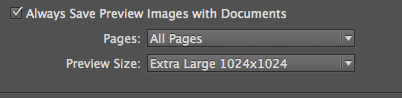
Setting your InDesign Preferences in File Handling to automatically generate useful previews.

Use N-Up Review Mode to view AI files with multiple artboards.
This article was last modified on December 14, 2022
This article was first published on April 23, 2013
Commenting is easier and faster when you're logged in!

Recommended for you
Set Them Free!
The other day I was working in Adobe InDesign, trying to reproduce a 1970s-era w...

50% Off All Photoshop Software from Alien Skin
Alien Skin software, makers of Photoshop plug-ins and iPhone apps for photograph...

The Digital Art Studio: 5 Favorite Illustrator CC Features
If you’ve ever experienced a power outage, you’ve also likely found yourself ref...