
Surrealistic Illo: Adding Infrared Imaging Effects

This story is taken from “Digital Photo Pro” (Element K Journals).

Creativepro.com readers can subscribe to Element K Journals at a discount. Click here to learn more.
Very often infrared images can make the ordinary look mysterious and interesting. In Figure A, you can see an image of a park shot in infrared. In regular black and white this picture wouldn’t be very remarkable, but in infrared it has a spooky, surreal quality that catches your attention.

Figure A: An ordinary city park can become a mysterious place under infrared.
Before digital cameras, shooting infrared images with film was something of a crapshoot. You didn’t really know how a scene would turn out until you got the film back. Since you can’t see infrared radiation, you never really knew what the object would look like or if you even got the correct exposure. With digital cameras, infrared imaging is far easier because the camera’s LCD shows you the results instantly. You can see how objects look and know if you’re in the ballpark of a correct exposure.
Digital Infrared Imaging
We’ll give you an overview of infrared imaging, starting with some background information that will help you understand infrared radiation and its effects on the imaging process. We’ll also show you how to determine if your camera is capable of making infrared images and go over the necessary gear that you’ll need to accomplish the task. Finally, we’ll cover some Photoshop techniques that will help you get the best results from your images.
What Is Infrared?
Infrared radiation (IR) is a small band of the electromagnetic spectrum that falls between visible radiation (light) and microwaves. Because it’s slightly longer in wavelength than light, we can’t see it. It ranges from about 700 nanometers (nm) to 1 mm, where as light ranges from 400 to 700 nm.
Infrared and ultraviolet radiation lay on either side of the visible spectrum, as you can see in the diagram in Figure B. Though we can’t see either infrared or ultraviolet, both can be used for imaging purposes because film and CCDs are capable of recording them.

Figure B: Infrared radiation is slightly longer in wavelength than light.
Heat on a Different Scale
Basically, IR is what we interpret as heat, but in reality it’s on a totally different scale. Scientists base heat off 0 degrees Kelvin, also known as absolute zero, which is the temperature at which molecules stop moving. The Fahrenheit equivalent of absolute zero is -459.4 degrees, so you can see it’s extremely cold. Therefore, everything above absolute zero has some amount of heat.
In reality, that heat is just IR given off by the moving molecules. As the molecules move faster, they give off more infrared and the object is perceived to be progressively warmer. The warmer the object, the more infrared it emits. An electric stove element is a good example of this. When you turn on the burner, you can feel the coil giving off IR before it turns visibly red. As the coil gets hotter, the wavelength of the radiation continues to shorten and eventually we can see the element turn red as some of the radiation speeds up to the visible range. This is called the point of incandescence. As an object continues to get hotter, it releases light and eventually ultraviolet radiation. This is the case with stars such as the sun, which gives us all kinds of light-as well as plenty of infrared to make shooting outdoors fun as well as warm.
Near Infrared
The infrared band is broken into two sections called near and far IR. For IR photography, we’re primarily concerned with near IR, which is the wavelengths that are closest to that of red light. Far IR is the longer, cooler wavelengths that can only be detected with specialized equipment for thermal imaging. CCDs aren’t capable of that.
As you can’t see the effects of IR, it’s difficult to tell what objects will look like upon capture. They can look very different than you’re used to. If you compare the images of the lily in Figure C and Figure D, you can see how different something familiar can look. In natural light, shown in Figure C, the lily has all the usual details, but under the IR in Figure D, the lily is transformed to a ghostly white. Foliage typically looks white under IR.

Figure C: This image was taken with visible light, which brings out the surface details of the flower.

Figure D: However, under IR, the lily loses its dark details.
Shooting Infrared Images
In standard photography, you’re capturing the image of objects reflecting light from a source. It’s just the same with infrared photography, except that your objects are reflecting IR from a source rather than light.
To take infrared images, you need several pieces of equipment. First, and most importantly, you need a camera that’s sensitive to IR. Then, you need an IR pass filter to block visible radiation and allow IR to hit the CCD. Finally, you need a light source to emit infrared radiance, and you also need a tripod. We’ll step you through the equipment necessary to get started.
Digital Sensitivity
CCDs are naturally sensitive to near IR. However, hot mirror filters are added to the camera to block it because IR can contaminate the colors when you’re shooting normal images. The better the quality of the hot mirror, the worse the camera will be at taking IR images because more IR is being blocked from reaching the CCD. This isn’t saying that the camera is bad. In fact, the opposite is true, as it stands to reason that a better quality hot mirror filter improves the camera’s abilities in standard light situations.
Test Your Camera
There’s a crude test that’s often recommended to determine if your camera is IR capable. Point a remote control at your camera lens and see if you can see the light in the LCD. If the beam records brightly, then the hot mirror filter on your camera isn’t blocking out all the IR and is capable of generating some sort of image. A good result should look something like the image on the right in Figure E. If the light only appears dim or doesn’t appear at all, then your camera probably isn’t suitable for IR.

Figure E: You can test your camera’s IR capabilities with a TV remote.
Choose Your Filter
There are a number of filters that you can use to shoot infrared. The choice you make will depend on your camera and how much you want to spend. Because you may be shooting through the hot mirror filter as well as the IR pass filter, you may not be able to use some of the high-grade filters that block out all visible light. Also, it may be difficult to find a filter to fit some of the non-standard sized lenses on a lot of digital cameras.
Filters vary quite a bit in price depending on the filter’s size and its light blocking abilities. To give you a rough idea of costs, a 58 mm IR pass filter will run you between $30 and $130. On the inexpensive end, you have the Hoya R72, which is a dark red filter that doesn’t block out all visible light. It does block quite a bit though. On the more expensive end, you’ll find the B+W 093, which costs about $100, and the Tiffen 87 that goes for around $80. See Table A for information on filters’ light blocking/IR pass abilities-not all filters are shown, as Heliopan alone makes 10 different IR pass filters.
The type of filter you use will also affect the final appearance of the image. Some filters will generate false colors when you’re shooting in color. The stronger filters like the Tiffen 87 will generate more image contrast than the Hoya R72, but your camera may not work well with it because it’s so dark. The Hoya R72 is a good first IR pass filter because it generally works and it’s not a huge investment. In Figure F, you can see a comparison of the same scene shown in Figure A. The difference is that Figure F was shot with the B+W 093 rather than the R72, which was used to shoot Figure A. Spend some time experimenting with the filters listed in Table A to see what your camera can handle.
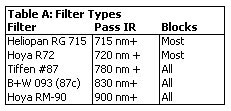

Figure F: Your filter choice affects the resulting contrast of your image.
Know Your Light Sources
Even though the sun emits mostly light and UV radiation, it’s a great source of IR as well. Depending on your filter/camera combination, you may find that bright days are better than overcast or vice versa. Infrared still comes through the clouds, so there’s no need to stay inside on a cloudy day. However, you’ll miss out on the cool dark skies that infrared typically generates from cloudy skies.
When you’re inside, any tungsten style lamps will work. Much of their radiance falls in the infrared range. Flash will also work but fluorescent lights hardly release any IR at all and therefore aren’t as useful.
Post Processing IR Images in Photoshop
Like most digital images, IR images typically require some amount of post processing to get them to look just like you want them to. Typical steps you need to take are converting your image to grayscale, adjusting contrast and burning in areas where you want increased detail. We’ll use the image in Figure G to take you through these steps in Photoshop 6. As you can see, the image is pretty weak, but after our tweaks it will look significantly different.

Figure G: Here’s an overexposed infrared shot that we’ll fix in Photoshop.
Channel Mixing
The best way to convert your IR image to gray-scale is with the Channel Mixer. Just desaturating your image or directly converting it to gray-scale won’t give you the best tonal results, especially if your image has a lot of false color.
To open the Channel Mixer, choose Image > Adjust > Channel Mixer to bring up the dialog box shown in Figure H. Since you’re making a black-and-white image, the first thing you need to do is select the Monochrome option in the lower-left corner of the dialog box. This makes your final image completely neutral.
Now, examine each of the color channels us-ing this technique-set the percentage of one channel to 100%, while the other two channels are set to 0%. After you’ve examined all three channels, select the darkest one to be your base image. Set this channel to 100% and then add or subtract percentages of the other channels until you achieve an image with a good tonal range. Keep in mind that a negative value inverts the channel before applying it to the output channel. Click OK once you’ve finished and then convert your image to grayscale by choosing Image > Adjust > Grayscale.

Figure H: The Channel Mixer is the best method for converting your image to grayscale. Merely changing mode removes precious image information during the conversion process.
Curve Control
Now that your image is in grayscale, you need to adjust its contrast. The quickest way to do this is with the Curves command. The best way to apply Curves is with an adjustment layer since it’s nondestructive and you can easily change it. To do so, click the New Adjustment Layer button (ICON) at the bottom of the Layers palette and choose Curves from the pop-up menu. First, use the black-and-white eyedropper tools to set the black-and-white point of your image. These choices should be made in the darkest and lightest portions of your image, respectively. Then, adjust the curve as necessary to get the best dynamic range possible. You can see our result in Figure I. It’s better, but it still needs some help.

Figure I: Use Photoshop’s Curves to establish a base contrast range.
Burn, Baby, Burn
As in the darkroom, burning and dodging in Photoshop works well to enhance areas of your image. Unfortunately, the Burn and Dodge tools won’t work on a separate layer so you’ll have to apply them directly to the image. This means you need to be careful and work in small areas before moving on to the next section. For either dodging or burning, it’s best to use a low exposure setting and a feathered brush. Exposures of 5% and less generally are the easiest to control.
Once you’ve burned in an area, press Ctrl-Z to reverse the effect. You can then press Ctrl-Z again to undo the undo. Toggle back and forth a bit to make sure you like what you did before continuing. As you can see, our final image in Figure J looks quite different from the original.

Figure J: A little burning can go a long way to enhance the effect of an IR image.
Broaden Your Spectrum
With digital cameras, you can experience the charm of infrared imaging without a lot of the hassle. If your camera can take infrared pictures, you can have a lot fun creating beautiful images, but be careful as you may find IR photography to be an addictive past time.
This story is taken from “Digital Photo Pro” (Element K Journals).
Creativepro.com readers can subscribe to Element K Journals at a discount. Click here to learn more.
This article was last modified on January 18, 2023
This article was first published on May 15, 2002
Commenting is easier and faster when you're logged in!

Recommended for you

How to Digitize a Film Archive with Adobe Lightroom or Adobe Camera Raw
Digitizing an archive of film images can be a time-consuming process. Instead of...

The Power of the Gradient Tools in Lightroom
Learn how to use gradients in Lightroom to add drama to a flat sky or brighten s...

Heavy Metal Madness: A Focus on Hocus Pocus
My favorite type of graphic discovery is one that comes out of nowhere, supplyin...