

Frans van der Geest sent us the idea for this tip, which he’s written up on his blog. But his blog is a little hard to follow if you don’t read Dutch! So here’s an English version, with a twist:
The new Live Caption feature of InDesign CS5 is a fantastic way to create automatic captions from image metadata, but it can be a bit of a hassle to set up. You can make using Live Captions much easier by storing them in InDesign Libraries or saving them as Snippets. Here’s how:
I’ve got several images where I’ve entered metadata into the Author and Description fields using Adobe Bridge, like so:

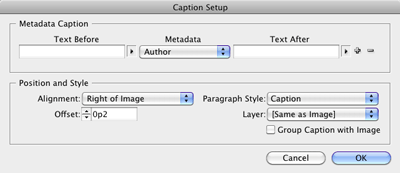
1. In InDesign use Object > Captions > Caption Setup to configure a caption:
2. Then apply the caption to any photo by choosing Object > Captions > Generate Live Caption.
3. Select the resulting Caption frame, and drag it into an InDesign Library, or drag it into the new MiniBridge panel to create a Snippet.
4. Repeat steps 1-3 to create another caption, this time using the Description metadata field, and drag the resulting Caption frame into an InDesign Library or create a Snippet.
Now, when you have another image that you want to add a caption to, just drag your caption Library item or Snippet onto the page. The text in the frame will display “<No intersecting link>”. But when you position the text frame so it touches your image (Smart Guides makes this easy), the Live Caption feature automatically updates the text in the caption frame. Magic!


You may notice that if you have a lengthy caption, and you use the Live Caption feature, that the caption doesn’t wrap, and you end up with something like this:

This happens because Live Captions use Text Variables technology, and Text Variables can’t wrap in InDesign. The workaround is to select the caption frame, and choose Object > Captions > Convert to Static Caption, and the text will then wrap properly. You will need to vertically resize the text frame to see the additional line of text.

This article was last modified on December 20, 2021
This article was first published on May 21, 2010
Commenting is easier and faster when you're logged in!

Recommended for you

InDesign Basics: Making a Photo Grid
Learn how to use two of InDesign's lesser-known tools to create a quick and easy...

File Naming Problems When Moving Mac to Windows
Bryan wrote: I work on a Mac and they work on a pc. I ran into a problem when I...
Automated Forms with Acrobat 8 and InDesign
One of the hottest new features in Acrobat 8 Professional is its Run Form Field...