

You’ve placed an image so it spans across a two-page spread, and your printer tells you to split it. That is, they want you to break the image into two — one graphic on each page. This isn’t hard to do, but it takes a bit of time, and if you had to do a lot of them it would get boring quickly. So I’m going to tell you three ways to do it, including a free script.
And also: I want to point out that in many (perhaps most) cases, you do not need to do this! Most printers handle this kind of imposition work for you. And if you export a PDF for them, InDesign splits the image for you when it makes the PDF. So the technique falls into the category of: Do it only if your printer insists.
The Manual, Slow Way
Here’s the procedure to change images manually:
- Select the graphic frame, copy it to the clipboard, and then choose Edit > Paste in Place
- The duplicate is now selected, so drag one of the side handles over to the spine (where the two pages touch). If Snap to Guides is enabled, the frame edge should snap to the side of the page.
- Select the original graphic frame, then drag the opposite side handle over to the spine.
In some cases, you’ll also want to move the images inside the frames toward the outside edge (away from the gutter). This adjusts for the little bit of the image that gets lost where the two pages come together. The result is that a bit of the image gets duplicated in the middle. To make this adjustment, double-click on the image (to select the image inside the frame) and move it toward the outside of the spread… for example, on the left-hand page, you might press the left arrow key on the keyboard 6 times (6 points is about 2 mm).
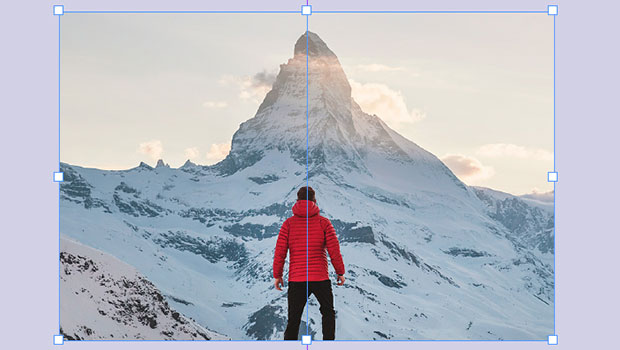
So, here’s the image before (one graphic frame):

And here is it after (two frames; just the one on the left is selected):

Use the Gap Tool
Anne-Marie Concepción taught me a great method that uses the MakeGrid script that ships with InDesign:
First step: Select the image and run the MakeGrid script (which you can find inside the Scripts panel > Applications > Samples). Set it to 2 columns, 1 rows, and zero space gap:

Second step: If the image was centered on the spread, then you’re done. But if the graphic frame was off-center, then: Use the Gap tool to move where the two frame touch.
This is actually kind of tricky because you have to put the Gap tool cursor exactly over the edge where the two frame meet, so you only have a tolerance of about one pixel. But when you get it, it will look like this:
Then, drag the edge to the spine (where the two pages meet).
Using the Script
OK, so let’s say you need to do 20 of these. At that point, doing it manually is too annoying and you want to find a script to automate it. Fortunately, a guy name Chris Bennett had this problem a few years ago and paid Martinho da Gloria (the brilliant mind behind the company Automatication) to write a script to do it. Even more fortunately, Chris has agreed to offer his script to the public for free!
You can download the script here.
Since the script was written for an older version of InDesign, you must put it inside a folder called Version 14 scripts.
![]()
This is a “startup script” which means that, unlike most scripts, you have to restart InDesign, and the script activates when you “start up” the application. But the benefit of this is that the script becomes a feature in the normal InDesign user interface. In this case, it shows up in the Table menu, listed as “Split Frame”:

Why is it in the Table menu? (Makes no sense, because this has nothing to do with tables.) I don’t know, but that’s okay; it works!
To run it, select the graphic frame and select Table > Split Frame. If you had to do this a lot, you could apply a keyboard shortcut to it. The shortcut lives inside the Scripts product area:

So now you know!
A huge thanks to Chris Bennett for sharing this script with the InDesign community!
This article was last modified on November 29, 2023
This article was first published on June 3, 2019
Commenting is easier and faster when you're logged in!

Recommended for you

InDesigner: BUST Magazine
Diane Burns shares the story of the first feminist-oriented lifestyle magazine.

InDesign How-to Video: How to Create a Gravity Text Effect
In this week’s InDesignSecrets video, David Blatner reveals how to add a gravity...

InQuestion: Making Colors Match Between Photoshop and InDesign
Q. My company is printing promotional brochures for an upcoming trade show. Beca...