
Snap Art 2 Makes Photoshop Art Easier, More Realistic

Score: 9/10
Pros:
Faster filters with more realistic default settings than in version 1; new focus regions work well for reducing filter effects. Factory Settings category folders make organization much easier.
Cons:
CMYK is still not supported. New focus regions don’t apply a true mask and don’t apply multiple filter settings to an image.
Version 1 of Alien Skin’s Snap Art, a Photoshop plug-in that applies realistic art effects to photographs, was already mature despite being a new product. However, there were some things to be improved upon, such as lack of CMYK support, slow rendering speed, and unrealistic presets. The new version 2 of Snap Art ($199/$99 upgrade) has improved some of these things, and Alien Skin has thrown in some other enhancements, too.
While Photoshop does have many artistic filters in the Filter > Artistic and Filter > Sketch menus, some aren’t realistic enough for artists and illustrators. Some artists turn to Corel Painter, an application that’s very good at capturing the look and feel of paint but also complex. Snap Art’s filters are designed to improve the realism of Photoshop’s default artistic filters without the complexity of a separate application like Painter (Figure 1).
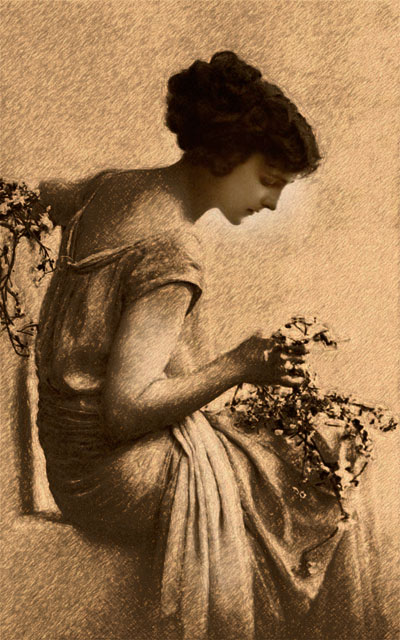
Figure 1: Snap Art and Photoshop work very well together. Here I used Snap Art 2’s Pencil Sketch filter and a Photoshop layer mask to selectively apply the filter.
Familiar to Current Users
The Snap Art 2 interface (Figure 2) is similar to its predecessor: The settings haven’t changed much (except the Photorealism slider the filters now share), and the filters are still the same:
• Color Pencil
• Comics
• Impasto
• Oil Paint
• Pastel
• Pen and Ink
• Pencil Sketch
• Pointillism
• Stylize
• Watercolor
Alien Skin still ships Snap Art with presets for all filters, though there have been some changes to these both good and bad. And CMYK is still not supported.
Figure 2: The user interface hasn’t changed much since Snap Art 1, except some changes to view settings and the addition of focus region controls.

New in Snap Art 2: The Focus Region
Snap Art 2 boasts a variety of small improvements and one major addition: focus regions. These focus regions are basically selection ellipses applied to reduce the filter’s effects (Figure 3). They’re designed to retain detail in important areas, such as a portrait’s face. They work well for reducing filter effects but don’t apply a true mask: Color and canvas settings will still affect the image. To fully mask the filter, you should apply a layer mask in Photoshop. Fortunately, this is easy to do if you set Snap Art 2 to duplicate layers when applying filters; this is on by default and can be turned off in Snap Art 2’s preferences.
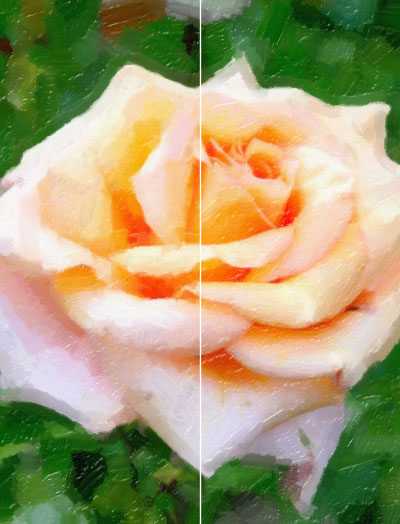
Figure 3: At left, the Oil Paint filter applied with no focus regions applied. At right, the same filter with a focus region applied to maintain detail in the center petals.
If you were hoping to use focus regions to apply multiple filter settings to an image, you’ll be disappointed. In one of my tests, I wanted to apply relatively flat color to the background with the Oil Paint filter and increase the painterly effect on the subject. Unfortunately, focus regions aren’t designed to do this: They only reduce filters, not increase or change settings for them. I might have been able to create the effect by placing multiple focus regions in the background, but that would have been unwieldy. I would love to see a rethinking of the focus region in Snap Art 3 that allows multiple settings within a single image.
Little Improvements Make a Big Difference
Many of Snap Art 2’s filters are faster and use more realistic factory default settings than in version 1. You can see the difference particularly in the Pencil Sketch and Comics filters (Figure 4).
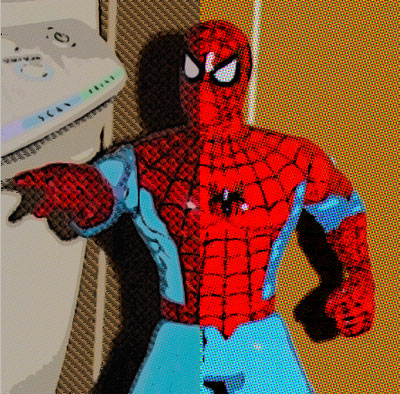
Figure 4: The Comics filter’s default settings show much improvement. Snap Art 1 (left) generates too much black but Snap Art 2 (right) captures the bright rosette patterns expected in comic book art.
The filter controls haven’t changed much with this version so you can recreate the Snap Art 1 results with a little tinkering, but having more realistic results upon launching Snap Art 2 makes it a better product (Figure 5).
Figure 5: I processed this fish with the Watercolor filter’s factory settings, which produced a beautiful watercolor effect.

Snap Art 2 handles settings differently, in ways both good and bad:
• The all-new settings are labeled more clearly than in the previous version.
• The Factory Settings pane supports category folders, making organization much easier. The previous Snap Art had only lists of settings. The settings that ship with Snap Art 2 are already organized in several categories, including Abstract, Landscape, Portrait, Vignette/Canvas and Favorites.
• As with Snap Art 1, you can save customized settings. However, the Manage button has been removed, so there’s no longer a clear way to import, export, e-mail, or rename presets. Instead, you must reach most of these functions by right-clicking any settings in the User Settings list. The import function seems to be the only function absent in Snap Art 2, making Snap Art 1 presets inaccessible.
The Snap Art Photoshop Panel
Photoshop CS4 supports third-party panels created with the Configurator plug-in. It’s a new technology and still not widely used, but it has great potential to change the way user interfaces are produced. Alien Skin is giving away a Snap Art 2 panel. While it’s easy to install it also seems to be just another way to access what’s already found in the Filter > Snap Art 2 menu.
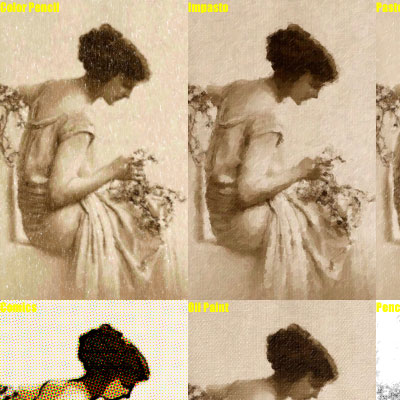
The best panels allow quick and easy access to functions that normally require more steps to activate. If the Snap Art 2 panel let you select a filter and preset and process images immediately, I’d call it a breakthrough. However, the panel only lets you click a filter button, which takes you to the Snap Art 2 interface. This is the same as selecting the filter in the Filter menu. However, the panel also contains a link to Snap Art tutorials and a button to generate a gallery of all Snap Art 2 filters based on an open image (Figure 6). I hope the panel gains more functionality in a future version.
Figure 6: The Snap Art 2 panel can generate a filter gallery with one click.
Should You Buy It?
Snap Art 2 is a good upgrade. The most impressive changes are under the hood; for example, the more realistic filter effects. The focus regions are helpful as well but have room for improvement, as does the Snap Art 2 panel. I encourage all Snap Art 2 users running CS4 to download and install the panel, if only to try it.
Corel Painter users who use that application for transforming photos into art should strongly consider Snap Art 2: it’s much less complex and makes beautiful results. However, handling tablet input and recreating the painting process is Painter’s strength, and Snap Art 2 is no substitute for that kind of work. Snap Art’s strength is its faithful recreation of artistic effects, without the need for brushstrokes.
This article was last modified on October 7, 2009
This article was first published on October 7, 2009
Commenting is easier and faster when you're logged in!

Recommended for you

Heavy Metal Madness: The Art of Labor Day, or is it Leisure Day?
I enjoy a three-day weekend as much as anybody, but Labor Day has always struck...
Photoshop Fun: Dolphin in a Glass
You might think it’s hard enough to swallow a whole dolphin. But the real...

How to Prepare Screen Captures for Print
Excerpted from Real World Print Production with Adobe Creative Cloud by Cla...