Set a Swatch to Overprint
When you fill an object or text with the default [Black] swatch at 100% opacity, it overprints any color behind it. Objects using any other swatch or any other percentage of [Black] automatically knock out (create a hole in) background colors when the file is output to color separations for printing.
To force objects that would normally knock out to overprint, you have to select the object and use the checkboxes in the Attributes panel (Window > Attributes):

That’s how I forced the second green circle below to overprint the 10% magenta background — I turned on the Overprint Fill checkbox:

As seen with View > Overprint Preview enabled

Magenta plate only, in Separations Preview
(from Window > Output menu)
If this were the only instance of overprinting that I wanted, it’d be simple. But what if I wanted everything using that green color to overprint, wherever it’s used in my layout? There’s no Overprint checkbox in Swatch options that I can enable.
At first glance, the only solution is to manually select every instance and use the Attributes panel to turn on overprinting. At second glance, remember there are Overprint checkboxes elsewhere in InDesign. You can use them to to your advantage.
Use Styles
When you specify a fill or stroke color within a Paragraph, Character, Table, Cell or Object style; you can specify overprinting instructions at the same time:
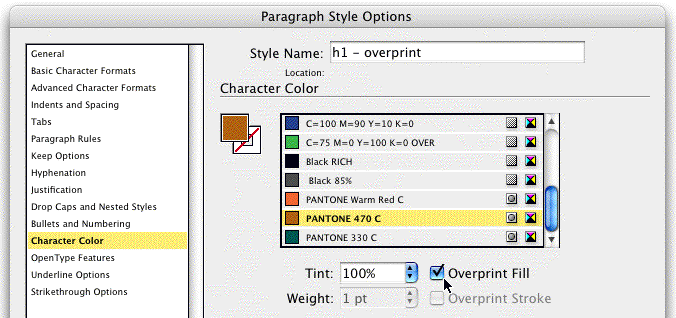

Applying that style to a selection automatically sets its fill/stroke to overprint, without having to open the Attributes panel. You can even create a Character style that does nothing other than set the text selection’s fill/stroke to overprint, without changing the color:
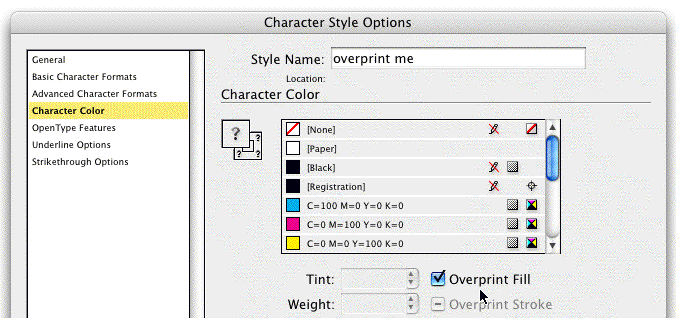
Thus if you’re disciplined about things, and always use a style to specify color (at least the overprinting one) rather than the Swatches panel, you can be assured your color will always overprint, where ever it’s used.
Use Find/Change
What if you have a completed layout, one where you didn’t use the above styles technique? Or what if you already have some styles applied to elements using the color, and don’t want to change their formatting by applying your “overprinting styles”? Find/Change (in the Edit menu) can help.
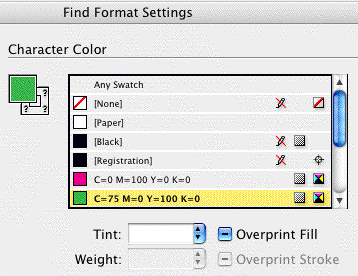
For colored text, go to the Text tab and leave the Find/Change fields blank. Click the More Options button to reveal the Find/Change Format area. In Find Format, select Character Color and choose the fill color you need to overprint:
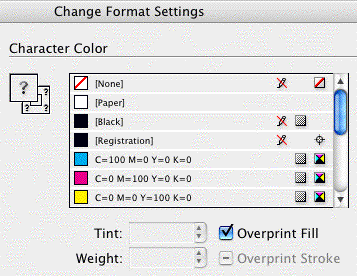
Then in Change Format, turn on the Overprint checkbox in the same Character Color section:
Click OK to return to the main Find/Change dialog box. The format area should look like this:

Run the Find/Change — with the Change All button, or via the Change/Find button if only some of the instances should overprint — and zip zap, text filled with that color will now overprint any elements beneath it.
For InDesign lines and frames that are filled or stroked with the color, you’ll need to use the Object panel in Find/Change, found only in CS3. Go there, and follow the same instructions as above … specify the color in Find Format, and turn on Overprint in Change Format:
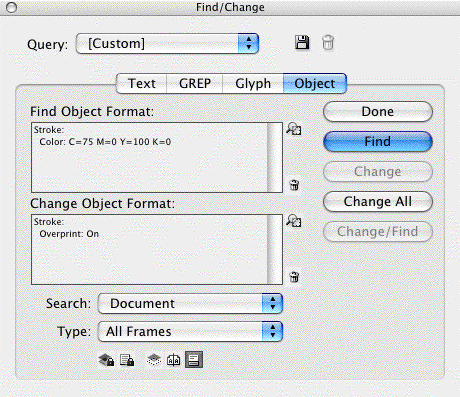
You may need to run this twice, once for elements filled with the color, and again for objects stroked with the color.
A Couple Tips
If, while you’re constructing the layout, you know that some instances of a given swatch should overprint, and others should behave normally (knock out), make a copy of the swatch. Add “Overprint” to the name of the copy, and use that swatch when you apply it to something that should overprint, or in the style you create for overprinting elements. And if you need to do a Find/Change to turn on overprinting for objects colored from the Swatches panel, you can specify the Overprint version of the color:
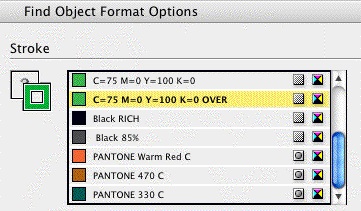
After running the Find/Change, elements colored with the normal version of the swatch will still knock out.
(Note that if you use the dupe swatches trick with a spot color swatch, you have to use the Ink Manager to alias the overprint version to the normal version before you output separations or create a press-ready file. Otherwise you’ll get two spot color plates of the same ink.)
Finally, remember that you can turn off the InDesign Preferences setting that makes 100% [Black] always overprint, if you want:

It’s probably not a good idea, though, since it means that any black text (even 6 pt. “the fine print” copy) knocks out of the background. You might not mind, but the pressmen trying to perfectly register the job on press will!
Instead, create a new swatch that’s colored 100% Black and name it something like “My Black” or “Knockout Black.” Since it’s not the official [Black] color, the preference setting doesn’t apply, and it will always knockout of the background color. Use that color for large headlines or fills of black in your design that overlap other colored elements. (Or create a Rich Black, like 40C 20M 20Y 100K, which often looks much better than plain 100K when used in large areas.)


Thanks for this very, very, very practicle tip! I had forgotten about the overprint fill option in find/change.
In regards to using the 100% “myBlack” colour for knockout Black: Talk to your printer. As I’ve encountered a number of printers who enable a setting on their RIPs that automatically sets all 100% to overprint.
Another work-around would use 99.9% Black. You can create a Tint Swatch that is 99.9% Black if you use this a lot. (it will show up as 99& in the swatche panel, but will be 99.9%).
Cari, thanks for the heads-up! I can definitely see where a printer might have that option turned on, thinking they’re helping.
One more permutation of this tip. As far as I can tell, selecting an image frame and setting its stroke and fill to overprint (via the Attributes panel) doesn’t make the frame’s contents — the actual image — overprint. Just the frame’s stroke, and any fill that’s visible. To make the image itself overprint, you need to select it with the Direct Selection tool and change the Blend Mode from Normal to Multiply, in the Effects panel.
Thanks! I have two different layers of text, both with a special Black of 85%. Default should be knocking these out, and I didn´t use any attributes/styles or swatches setting for overprint. One layer is overprinted and the other is knocked out….WHY?
Hi, work in a printers and the blacks in my indesign 3 do not overprint.
I have tried manually overprinting my blacks too, still no joy, bearing in mind i export these files to eps.
Indesign cs2 and 1 work perfectly in this area. Anyone else get the same?
I received a pdf from a customer. There was white type on top of a greyscale photo that was on top of a blue box. The white type knocked out of the photo, but overprinted the blue box beneath the photo. What caused that?
A late thanks for this tip, Anne-Marie! It will definitely benefit my current publication.
Andre, you mention that you’re using a “special Black.” You should note that no spot colors–even those defined as 100% black–will overprint unless you explicitly set them to overprint using any of the methods shown on this tip.
Cari had the best advice: “Talk to your printer!” Most modern rips have more intelligent trapping options than just overprinting anything that is 100% black. For instance, they may have settings to automatically overprint black text and strokes up to a certain size, and beyond that, use the regular trapping settings (usually to choke into a black solid).
It is easier for them to turn these options on as needed, and not always so easy to undo universal overprint-all-100%-black setting, once it is in a PDF file.
I would actually say to err on the side of leaving this option off unless they specifically tell you that is how they want it. But, always talk to your printer first.
excellent advice. particularly useful when I wanted my silver to overprint when it was going to be foil blocked and not litho-printed.
Google +1
Great post. Tremendous, enormous monster help! Thanks for helping understand and fix some overprint problems.
when i use indesign my paragaph style color is black but background color is light grey.. how to change the setting,.,..
@Arulnesan: I suggest asking your question on our forums (click forums above; you’ll need to sign in as a free or paid member to post).
thanks brother…
Impressive article regarding overprinting. Thank you helped me a lot!
Please can you help, I have am using a 5th colour (spot black), I don’t want it to knock out from the cmyk layers below. It works EXCEPT if I make the text 0% of the black spot (used on a dark background).
PLEASE HELP