
Secrets of Lightroom for Mobile
Learn about the many hidden but powerful features in the phone and tablet versions of Adobe Lightroom.

This article appears in Issue 13 of CreativePro Magazine.
You’ve just come from an amazing photo shoot, buzzing with anticipation and impatience to see how your photos turned out. But what if you won’t be in front of your computer for several hours, long after that glow wanes?
If you’ve tucked your smartphone or an iPad into your camera bag, you can import the images and get started right away. The mobile versions of Lightroom are more than capable for editing and reviewing your shots—they are filled with shortcuts and hidden features that let you work with photos while the memories are still fresh.
And because images and edits sync automatically to Creative Cloud, they’ll be waiting for you in Lightroom Classic or Lightroom desktop on the computer when you get back.
What follows is my list of favorite little-known features of the Lightroom apps for iOS, iPadOS, and Android.
Temporarily Hide Edits
In the desktop versions of Lightroom, you can temporarily hide individual edits. For example, you might want to see your image without a vignette you applied, but still view it with the exposure adjustments visible.
The desktop apps include an easy switch or button to enable or disable each of the adjustment categories, such as Effects. On the mobile apps, where interface space is at a premium, touch and hold an edit category to hide just that category’s edits (Figure 1).

Figure 1. Holding the Effects panel title (top) temporarily hides the vignette that’s been applied (bottom).
Move the Editing Sidebar on iPad
If you’re left-handed, the latest version of Lightroom for iPad lets you move the editing sidebar to the left side of the screen instead of anchoring it on the right (Figure 2).
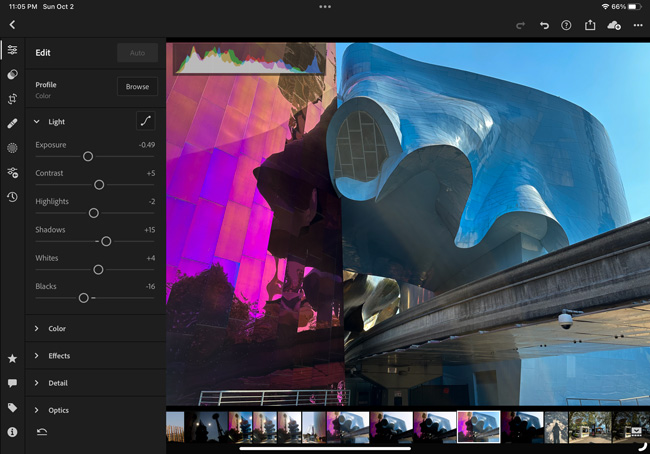
Figure 2. You can now move the editing sidebar to the left side.
Tap the More Options icon (…) and choose App Settings, then choose Input. At the bottom of the list, turn on the Left-handed editing option.
Resize Thumbnails and Toggle Overlays (iOS and iPadOS)
The Library’s Grid view is optimized to display your photos with few distractions. In the iOS and iPadOS versions of Lightroom for mobile, you can adjust the size of the thumbnails and choose informative overlays, such as the star ratings or image info, using gestures that aren’t immediately apparent.
Pinch inward with two fingers to make the thumbnails smaller and view more of them at a time (Figure 3). Conversely, pinch outward to view larger thumbnails. You can also select a size by tapping the More Options icon, choosing View Options, and then picking Small, Normal, or Large Thumbnails. (But just relaying those steps is so much more work than pinching with two fingers.)
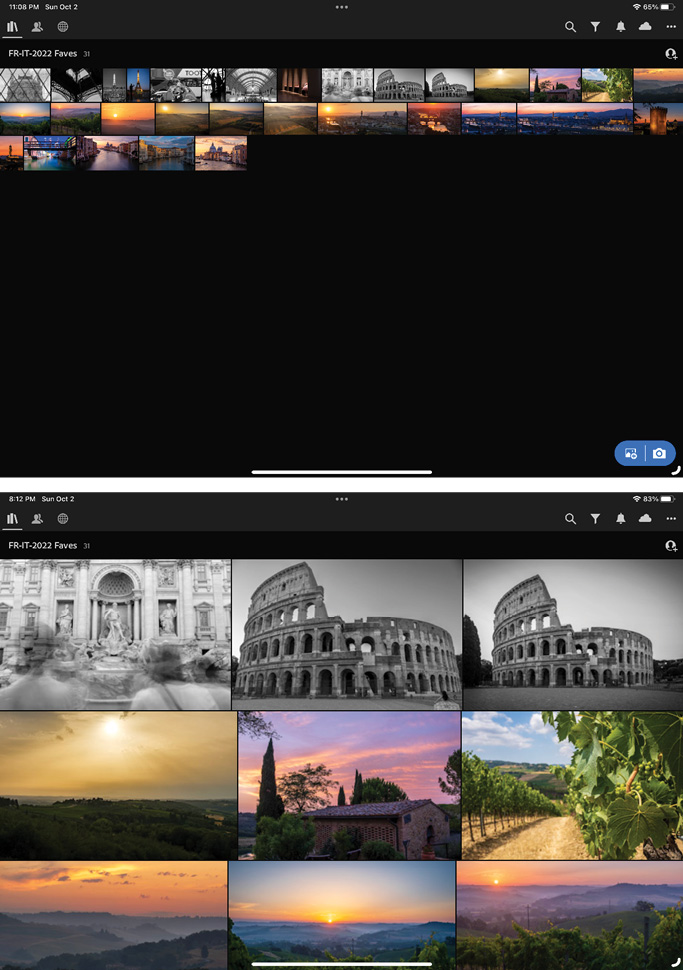
Figure 3. Pinch inward with two fingers to change the thumbnail size from Normal (top) to Small (bottom); pinch outward to enlarge the thumbnails.
For the overlays, tap once on the screen with two fingers. That cycles through the information (Figure 4): file types, flags and ratings, photo info (the time, date, dimensions, and file names), EXIF metadata (aperture, shutter speed, and ISO), comments and likes made by others sharing your album, and online collaborators. You’ll also see the option to hide all overlays.
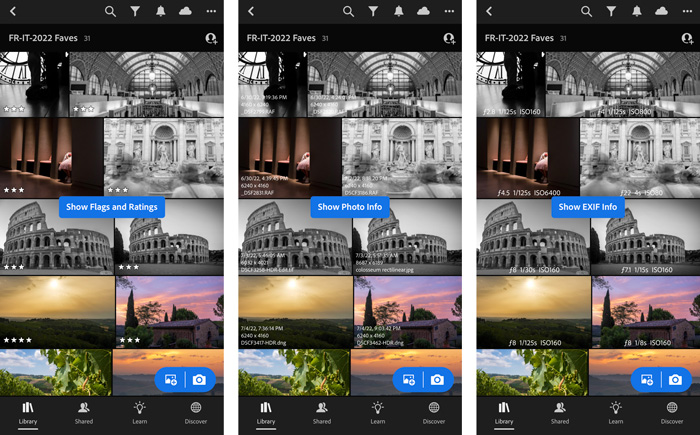
Figure 4. Tap with two fingers to switch between the informational overlay options.
Edit Using Apple Pencil
If you own an iPad or iPad Pro that supports the Apple Pencil, Lightroom for mobile accepts stylus input.
Working with a stylus is great for painting specific areas of a mask, for using the Heal tool to remove items that are irregularly shaped, or for some precise dodging and burning. I sometimes use Lightroom on my iPad Pro to create masks even while I’m sitting at my desk because I get better results than using the mouse on the computer.
Quickly Rate and Cull Images
One of my favorite hidden features is the ability to quickly assign star ratings and flags (Figure 5). The mobile Lightroom apps incorporate a clever method, one that lets you speed through your photos as you review images using both hands.
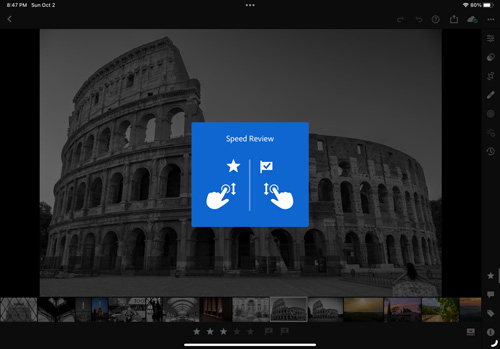
Figure 5. Quickly rate or flag your images by swiping on the left or right portions of the screen.
On the phone apps, use the Mode menu at the top of the screen to switch into Review mode. On the iPad app, tap an image to view just it and then tap the Review button (the star) in the side panel.
Next, drag a finger up or down on the left side of the screen to set a star rating. Drag up or down on the right side of the screen to choose a flag (picked, unflagged, or rejected). Then swipe side to side to go to the next image, or tap one in the Filmstrip if it’s visible.
Using this technique, you’d be surprised how swiftly you can review your photos and set them up for later; for me, anything I rate as two stars is worth editing, and anything I flag as rejected can be deleted later in one operation.
Reveal Your Best Photos
Wouldn’t it be nice to have some help identifying your best images? Using Adobe Sensei artificial intelligence technologies in the cloud, the mobile apps pick out what are likely the good shots in an album.
Start by selecting an album containing fewer than 2,000 photos. Then select the More Options icon at the top-right corner of the screen and choose the Choose Best Photos option.
After a short wait while the album is analyzed, Lightroom splits the images into two categories: Chosen and Other. Drag the Quality Threshold slider to be more or less choosy. A higher value picks fewer good photos (Figure 6).

Figure 6. Let Lightroom take a first shot at picking your quality photos.
Lightroom uses criteria such as your own ratings, the presence of people you’ve identified elsewhere, and characteristics such as whether the images are in focus. It’s not entirely clear why the algorithm would rank one photo above another. But the value to you is seeing which shots are more likely to be of higher quality.
Tap the More Options icon to take action on the chosen photos. You can create a separate album, flag them as you pick them, or export them. You can also flag the other photos as rejected or remove them from the album if you agree with Lightroom’s choices.
Store Images for Offline Editing
One consequence of the Lightroom mobile apps is that they run on devices that typically have limited storage. To avoid overloading a phone or tablet with gigabytes of image files, Lightroom does a couple of things.
First, it stores small previews so you can view thumbnails in the Library, fetching the full previews from the cloud as needed when you, say, open an album. You can test this in action by putting the device into Airplane mode, which turns off the internet connection, then viewing an older album (Figure 7).

Figure 7. In Airplane mode, the previews for the images at right are unavailable.
Second, when you tap an image to view or edit it, the app downloads a Smart Preview, which is a reduced-resolution version that takes up far less space than the original.
Most of the time, grabbing images from the cloud is so speedy and seamless with decent internet access that you won’t notice Lightroom doing so in the background. If you know in advance that you’ll be out of range, you can force the app to download these images for offline use.
Pick an existing album (or create a new one), and tap the More Options icon to the right of the album name. Then, turn on the Store Locally option (Figure 8). Lightroom will tell you how much space will be needed; tap the Download button to continue.

Figure 8. Turn on Store Locally to download the images in an album to the device.
A blue icon will appear on the album preview to indicate that the images are stored locally.
Edit Full-Resolution Originals
Sometimes, you want to work on an original full-resolution file, like when you hand off an image to Photoshop for iPad (which I covered in my article, “Using Lightroom and Photoshop Together on the iPad,” in CreativePro Magazine, Issue #10). There are two ways to ensure that you’re working with a full-size image and not a reduced-size Smart Preview.
With a single image open, tap the Sync icon (a cloud on iOS and iPadOS; a checkmark in a circle in Android). You’ll see the formats for Local and Cloud Backup. If the device contains the Smart Preview, tap the Get This Original button to download the original (Figure 9).

Figure 9. The local copy of this photo is stored as a Smart Preview, but you can download the original raw file.
Note that the Sync icon is the only one that tells the truth: If you check the Info panel, it will tell you the format and dimensions of the original image, even if a Smart Preview is stored on the device.
The other option is to set Lightroom to always download originals. Go to the App Settings, and under Cloud Storage & Sync, turn off the Only Download Smart Previews option. If you do so, of course, you will use more storage on your device.
Display Photos as a Slideshow
How many times have you told a story and wanted to share photos with someone? A mobile device makes that easy—just hand it over!—but no one else wants to wade through your entire Library or figure out the Lightroom interface if they’ve never used it before.
Instead, tap the More Options icon and choose Start Slideshow. The photos appear in full-screen mode and automatically advance after a couple of seconds (Figure 10).
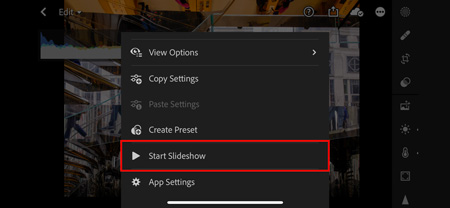
Figure 10. Start an impromptu slideshow from any photo.
You can control the transition between shots and the amount of time each image appears by tapping the More Options icon that shows up during the slideshow (Figure 11). (You may need to tap the screen once to make the controls visible.) Choose among a Cross Fade, Wipe, or Flip effect, or choose No Transition.

Figure 11. Choose the transition and the time each image appears in a slideshow.
Poking Around the Periphery
These are only a few of the many hidden features in the Lightroom mobile apps. The best part is discovering them for yourself, either by paying attention to the orientation animations that appear when you launch it for the first time or digging through the settings (such as the obscure-but-useful ability in the iPhone and iPad versions to show touches, which is great for recording demos).
This article from CreativePro Magazine is for members only. To continue reading, please log in above, or sign up for a membership today! Thanks for supporting CreativePro!
Commenting is easier and faster when you're logged in!

Recommended for you

CreativePro Magazine Issue 10 Now Available
New articles on advanced photo techniques, Lightroom and Photoshop on the iPad,...

A Film Technique for Your Digital Photography
Before Picture Elements (“pixels” for short) were a gleam in some IB...

Adobe Lightroom Mobile Comes to Android. Sort Of.
What was that loud rumbling noise I heard last week? That was the collective...