
Scripts from the Crypts
Mike Rankin digs deep into the InDesignSecrets archives to find 20 scripts that are scary good.


This article appears in Issue 138 of InDesign Magazine.
If you’ve ever seen any of the old Universal horror movies, you know that digging around in dusty old crypts usually leads to some very bad things. Our heroes go bravely in search of knowledge and treasure but end up bringing home only a horrible curse. But trust me, this time it’s different. This time, we’re not desecrating a pharaoh’s tomb or nosing around in the cellar of a certain Transylvanian count. We’re going to explore the deepest, darkest corners of the InDesignSecrets archives. And with over 3,500 posts and 8,000 forum discussions, there are many dark corners to thrust our torches into and see what comes to light. So put away the garlic and holy water and follow me as we bravely go in search of 20 great scripts from the crypts!
Let’s make this frighteningly easy
To save you the hassle of downloading and installing these scripts one by one I’ve compiled them all into a ZIP archive that you can grab here. Need help installing them? Read this post.
Remove Underlines
If you’ve ever had to apply underlining to a bunch of text you might have noticed the rather annoying way that InDesign applies the underlining to spaces at the end of each line. It’s bad enough when the text is left-aligned, but when it’s centered it can look downright goofy (Figure 1).

Figure 1. Before and after using the Remove Underlines script
The script works by creating a No Underline character style and applying it to the spaces at the end of each line. It will leave other end characters, including soft hyphens, untouched.
What happens when the text is edited and the No Underline style is applied to spaces within the paragraph? In that case, you can do the following:
- Edit the No Underline style, and turn underlining on.
- Delete the No Underline style, and choose Preserve Formatting.
- Re-run the script.
Move Pasteboard Items to the Current Spread
For some jobs you might have a bunch of objects that you need to place throughout a document. One way that some folks do this is to stash said objects on the pasteboard, and then move them down to each successive spread when it’s time to work on that one. Sure, this routine works, but you gotta admit that selecting, cutting, moving, and pasting can grow awfully tiresome—especially if there are lots of little bits and pieces you have to keep moving. So what about a script that moves everything on the pasteboard to the current spread? Yes, please!
Note that the script will only move objects that are entirely on the pasteboard. Items that touch the page edge will be moved, but any that overlap the page at all will be left in place.
See Issue 95 for Sandee Cohen’s collection of pasteboard pointers.
Convert All Swatches to Process
I’m tempted to call this one the Lady Macbeth script, because it enables you to say, “Out, damned spot!” and rid your files of spot colors by converting them to process CMYK.
While the script will convert RGB swatches too, note that it works only on swatches that are unused or applied to objects in your layout. So like Lady Macbeth you may see spots that stubbornly refuse to go away—when you have placed graphics that use those spot colors.
Bonus tip: To leave your swatches unchanged and make sure there are no spot colors whatsoever in the files you output, open the Ink Manager (either from the Swatches panel menu or in the Export PDF dialog box) and turn on All Spots to Process.
Add or Multiply Values in Table Cells
At the risk of stating the obvious, InDesign is not Excel. By itself, it can’t use formulas or perform any kind of calculations on data in tables. If you need that sort of thing, you could look into a commercial solution like Smart Styles by Woodwing or Active Tables by DTP Tools. But if your needs are simpler, these scripts may do the trick. One will add all values in selected table cells. The other will multiply those values. Both scripts handily ignore any currency symbols.
When using either script, you need to extend your selection to include an empty cell where the sum or product will go. Otherwise, the scripts will ask you if it’s okay to overwrite the contents of the last selected cell. You can run the scripts on fully or partially selected rows or columns of data (Figure 2).
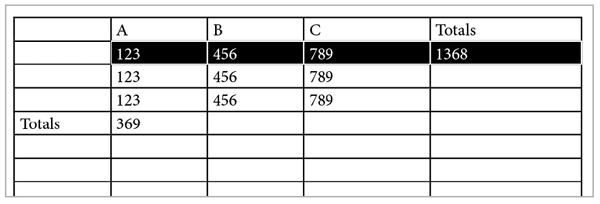
Figure 2. Need to add or multiply data in tables? Put away the calculator and let scripts do the work for you.
Both scripts have one notable limitation in that they can’t handle negative numbers. More specifically, they ignore any minus signs and treat all numbers as positive.
See Issue 116 for a great collection of Excel tips for InDesign users.
Apply an Object Style to Graphic Cells
Good news! The client loves the catalog layout you designed, with all their products neatly presented in a tabular format.
Bad news! They want a little tweak: “Could you add a rounded stroke around all the images. And please throw on a drop shadow while you’re there to make ’em all pop. That would be great.”
At this point you could put on another pot of coffee to keep yourself awake as you spend hours manually applying those settings to hundreds of graphic table cells—all the while praying that the client doesn’t call back to ask for yet another change. Or, you could run this script and be done in seconds.
To use the script, first open it in a plain text editor and replace the code yourObjectStyle with the name of the object style you want to apply to all graphic table cells in your document. Save the change, then run the script.
Change Case by Style
When it comes to paragraph styles, you can choose only case options like Small Caps, All Caps, or OpenType All Small Caps to format your text. There’s nowhere to apply the settings found in the Type > Change Case submenu, where you can choose Uppercase, Lowercase, Title Case, or Sentence Case. That’s where this script comes in. Just select a text frame or put your cursor in a story and run the script. You’ll get a dialog box where you can choose a paragraph style and the case you want to apply (Figure 3). Note that the case change will be applied to all text in the document formatted with the paragraph style you select, not just text in the frame you selected.
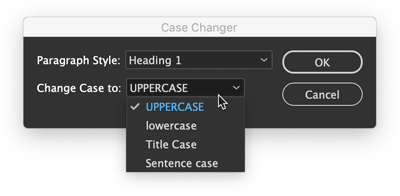
Figure 3. Need to fix the case of a bunch of titles in a hurry? Just pick the style and the case you want.
Sync Layers Across a Book
As someone who regularly works with InDesign book files, this one especially warms my heart. Books are, like so many InDesign features, half-great. So we get things like the ability to synchronize swatches and styles throughout a book, but not layers—which seems like a pretty darn important thing to keep in sync, wouldn’t you say? Fortunately, this script saves you drudgery of opening every file in a book and manually setting the visibility of the layers as you want them.
When you run the script it opens all book documents and presents you with a dialog box to choose which layers are shown and which are hidden throughout (Figure 4). You can also choose whether to leave all documents open or to save and close them.

Figure 4. Syncing the visibility of layers in book documents is a snap with this script.
See Issue 130 for a collection of 10 other great scripts for working with long documents.
Set Poetry
Here’s one for your next highbrow project—or a set of dirty limericks, I’m not here to judge. It makes setting poetry a snap by finding the longest line in a selected range of text, horizontally centering that line in the text frame, and making the rest of the lines flush left with the longest one (Figure 5). Bill Shakespeare never had it so good.

Figure 5. This script takes all the fussy alignment work out of setting poems.
Make a Font Table
The Glyphs panel is great for many reasons. You can use it to search or browse through your fonts to locate specific glyphs and insert them in text. You can even save a collection of glyphs in the panel for later reference or use. But wouldn’t it also be nice if you could save a collection of glyphs in an actual InDesign document as live text? That way you could view them in any size or color, see how they interact with other elements on the page, or share them with your colleagues. This script allows you to do just that.
When you run the script, you get a dialog box where you can choose a font and the range of glyphs you want (specified by beginning and ending Glyph IDs). When you click OK, the script creates a new document and puts all the glyphs in a text frame, set in a paragraph style called FontTableStyle (Figure 6).

Figure 6. Creating a sample of any set of glyphs (like these Greek letters) is easy with the Font Table script.
Now I hear you saying, “Mike, that’s all well and good, but I have no idea what Glyph IDs I want. I’m not that much of a font geek.” Well, neither am I. But I have no problem figuring out the IDs I want, because I just go to the Glyphs panel and pause my cursor over the first and last glyphs I want in my range. The Glyph ID numbers appear in a tooltip (Figure 7).
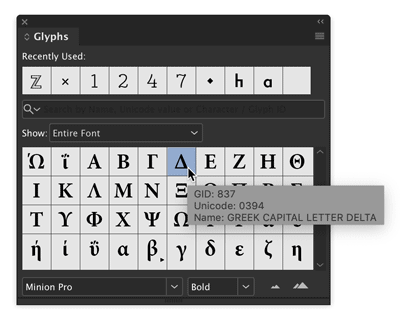
Figure 7. Pause the pointer over a glyph in the Glyphs panel to see its Glyph ID value.
Add a Place Command to the Context Menu
To me, right-clicking to use the context menu is like the missing link between using menu commands and keyboard shortcuts. It’s not quite as nerdy and efficient as a shortcut, but it’s definitely faster and slicker than going all the way up to the main menus at the top of the screen to find and execute a command. But some important commands never appear in the context menu. One of those commands that you probably use throughout the day is Place. For whatever reason, Place never founds its way into the context menu, but this script rectifies the situation (Figure 8).
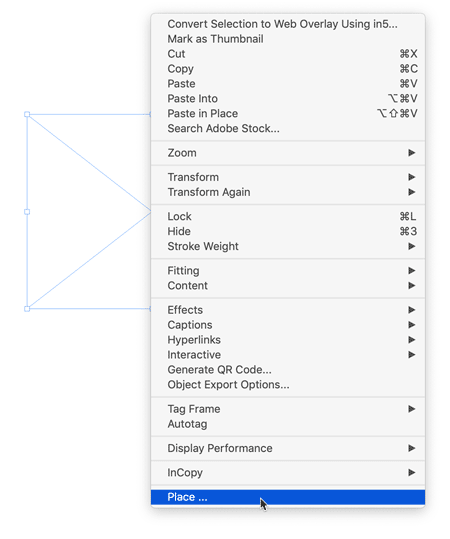
Figure 8. This script adds the Place command to the bottom of the context menu when you have a frame selected.
There are two important things to note with this script. First, you must have a frame selected for the Place command to appear in the context menu. Second, you need to run the script each time you restart InDesign—or put the script in the Startup Scripts folder so it runs automatically every time InDesign launches. You can find the Startup Scripts folder inside the Scripts folder in the InDesign application folder.
Sync Superscript and Subscript Preferences
Here’s another one that’s a gift to anyone working with InDesign books. This script allows you to synchronize superscript and subscript settings for all documents in a book. These settings are found in Advanced Type preferences, which seems kind of weird at first glance, but I guess it makes sense since you probably want them to be consistent throughout a given document, and not vary from style to style. But there is no excuse for not letting users sync document preferences across book files. C’mon, Adobe, show us some long-document love!
Curious about which preferences are document-specific? Here’s a handy guide to show you. This script won’t sync all document preferences, but at least your superscripts and subscripts will all look alike with no sweat.
If you would like a script that sets all InDesign preferences (one document at a time), check out Keith Gilbert’s Setup script, here.
Generate Color Swatch Variants
The Color Theme tool and Adobe Color Themes panel give you lots of options for sampling a color from your layout and creating variations of it. But this script offers something unique: the ability to mix colors using HSB, CMY, and RGB sliders at the same time. So, for example, you can create a new set of swatches where the color varies in both saturation and cyan (Figure 9).

Figure 9. Mixing up new color swatches with the Variations script
See Issue 106 for a deep dive into InDesign’s features for picking, organizing, and sharing colors.
Tidy Up Email Hyperlinks
File this script under the “better safe than sorry” category. It fixes an annoying little issue with email hyperlinks that InDesign creates, where the @ symbol is replaced with %40. So when you tell InDesign to make an email link to mi**@*********ro.com, what you actually get is a link to mike%40creativepro.com. You can see this even before you export the file in the tooltip that appears when you hover over the link in the Hyperlinks panel (Figure 10).

Figure 10. By itself, InDesign substitutes %40 for the @ symbol in email hyperlinks.
While it looks sloppy and might confuse some folks, the link will actually work in most cases. But when you lay your head on the pillow at night wouldn’t you rest easier knowing that your email hyperlinks look right and will work in all cases? I do, because I run this script on the files we use to make the very magazine you’re reading now. So if you end up using this script send me an email to let me know!
Count List Items
This script will count the number of paragraphs set in a certain paragraph style and make that number appear in your document. Why would you want to do such a thing? Well, one reason is to display the total number of items in a list or steps in a set of instructions.
Before you run the script you need to edit it so it has the names of the style you want it to count (the list style) and the style where you want the results to appear (the heading style). When you run the script, it inserts the number of list paragraphs it finds in a text string at the end the heading paragraph (Figure 11).

Figure 11. The script counts paragraphs in the list and puts the number at the end of the heading paragraph. The different formatting is from a nested style, not the script.
For advice on making great-looking lists, see Nigel French’s article in Issue 55.
Paste on Multiple Pages
Here’s a script you can use to convince your co-workers you have InDesign super powers. After all, it’s not possible for a mere mortal to simply select one or more items with the Selection tool and then paste that selection onto any number of pages in the document faster than a speeding bullet, right? That would have to be the work of a “Super.” Right, Clark. Just be sure to double-click the script when no one’s looking; your secret is safe with Lois and me.
Sync Layers in Placed Photoshop Images
InDesign has allowed you alter the visibility of layers in placed Photoshop files since CS2, via the Object Layer Options command in the Object menu. But if you’ve placed large number of Photoshop files, it can be a pain to change which layers are visible in all of them.
But with this script the job couldn’t be much easier. When you run it you get a dialog box with a list of image layer names. Just use the checkboxes to set the visibility the way you want and click OK. Note that there is a tiny bit of prep work you have to do before running the script. You need to edit the line of code that lists the layer names in your image files (Figure 12).

Figure 12. The script gives an easy way to set the visibility of layers in placed Photoshop images, once you tell it the layer names.
Update all TOCs at Once
If I had to vote for my favorite long document feature in InDesign, it would definitely be tables of contents. They’re incredibly useful for building not only TOCs but things like glossaries, image credits, and so on. So it’s a great thing that you can build as many TOCs as you like into one InDesign document. What’s less great is how you have to update each one of those TOCs individually. But this script does the trick, so you have time to think up even more uses for TOCs in your documents. Or, y’know, just watch a video of a panda eating bamboo.
Apply Master Pages Based on Styles
There are a few different solutions for making InDesign apply a certain master page whenever it finds text on a document page formatted with a particular style. ID-Extras’ Mastermatic ($57) is probably the most robust, because you can set it to work automatically, so that as text reflows the applied master pages are always correct. It also supports applying master pages based on the presence of object styles and gives you the ability to define multiple style-master page pairs. So cool!
But if you’re in the market for a simpler solution (or your plug-in budget is $0), this script might suit you. Unlike Mastermatic, the script can associate only one paragraph style with one master page at a time. You will also need to re-run the script if text reflow causes the key paragraph style to move to different document pages.
To make the script work with your files, you need to edit the code so it includes the name of your desired paragraph style and master page (Figure 13).

Figure 13. Edit lines 6 and 9 in the script to make it work with your styles and master pages.
Shift Table Contents to a Different Cell
This pair of scripts moves the data in every table cell forward one cell (Shift Up.jsx) and back one cell (Shift Down.jsx). It would particularly useful if you’re creating calendars and need to start each month on a different day. Outside of that, I’m not really sure what it could be used for, but it’s so darn cool I had to include it.
Convert All Bullets and Numbering to Text
If you have a file with automatic bullets and/or numbering that you want to be absolutely sure never changes, you can convert those bullets and numbering to regular text. You can do this pretty easily at the paragraph level: Put your cursor in the paragraph, right-click, and choose Convert Bullets/Numbering to Text. You can also select all the text in a story and use the same command to convert all the lists in the story to live text. But there is a real gotcha waiting to, well, getcha: When a list is continued over multiple stories in unthreaded text frames, manually converting to live text screws up the numbering.
There are two ways that I know of to get around this problem. The first is to select the style for your numbered list in the Paragraph Styles panel, then go to the panel menu and choose Convert “(the style name)” Bullets/Numbering to Text. Or, if you want the ultimate solution, use this script to instantly convert all Bullets/Numbering to Text throughout your document. Note that the live bullets and numbering the script creates represent an override to the paragraphs styles you’ve used, so if you re-apply those styles you’ll have double bullets or numbers. Caveat converter.
Bonus: Give Yourself a Star
There’s nothing wrong with a one-trick pony, if the trick it does is a nifty one. That’s the case with this script, which, as its name suggests, just makes perfect stars. “Perfect” meaning, a 5-pointed star like you’d expect to see on the American flag (Figure 14). You can, of course, make the same thing with InDesign’s Polygon tools, by playing around with the values in the dialog box. But if you know exactly what you want already, why not just make it perfectly in about two seconds? So go ahead give give yourself a star for being so smart and efficient!

Figure 14. There’s no need to wish upon a star when you can just pick the location and size you want.
Exploring on Your Own
For the brave among you, there’s plenty more treasure waiting to be unearthed in the blog and forum posts of InDesignSecrets. Occasionally you’ll be disappointed by a link to an Adobe Forum post that has given up the ghost. Or you might hit a dead end where an ancient script won’t work in the latest version of InDesign, but most (shockingly) do. The only way to find out if a script will work for you is to try it.
In the forums, you may encounter scripts where the code is posted right in the discussion, instead of as a downloadable file. Don’t get spooked! This post has instructions for taking code out of a post and saving it as a working script. And this post has some advice on how to make small tweaks to get a broken script working again. So don’t be afraid to try out whatever you find. But be smart: Always save your documents before running a script and check them carefully afterwards, just in case there was something monstrous lurking in the code.
Fangs for reading!
Thanks to the scripters!
Of course this article wouldn’t exist without the folks who’ve shared their time and skills over the years to help a bunch of strangers in the comments and forum posts at InDesignSecrets. Their talent and generosity make them the real heroes of this story.
- Masood Ahmad
- Jeremy Bowman
- Martinho da Gloria
- Theunis De Jong (aka Jongware)
- Max Erickson
- Gabe Harbs
- Khalid Hussain
- Olav Kvern
- Kai Rübsamen
- Dave Saunders
- Kasyan Servetsky
- Ari Singer
Commenting is easier and faster when you're logged in!

Recommended for you


InDesign Magazine Issue 96: Type FX
We’re happy to announce that InDesign Magazine Issue 96 (April 2017) is now avai...

InQuestion: Relinking Files and Auto-Size Text Frames
Erica Gamet shares the best Q&A from the InDesignSecrets Facebook group.