Changing sizes… mixing scaling and sizing
This is a story about scaling and sizing objects? InDesign CS5 introduced the ability to resize and scale multiple selected objects using the selection tool and the shift or Cmd+shift (Mac)...

This is a story about scaling and sizing objects? InDesign CS5 introduced the ability to resize and scale multiple selected objects using the Selection tool and the Shift or Cmd+shift (Mac) or Ctrl+Shift (PC) keys.
Yes, you can also use just the Cmd (Mac) or Ctrl (PC) keys? but that wouldn’t retain aspect ratios ;)
Let’s take a quick look at how things work. Here’s a screenshot of the starting point.
Scaling multiple objects
To scale multiple selected objects proportionately, press the Cmd+Shift (Mac) or Ctrl+Shift (PC) keys, then drag one of the selection handles outward to scale up or inward to scale down.
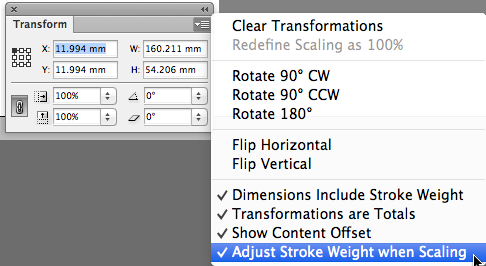
Scale the strokes or not?
You might notice that strokes you’ve applied to objects are also scaled when you user this keyboard shortcut.
To control whether or not strokes are scaled when scaling objects, you can enable or disable the Adjust Stroke Weight when Scaling setting from the Transform panel menu, or the Control panel menu.
Sizing multiple objects
To size multiple selected objects proportionately, press the Shift key, then drag one of the selection handles outward to size up or inward to size down.
“Sizing” proportionately sizes the text frames up without changing the font size. It won’t change the stroke weight of the graphic frames as could occur when scaling. The graphic frames are also sized proportionately? But but what’s happened to the images? Well? the content has stayed behind? Hmmm… not so good right?
So let’s look at a technique that mixes scaling and resizing. A technique that allows us to select multiple objects images and text frames, and resize the text frames without changing the font size whilst “scaling” the image content.
Mixing it up
I was asked in a recent class I taught whether you could scale the images up proportionately AND resize the text frames without changing the font size. We’re lucky that with CS5 another cool new feature was introduced in InDesign called Auto-Fit.
So here’s the trick to scaling your images AND resizing your text frames.
Enable the Auto-Fit option for all of the graphic frames in your selection first. You find this setting in the Control panel, as well is in the Frame Fitting Options (Object menu).
Next press the Shift key, then drag one of the selection handles outward to size up or inward to size down.
Yay? we’ve now managed to retain our stroke weights (remember we’re using the sizing shortcut? not the scaling one? the only reason the images ‘scale’ is because of the Auto-Fit setting being enabled). We’ve also managed to retain our text size, yet resize the frames proportionately at the same time ;-)
This article was last modified on December 21, 2021
This article was first published on May 23, 2012
Hi Cari,
I’m still on CS6 and found this very useful – thank you.
I found that holding [Shift]+[Ctrl] while dragging a corner of a frame also scaled the text wrap, and I haven’t found a way to turn this behaviour off. The only work-around seemed to be repeatedly selecting “Redefine scaling as 100%”, which wasn’t really ideal. So, many thanks!
I use InDesign CS5. Recently I must have done something to my settings. When creating a new document this is what happens. Ok my issue is, let’s say I have a body of text that is 12 pt font and I scale it to 125%. My text gets larger but the pt. size still says the font is 12 pt vs. showing me the new enlarge font size. Does anyone know how to fix this?
Hi Lindsey
I think in CS5 it’s Preferences > General > When Scaling…
There’s a choice of “Apply to content” or “Adjust scaling percentage”.
You may wish to change this option, if it is showing the old size followed by a new size in brackets, eg 12pt (12.35pt)
If I scale a text box with the first of these options selected, the new font size is shown and the scaled frame resets to 100%.
With the second option, the type shows up as “11pt (11.675pt)” – new size in brackets – and the text frame %age shows its new scale not 100%.
To apply type and scale transformations to text boxes you have already scaled, you can use “Redefine scaling as 100%” in the Transform panel menu.
Hope this helps
I like to click on a text box, and then click on in the Transform panel and use the arrow keys to make the box bigger or smaller. It’s a very important function for me. Is there any way to bypass the Transform panel and just use keyboard shortcuts? I’ve spent a lot of time looking and can’t find anything in the custom shortcuts that would work.
This was a GREAT feature in CS5, BUT how do you do this in CC 9.2?
This site saves my life time and time again :)
Thank you!
Jodie: absolutely! All you need to do is change the number in the Font Size box. The weight will not change from “Light” to “Bold” to “Black”.
Or do you mean something like its ‘line thickness’? No, you cannot. Font are not drawn with lines, they are *surfaces*. A lower case l is just a rectangle; and you cannot make a rectangle *taller* without making it *fatter* as well.
Hi there, can you increase font size without increasing the weight of the font in indesign or illustrator?
When I originally commented I clicked the “Notify me when new comments are added” checkbox and now each time a comment
is added I get three emails with the same comment.
Is there any way you can remove me from that service?
Cheers!
Hi there, I have question. I was told ages ago that if you resize an image in indesign to a greater or lesser percentage than 10% you should resize the image in photoshop and relink. I can see in the link palette window what resolution I have, so I know when I’m in danger of low res. I’m just curious if I need to do the extra step of resizing in photoshop when I go past this 10% mark. Thanks much.
Ha ha! My option for “Adjust Stroke Weight when Scaling” in the Transformation menu is *disabled*!!!
How do I enable it?
@Cari, awesome, that works a charm. And then can hit Escape to return to the group selection! Thank you.
@David, thank you! What a relief.
@Cari We are both on CS5.
@Aaron: answer to second question: https://creativepro.com/taking-another-look-at-the-content-grabber.php
@Aaron There’s a different technique for this. If you are looking at scaling a single item within a Group: Double click the item within the group to isolate it (no need to ungroup), then Ctrl+Shift (PC), Cmd+Shift (Mac) drag one of the handles. Hope this helps. — Cari
@Salieri which version of InDesign is he/she using?
@Dave have you tried using the Free Transform Tool to scale multiple selected ungrouped objects in CS5? Should do the trick I reckon. — Cari
I just upgraded from CS4 to CS6, and I miss the way selecting worked in CS4: If you had multiple objects selected you could scale any single one of them without affecting the group. (If you wanted to scale all you would group the selection and then scale.)
Any way to revert to this functionality?
And on a completely unrelated note not suitable for this thread, any way to turn off the contextual target icon (to select contents) when hovering over a graphic frame?
This looks interesting. A colleague of mine was working on a layout with grouped images and text frames. When he scaled them, either with CMD+SHIFT or not, the text boxes began to cut his text off, making it overset. He could resolve this by ungrouping or by enlarging the bottom of the text box.
However, when I tried CMD+SHIFT on my Mac, on the same layout, the text scaled fine. I had a look at the Adjust Stroke Weight option but felt this wasn’t quite right. Do you feel this could be an Autofit issue?
I’m still working in CS5. One thing I’ve noticed when group scaling multiple text boxes in this manner is that the box shrinks more than the text (by a hair), so the text disappears from the box and I have to go back and make the text box a hair larger. Am I missing something?
@Steve :)
Couldn’t agree more… The Alternate/Liquid Layout features in CS6 are impressive… and come to their full potential when you combine them with a ton of other seemingly ‘small’ features :) :) some of which have been around for some time ;)
The Auto-Fit setting was one of the great small features of CS5. I’ve seen it become even more useful in CS6, when you’re using the Alternate Layout or Liquid Layout features to create multiple page sizes in layouts, and you need to have the whole process done in a semi-automated way!
@Bojan :) good stuff :)
I already linked to this post (closing paragraph).
Hi Bojan,
Nice post :) Feel free to link to this post as well, I think the two posts will tie together very well ;)
Cari
Today I posted Selecting and Scaling Frames and Images in Adobe InDesign – https://bit.ly/JxXA6U and I would like to connect with your post if you do not mind.