

Corel has released a new version of Painter, the venerable painting and illustration program. Version X, which costs $429 for a full version and $229 as an upgrade, is faster than previous versions and includes new tools for artists and photographers.
Enhancements for Artists
More realistic brushes. The big news in Painter X for artists are the new RealBristle Brushes. Pick up multiple colors from the Mixer palette and paint — the resulting brush strokes are fluid, expressive, curvy, and multi-colored.
Figure 1 shows three strokes I created with three generations of Painter brushes; that is, brushes introduced in various versions of the software. A, the oldest of the three, is the Oils’ Medium Bristle Oils; B is the Artists’ Oils Oily Bristle brush, introduced in Painter IX; and C is the new Painter X RealBristle Brushes Real Flat variant.

Figure 1. Click on the image for a larger version.
As you can see, the RealBristle Brushes really do paint in a more realistic way compared to previous generations of Painter brushes.
Besides having multiple colors in the brushstrokes, you can blend colors and control the brush strokes to get the desired result in ways that weren’t possible with previous generations of Painter. However, those brushes, still in the program, are useful for certain effects and situations, as well. Painter is like an artist’s atelier. You can have materials lying around untouched forever, then suddenly find the perfect use for them in a new project..
The ability to use multiple colors from the Mixer palette with brushes besides Artists’ Oils is also new in Painter X. The Mixer palette now lets you mix and paint with multiple colors with Painter brushes using the dab types Camel Hair, Flat, Bristle Spray, Watercolor Camel, Watercolor Flat, and Watercolor Bristle.
Dab types are listed in the Window menu’s Brush Controls palette under the General category. You can set just about any brush to have these dab types, which means the brush can lift colors from the Mixer palette once you choose one of the above dab types.
(By the way, I found this information in the printed manual, which Corel brought back for Painter X, after having omitted it in Painter IX.)
I painted the face in Figure 2 from scratch without a reference photo using the RealBristle Brushes.

Figure 2. Click on the image for a larger version.
I painted with the RealBristle Brushes Real Oils Short and Real Round variants and blended using the Real Oils Soft Wet variant.
For the outlined areas on the face (around the eyes, for example), I used the Real Flat variant. A tablet is a must for most Painter work, and I like the Wacom Intuos 3 tablet. The Real Flat variant takes advantage of the Wacom 6D Art Pen’s rectangular nib. You paint along the thin part of the rectangle to get a thin stroke, then turn the pen in your hand and paint along the wide part of the rectangle to get a wide stroke.
Another cool thing for artists about Painter X and the 6D Art Pen is that both the Art Pen and the regular pen that comes with the Intuos 3 remember the most recent brush. For example, you can choose a variant to paint with for the Art Pen and a blending variant for the regular pen and then switch between the two. Because it’s similar to how you work with different brushes in real life, choosing between the two styluses is more comfortable than switching between the two brushes by clicking on them in the software.
The RealBristle Brushes have their own RealBristle palette in Brush Controls, including brand-new brush silhouettes, and you can lose a few days playing with the sliders and seeing the results.
Here’s a tip from Painter program manager Rick Champagne: If you paint in the Canvas, you may not see the beauty of the RealBristle Brushes because they blend with the white in the canvas (though this blending with white can also be very useful). To paint with brush strokes that more closely resemble the color you choose in the Colors palette, or in the Mixer, paint in a layer instead. Thanks, Rick!
I think the new RealBristle Brushes are the most versatile and useful bristle brushes in Painter. While Artists Oils (introduced in Painter IX) are nice, I use them for painting in backgrounds, where you don’t need to control the result that specifically. But for something like painting faces, you need to be able to predict the outcome, and the RealBristle Brushes give you a lot of control over the finished product.
Divine Proportion. The new Divine Proportion composition tool helps artists visually arrange their canvas prior to drawing or painting. Widely used throughout history by artists, designers, and architects, divine proportion is a ratio of 1:1.61803398874989, or approximately three to five, which is generally recognized as aesthetically pleasing to the eye.
Figure 3 is an example of one of my abstracts; the yellow lines are part of Painter’s Divine Proportion tool, not my abstract.

Figure 3. Click on the image for a larger version.
You can change the Divine Proportion grid’s colors, orientation, opacity, rotation, and appearance to fit your composition. However, you can’t make the grid lines wider, which would be useful when you’re working on a complicated image like Figure 3. Still, Divine Proportion is a handy composition tool for artists.
Enhancements for Photographers
New Auto-Painting Features.. Every copy of Painter X comes with a little man inside the software who paints for you. Or at least it seems that way, thanks to the new Smart Stroke settings in the Auto-Painting palette. When you click Smart Stroke Painting and Smart Settings and turn on Auto-Painting, Painter applies brush strokes with varying widths, lengths, and pressures to follow the forms of the original photo.
Figure 4 shows a photo of artist Laurence Gartel and me (in the right-hand corner) and a painting from it after I applied Auto-Painting with the Smart Stroke features selected. The new Speed slider in the Auto-Painting palette lets you control how fast the brush strokes appear.

Figure 4. Click on the image for a larger version.
Painter X comes with a new Smart Stroke Brushes category, though I used the Artists Sargent Brush variant for this image. The only manual painting I did was to touch up the faces and the hand with the Restoration palette’s Soft Edge Cloner brush.
Color Scheme Tools. One of the differences between a photo and a painting is that generally, a painting has a limited color scheme while a photo has more random colors.
With this basic art concept in mind, Corel added three tools in Painter X to help photographers create limited color schemes in paintings from photos.
Two of these tools are in the Underpainting Palette in the Color Scheme drop-down menu. First, there’s a new list of color schemes based on media styles, such as Impressionist, Classical, Modern, Watercolor, Sketchbook, and Chalk Drawing. With a photo open, you select one of these schemes and Painter updates the photo’s colors to match the selected scheme.
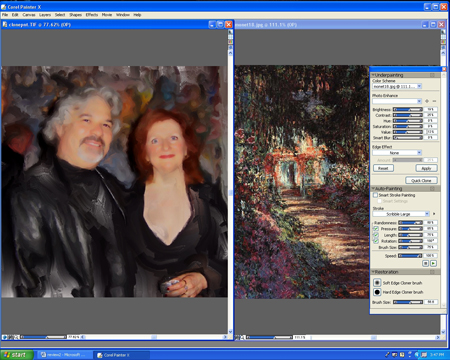
Second, you can now also choose a color scheme that matches the colors of any open image by selecting the open image in the Color Scheme drop-down menu. Want to use Monet’s color palette? Open a photo and a Monet and choose the Monet in the Color Scheme menu (Figure 5).
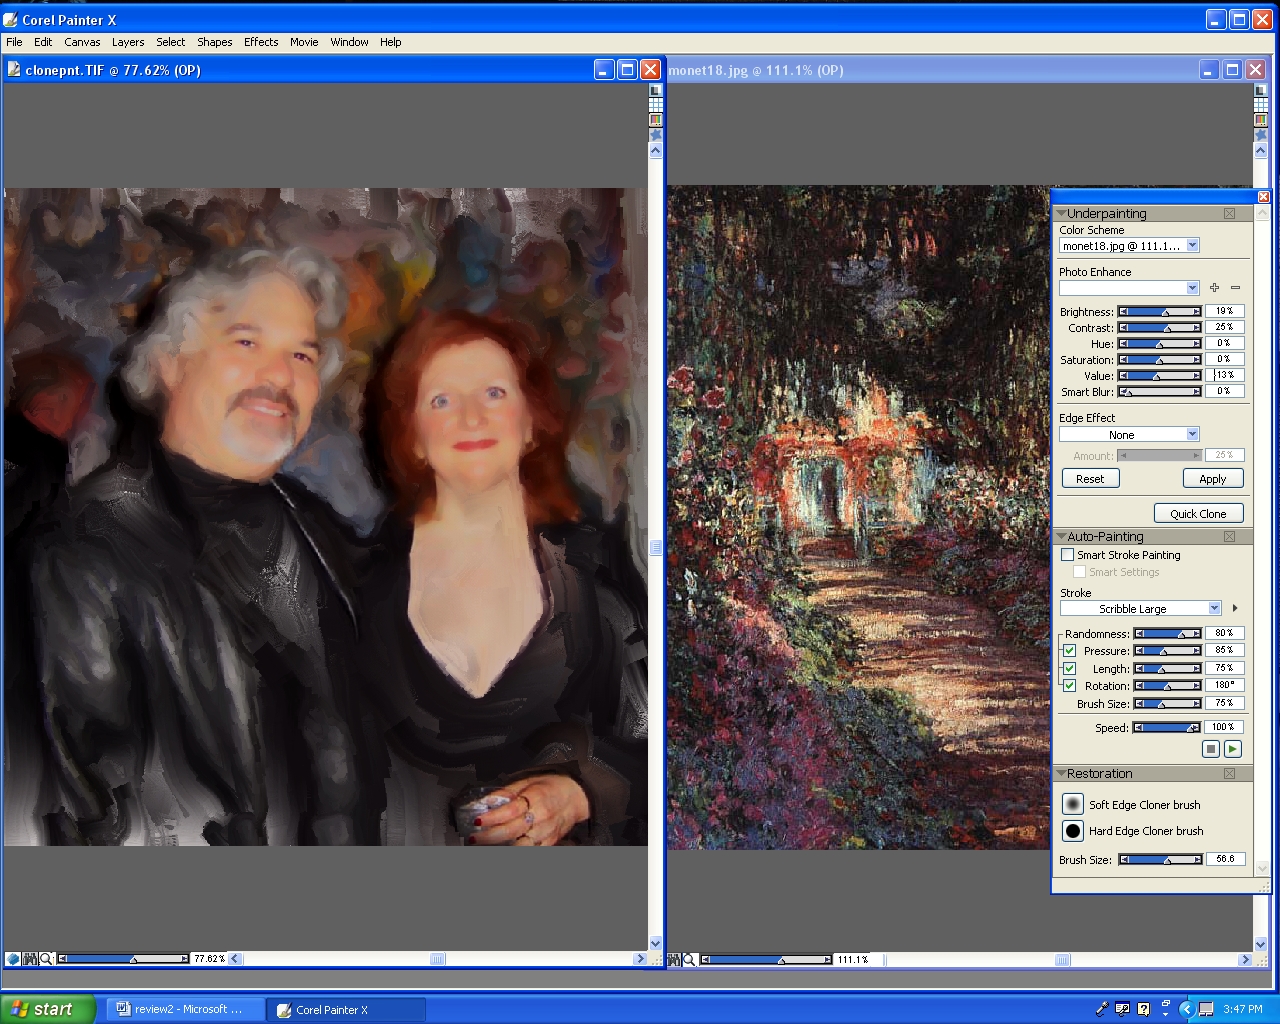
Figure 5. Click on the image for a larger version.
Once you’ve chosen a color scheme or an open image, you can then adjust the results using the sliders in the Photo Enhance section of the Underpainting palette.
The third way to adjust your color scheme is with Painter X’s new Match Palette, found in the Effects menu under Tonal Control. Using Match Palette, you can bring in the colors from another image, which is similar to the Color Scheme menu in the Underpainting palette. The difference is that with the Match Palette, you adjust how the source image combines with the current image.
Photographers like to offer painterly photos as another possibility to their clients, and Corel really hit the spot for photographers with the Auto-Painting palette (introduced in Painter IX.5) and these enhancements in Painter X. When you use them together, Painter X’s smart stroke features and the color scheme options speed up the painting process without creating cookie-cutter filter effects.
However, there’s always room for improvement. I’d like to see interim undo’s for the Photo Enhance sliders besides the Reset button. Also, it would be nice to be able to save your own color scheme in the drop-down menu. But these are merely minor points.
Layout Grid. The new Layout Grid composition tool provides guidelines that follow photography’s Rule of Thirds but can be customized to other grid patterns. The grid helps you to visually arrange the canvas or a photo before you draw or paint.
The Layout Grid is an alternative to the Divine Proportion tool: Artists will probably be more familiar with the Divine Proportion concept, while photographers will probably relate to the rule of thirds in the Layout Grid. You can use either when you’re painting from scratch or turning photos into paintings.
Enhanced cursor silhouette. Painter has always had a cursor that adjusts in width based on size settings in the Property Bar, which is similar to Photoshop’s cursor.
However, Photoshop’s cursor remains visible when you apply a brush stroke, but Painter’s would disappear. In Painter X, the cursor now shows the size of the stroke continuously.
I list this change in the photographers’ section of the review since it’s a concept that photographers relate to because of their familiarity with Photoshop, but of course, both photographers and artists can use it.
Enhancements for Both Artists and Photographers
Dodge and Burn. Painter’s Dodge and Burn tools have been enhanced and added to the Toolbox, making them more readily accessible. I often use Dodge and Burn on photos to prepare them for painting, and also on paintings to adjust tones.
New Libraries. With every Painter upgrade come new libraries of goodies, and Painter X is no exception. There aren’t enough hours in the day to play with all the new gradients, nozzles, patterns, stock photos, and paper textures.
Figure 6 shows just one example of what’s new. I loaded one of the new gradients libraries, filled an image with one of them, and chose the image in the Color Scheme drop-down menu. My painting then filled with the color scheme of the gradient. Too cool!

Figure 6. Click on the image for a larger version.
Improved Performance, More Platforms
Some changes may not be visible, but they are definitely felt. Painter X is faster than Painter IX, which was itself very fast. Operations such as opening images and painting with the brushes are very speedy in this version. I run it on Windows XP, but version X also runs on Windows Vista and Windows 2000, and on PowerPC and Intel-based Macs running OS X 10.3.9 or higher.
The Last Word
I highly recommend Painter X, whether you’re painting from scratch, starting with a photo, or both.
Artist, author, and photographer Karen Sperling is the original Painter expert. She wrote the manuals for the first several versions of Painter, authored several Painter books, has had many Painter tutorials published in magazines, and currently publishes the Artistry Tips and Tricks e-zine. She has taught Painter to artists and photographers at movie companies, design firms, universities, and professional photographer organizations. Karen’s art will be included in her first New York gallery show in April 2007, coinciding with her NYC Artistry Retreat. Visit www.artistrymag.com for details.
This article was last modified on January 18, 2023
This article was first published on April 4, 2007
Commenting is easier and faster when you're logged in!

Recommended for you
Big Discount on Topaz DeNoise
Topaz Labs is currently offering a deal where you can get their photo noise redu...

Damn You, Art School
It takes more than a good education to succeed in a any field. It takes real-wor...

The One-Hour Ad Deadline
The phone call and the email arrived together. “We’ve reserved a full page ad in...