Review: Alien Skin Bokeh

Pros: Accurately simulates shallow depth of field. Gives much greater control over highlight appearance and apparent depth than Photoshop alone. Plug-in’s sliders are simple enough that moving beyond the presets is very easy.
Con: $199 price is too high given how infrequently you’ll be able to use it. Note that that limited use is not a deficiency in the product, but a reality of the difficulty in masking more complex images.
Rating: 7.5
Focus is a funny thing. On the one hand, photographers use lenses that deliver a fine degree of sharpness and advanced autofocus systems that ensure proper focus. On the other hand, photographers select particular apertures, and control the apparent size of an image’s background, to reduce a scene’s depth of field, thus throwing some image elements out of focus.
This type of depth of field control can be essential if you want to compose images in a way that brings an appropriate degree of attention to your subject, and it’s one of the most powerful creative controls in the photography arsenal. However, there are times when shooting with shallow depth of field isn’t possible. For those times, you might want to create the effect digitally after taking the shot. While Photoshop provides its own tools for creating a shallow depth of field effect, you’ll get better results from Alien Skin’s Bokeh plug-in. However, as you’ll see, if you’re serious about shallow depth of field, software may not be the ultimate solution.
The Goal
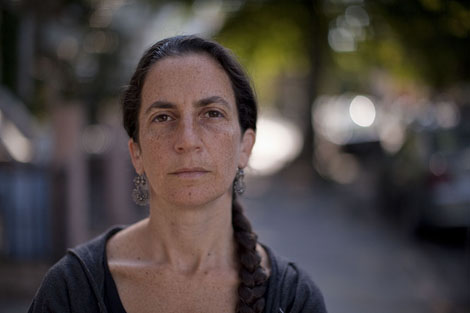
Here’s an image shot at f1.2 using a Canon 5D Mark II, with the Canon 50mm f1.2 lens. This gives you an example of what true, optically generated shallow depth of field looks like. (Click on all images to see larger versions.)
Figure 1.This image was shot at f1.2 to achieve very shallow depth of field.
Here’s the same shot taken with the same lens, but at f11.
Figure 2. Here’s the same subject shot at f11.
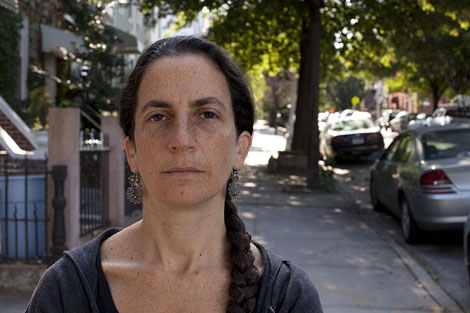
Obviously, the background in the first image is much blurrier. Photographers use a Japanese word, bokeh (pronounced “??”), to refer to the overall quality of the blurriness of the background. Yes, there is an aesthetic to blurriness, and once you start paying attention to it, you realize that some soft backgrounds are nicer than others.
With a high-quality lens, out-of-focus areas in an image will soften in a particular way. For example, specular highlights — the bright highlights that occur on shiny parts of chrome, or on the surface of water — often appear as soft circles. Sometimes highlights brighten and smear. Photographers often speak of the “butteriness” of a particular lens’ bokeh, referring to the overall smoothness of the defocusing.
Because it’s easy to think that an image with shallow depth of field simply has a blurry background, you might be tempted to use one of Photoshop’s normal blur filters. But look what happens if I take the f11 image and use Gaussian Blur on the background:
Figure 3. The Gaussian Blur I used on this image doesn’t look like the blurring you get from a lens.
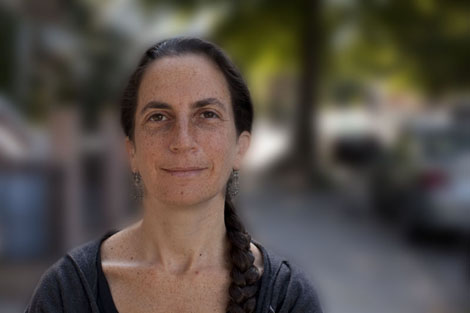
While the background is blurry, it has a very different quality from Figure 1, shot at f1.2 with authentic bokeh. The main difference is that in Figure 3, the highlights haven’t brightened — if anything, they’ve become dull — and their shape isn’t exaggerated into big, round circles.
Look at the tree in the background. In the optical 1.2 image (Figure 1), it has a very different shape from the Gaussian Blurred image (Figure 3). Figure 3 isn’t as appealing as Figure 1, with true shallow depth of field.
Photoshop does have a Lens Blur filter that lets you apply a more “realistic” lens blurring. While it does do a better job of blurring the background, it doesn’t let you apply as much blur as you’d need to simulate the super shallow depth of field of a 1.2 lens.
Figure 4. Photoshop provides its own Lens Blur filter for simulating shallow depth of field.
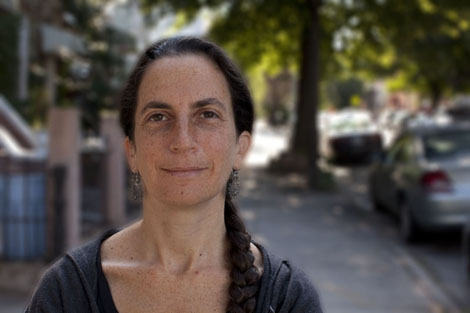
To get a software solution that accurately mimics shallow depth of field, you need to turn to a Photoshop plug-in.
Alien Skin Bokeh
Bokeh, a $199 Photoshop plug-in, offers advanced tools for creating shallow depth of field effects. It goes beyond simple blurring to create a realistic bokeh, complete with shaped, brightened highlights. Unlike Photoshop’s Lens Blur filter, Bokeh can create extremely thin depth of field effects and gives you more control over the bokeh’s appearance.
Look what happens when I run Figure 2 through the Bokeh plug-in:
Figure 5. Alien Skin Bokeh does an extremely accurate job of emulating an f1.2 lens.

Bokeh ships with presets that simulate particular lenses at specific apertures, so I processed this with the Canon 85mm f1.2 preset. As you can see, the highlights and overall softening are similar to the image shot with the real 1.2 lens I used to create Figure 1.
You can easily customize the presets, create your own, or work in strictly manual mode by manipulating Bokeh’s control sliders. In addition to overall strength — which controls how much blurring will be applied — you can also adjust the shape of the simulated aperture. Aperture shape affects whether highlights will be perfect circles or have flat sides. Boken can even change the highlights to a heart shape. Sure, it’s cheesy, but it might be useful for wedding photography.
Bokeh also adds a “Creamy” slider that further refines the quality of the background softness by making smoother transitions into brighter areas.
Separate controls let you alter how much boosting is applied to highlights, as well as control how those boosted areas blend into the background. In fact, Bokeh may provide more control than you need, but its sliders are simple enough that moving beyond the presets is very easy.
Tricky Selections
The tricky part about using Bokeh is making a selection to constrain the effects of the blurring. Bokeh includes only limited selection tools of its own, so you’ll probably need to select your foreground using Photoshop’s normal selection methods. You’d have to make a selection if you were using Photoshop’s Lens Blur or another blur filter, of course, so this isn’t really a deficiency in the Bokeh program. Just beware that your success with Bokeh may depend on your ability to make a good selection before launching the plug-in.
For example, one of the most common applications for shallow depth of field is portraiture, and portraits usually make for some of the most difficult masking chores, because of the dreaded Wispy Hair Problem (WHP). In an image with a bad WHP, or other difficult masking troubles, Bokeh might be of limited use. The image in the above examples has a bit of a WHP, and it wasn’t easy to cut a decent mask with Photoshop.
Bokeh provides its own linear and radial gradient selectors that solve some masking problems. What’s more, these tools can be easily combined with Photoshop’s own selection controls. I’ll step you through my process with the sample image you’ve seen above. I first used Photoshop’s Quick Selection tool to select the woman’s shoulders (Figure 6).
Figure 6. To select the woman, I started by selecting her shoulders Photoshop’s Quick Selection tool.

With the selection made, I opened Bokeh and selected the blur parameters that I want, and then I chose a Focus Region of Radial + Selection. This activatesd the radial selection tool, which basically creates a radial gradient selection: an elliptical gradient with a smooth transition from the selected to unselected area. Bokeh automatically combined this radial gradient with the selection I made earlier in Photoshop. That allowed me to create a reasonably smooth transition around her hair.
You can control the size and position of the radial gradient, and you can drag the outer ellipse to control the size of the transition. Unfortunately, the radial selection tool can only be uniformly scaled. In this sample image, that meant there was no way to squish the upper part of the gradient down to the woman’s head. Because of this, there was a bit just above her head I couldn’t blur properly.
Figure 7. Using Bokeh’s built-in Radial selection tool, I can create a mask that creates a smooth transition around the wispy parts of the woman’s hair. Unfortunately, there’s no way to mask the spot above her head, so it remains in focus.
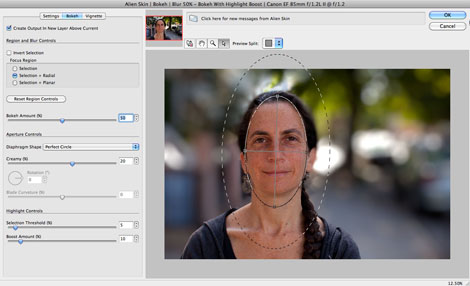
I solved the problem by duplicating my original layer (Bokeh always places its results on a new layer), blurring it with the same settings, and then using a Layer Mask to patch the problem area.
Note that the final image (which you saw in Figure 5) still isn’t perfect. Her hair has been blurred too much on the sides because I couldn’t wrap a smooth gradient around her.
Also, though the background looks very authentic, the overall effect is still not quite right. Because depth of field at 1.2 is so shallow, her shoulders and collarbones should probably be softened a little bit. With more compositing and layering, it would be possible to achieve this effect, but it would be a lot of work.
As handy as the Radial selection tool is, there are still some effects that are very difficult to achieve in Bokeh. If your subject is off-axis to the camera, for example, creating a realistic shallow depth of field across their face is going to be almost impossible.
More Selections
Bokeh also includes a Liner selection tool that can be essential for getting realistic results.
For example, consider this image:
Figure 8. I want to lessen the depth of field in this image.

While it’s easy enough to select the sign and then use Bokeh on the unselected part of the image, the results are hardly realistic.
Figure 9. Obviously, blurring everything but the sign doesn’t work well.

For the image to look real, the foreground should be unblurred and the Bokeh effect needs to gradually increase into the background. Within Bokeh, it’s easy enough to define a simple linear gradient mask, just as I did with the radial mask earlier. Your original selection is subtracted from this mask and the blurring effect is then applied.
Figure 10. With the addition of a linear gradient, you can create a more realistic transition.
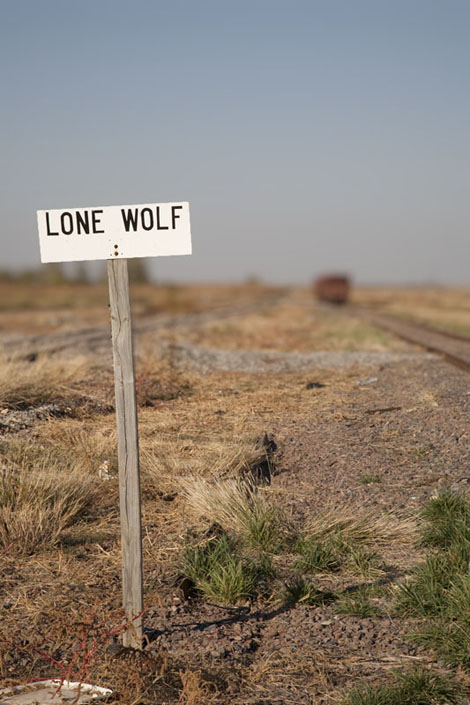
However, note that Bokeh’s linear gradient can make a gradient in one direction only. If you want a gradient in front of and behind the subject (a common shallow depth of field effect), you’re in for a lot of compositing.
Bokeh’s gradient tools also let you create the now-somewhat-overused fake toy effect. Normally, you need an expensive tilt/shift lens and an SLR to get this effect, but with Bokeh, it’s very easy to achieve with a simple selection combined with a radial or planar gradient.
Figure 11. With Bokeh, you can lower the depth of field in this landscape to achieve a fake toy effect.

Our eyes automatically recognize shallow depth of field as an indicator of scale. Normally, you would never see a big landscape with depth of field like this, but if you were looking at a small model of Florence, it would appear very much like this. So, by reducing the depth of field this dramatically, the city appears toy-sized.
Go to page 2 for more on Bokeh, including whether it’s right for you.
This article was last modified on December 17, 2022
This article was first published on October 21, 2009
Commenting is easier and faster when you're logged in!
Recommended for you

How to Easily Share Lightroom Photos to a Group
Did you photograph a group event, family gathering, or client shoot and want to...

CreativePro Tip of the Week: Using Resource Libraries in Illustrator
This CreativePro Tip of the Week for using resource libraries in Illustrator was...

Better Tools for Tones: Why I Don’t Look at the Histogram
The histogram—the graph of tonal levels you see in photo-editing software—helps...


