


Shooting in the Raw
Adobe’s Camera Raw plug-in is valuable not just because it integrates raw file support directly into Photoshop, but because of its excellent highlight recovery capabilities that let you shoot to your digital camera’s strengths. Although the basic Camera Raw interface and feature set have remained the same in Photoshop CS2, the new version can open multiple raw files simultaneously.
The previous Camera Raw integrated with the Photoshop File Browser, but Camera Raw version 3 works closely with the Adobe Bridge application. In Photoshop CS, you had to enter the Camera Raw dialog, define Raw settings there, and then return to the File Browser to apply those settings to other images. Bridge also allows this workflow, but the new Camera Raw goes one better by letting you simultaneously bring multiple raw files into the Camera Raw dialog.
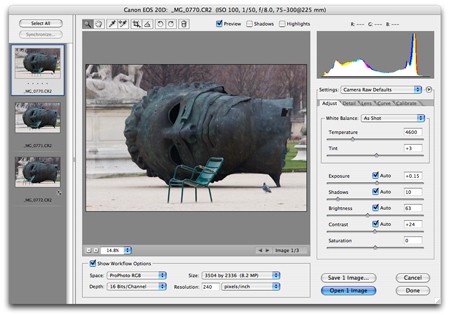
Camera Raw now lets you import multiple images and apply raw settings to entire batches simultaneously.
Multiple images are displayed as a stack of thumbnails along the left side of the Camera Raw dialog. You can select an image to define its raw development settings, just as you could before. If you select multiple images, any changes to the raw sliders are automatically applied to all of the selected images. A new Synchronize button lets you transfer any or all of your current raw settings to the other images in the current batch. This facility makes it much easier to quickly process an entire shoot’s worth of raw files.
There are slight improvements to the Camera Raw controls. The Exposure, Shadows, and Brightness and Contrast sliders now each include an Auto option that calculates what Photoshop thinks is an appropriate setting. As with many of Photoshop’s automated functions, the Auto raw settings often do a good job.
For tricky images, though, you’ll want to manually define raw settings, and the new Curve tab makes that much easier. Just like a standard Curves dialog, the Camera Raw curve lets you define a Tone Curve by placing control points on an editable curve. For making precise edits to a particular range of colors, Camera Raw’s Curve lets you do things that would be impossible with the basic sliders.
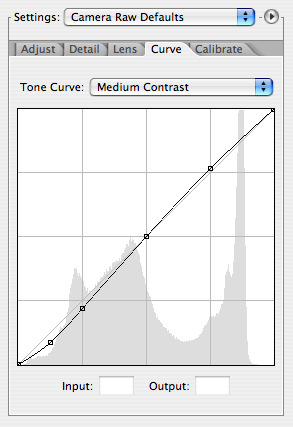
Camera Raw’s new Tone Curve lets you apply Curves like edits to your raw data.
Finally, Camera Raw now includes a Straighten tool, which you use by simply dragging along any line that should be horizontal. The Straighten tool not only rotates the image to straight, but can automatically crop the image to the largest crop that can contain your newly rotated image.
More vendors are adding raw support to their cameras, and more photographers are discovering the advantages of shooting raw. Consequently, Photoshop’s Camera Raw plug-in is becoming an indispensable photography tool. Version 3 has improved greatly on Camera Raw, with no compromise of existing features.
Beefing up the “Photo” in Photoshop
Photoshop CS2 added several other photography-specific features. The new Lens Correction filter provides effective controls for dealing with barrel and pincushion distortion. A single slider lets you distort the image inward or outward to correct for whichever type of distortion you’re facing, and this one control would have been a welcome addition to the new rev. But Adobe has also added sliders for reducing chromatic aberrations and vignetting. And the same Straighten control that’s provided in the Camera raw plug-in is included in the Lens Correction Filter.
Two transform sliders help you reduce vertical or horizontal perspective. They’re much easier to use than Photoshop’s normal Perspective control.

With the new Lens Correction filter, you can correct barrel and pincushion distortion, as well as correct for perspective.
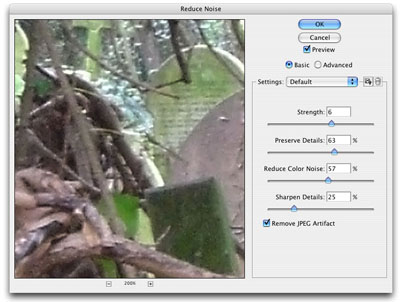
Noise is the bane of all digital photographers, but previous versions of Photoshop didn’t include commands designed specifically to deal with noise. Though there are any number of techniques for fighting noise using Photoshop, they aren’t always effective, and most are a lot of work. Adobe finally addressed the issue with the new Reduce Noise filter, which attacks luminance and chrominance noise.
The danger of noise reduction is that as you eliminate noise, you often eliminate sharpness as well. Photoshop CS2’s Reduce Noise filter strikes a good balance between eliminating noise and preserving image detail. There are controls for processing individual color channels, and the Reduce JPEG Artifacts option does a fair job of reducing the boxy patterns caused by strong JPEG compression.
Reduce Noise works far better than any past Photoshop technique. However, the filter doesn’t reduce luminance noise as well as it cuts chroma noise, and the filter isn’t as effective as standalone options, such as Noise Ninja and NeatImage.

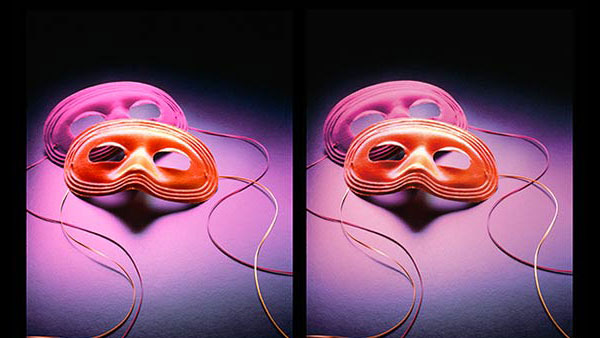
The new Reduce Noise filter is very good at eliminating tricky chrominance noise artifacts. The top of these two images is pre-filter; the bottom image is post-filter.
Adobe has also improved Photoshop’s sharpening capabilities with the new Smart Sharpen filter. Smart Sharpen is basically a regular Unsharp Mask filter with an extra control for specifying the type of blur to use when creating the mask for sharpening. Unsharp Mask normally uses a regular Guassian Blur. Smart Sharpen adds options for Lens Blur, which usually yields finer detail with less halo-ing. A Motion Blur option lets you fix blurs caused by moving subjects or camera shake, and it’s surprisingly effective. Finally, you can use the new Shadow and Highlight tabs to control the visibility of the dark and light halos that can mar sharpened images.
Though it doesn’t offer as many options as Nik Sharpener Pro, Smart Sharpen offers all the sharpening control most users will ever need.
The new Spot Healing Brush is a simpler version of Photoshop CS’s Heal tool. Rather than requiring you to select a source point for healing, the Spot Healing brush samples surrounding pixels automatically. Sometimes the Spot Healing Brush seems magical, perfectly eliminating complex objects. At other times it’s not so successful. For eliminating spots or lens grunge, it’s a quick, effective tool. For more complex healings, though, stick with the Heal and Rubber Stamp tools.
Adobe has expanded the program’s 16-bit support, providing 16-bit functionality in the Liquify and Lens Blur tools, as well as the new Reduce Noise and Smart Sharpen filters. The Shadow/Highlight tool now works in CMYK and LAB modes at 8 or 16-bit.
A new 32-bit mode allows for the creation of High-Dynamic Range images using a new HDR tool. You can import a series of bracketed exposures into the Merge to HDR tool, and Photoshop automatically merges the images into a single result. Merge to HDR includes a special 16-bit conversion tool that provides excellent control for downsampling your high-range image into a regular 16-bit image. Accurate registration is essential for good results, and you’ll need to shoot very carefully when aiming for an HDR image. The tool, though, is ideal for 3D rendering and animation applications, as well as for photographers.
Gobs of Other Features
In addition to the headliner new features, Photoshop CS2 has an array of other changes and additions.
You can completely customize the keyboard and menus, re-define keyboard shortcuts, show or hide menu items, and add color to menu items. You can also freely change any palette menus, and change the size of text in the options bar, palettes, and Layer Styles dialog. Even if you don’t want to change specific commands, you can create a more streamlined interface by eliminating commands you never use. This simplified interface is especially helpful when you’re teaching, or if you call on only a small part of Photoshop’s feature set.
Acknowledging that Photoshop’s Batch command is most often used for simple File conversions, Adobe has added a handy new Image Processor, which lets you do batch format changes, with options for resizing, adding a Copyright metatag, and executing an action.
I also appreciate these new features:
- The Action Event Manager, which lets you attach Actions to specific program events. For example, you could specify a color correction script that executes any time you choose the Print command.
- The ability to preview your images on a video monitor using a Firewire link to a video camera or deck. For video designers, this feature eliminates the hassle of moving images into an editing app to check video colors.
- The ability to sync your color management settings with the rest of the CS2 suite.
- Support for up to 3.5GB of RAM, as long as you’re running a Power Mac G5 or a Windows XP 64-bit Edition system running an Intel XEON processor with EM64T, AMD Athlon 64, or Opteron processor.
- You can animate GIFs using the same mechanism found in ImageReady. The data-driven graphics capability of ImageReady has also moved into Photoshop.
- The simple Red Eye tool does an excellent job of removing red eye with a single click.
Order Up!
Photoshop is still not perfect. It’s still not fully 16-bit, at a time when many film professionals are working at even higher bit-depths, and its filters are still destructive.
Nevertheless, Photoshop CS2 is one of the most impressive upgrades in a long time, both for its breadth and for the strength of additions such as Vanishing Point. Even small features, such as the WYSYWIG font menu, are thoughtfully designed and well implemented.
Adobe deserves kudos for this upgrade, though they’d probably be more satisfied with cold hard cash. So do them and yourself a favor and order yourself a copy.
This article was last modified on January 18, 2023
This article was first published on May 3, 2005
Commenting is easier and faster when you're logged in!

Recommended for you
Soft-Proofing: Benefits for the Graphic Designer
There is a very useful, but often overlooked, feature in Photoshop relating to c...

Corel's AfterShot Pro Seeks to Lure Lightroom and Aperture Users
Bibble was a software program from Bibble Labs that helped you manage and improv...

Simultaneous Contrast: How Your Environment Affects Color Perception
This article originally appeared on chromaqueen.com. Republished with permission...