

Since Adobe released InDesign CS2 — the fourth version of the company’s challenge to QuarkXpress — in 2005, a lot has happened. InDesign has increased its market share in the design and publishing world. Adobe acquired Macromedia and its product line (including Flash, Dreamweaver, and Fireworks), and InDesign’s chief rival scored a victory in the battle between the two by releasing QuarkXpress 7.0 as the first major page-layout software to run natively on the Intel-based Macintosh platform.
What a difference two years makes. Adobe has countered Quark at last with an application that is now Universal (compatible with both Intel and PowerPC-based Macs). More than that, it has done the same for all of the products in its Creative Suite, which now comes in six different editions; three of which — Design Standard ($1,199), Design Premium ($1,799), and the mouth-wateringly complete Master Collection ($2,499) — include InDesign CS3. It’s no secret that the “Suite” strategy has gone a long way toward the successful adoption of InDesign. Most XPress users depended on at least two other products in previous versions of the Creative Suite, and purchasing the complete package was both a bargain and an opportunity to try out the new kid on the page-layout block. But it was InDesign’s feature set, ease of use, and integration with the other products in the Suite that made converts out of the curious.
Adobe’s concentration for this new version is squarely on efficiency, automation, and customization. This reflects another focus for the company: its customers. Adobe has clearly been paying attention to the growing number of InDesign users, as evidenced by the addition of features like Table and Cell Styles (the number-one feature request, according to Adobe) and Text Variables, as well as significant improvements to InDesign’s existing Find/Change and Numbered List functionality.
What You See
InDesign CS3, like the rest of the applications in the Creative Suite, sports a new user interface that replaces palettes with panels. Those of you who’ve downloaded the Photoshop CS3 public beta will already be familiar with that application’s implementation of this new UI. In the CS3 products, palette groups are now called panel stacks, and these stacks reside in a dock (or multiple docks, if that’s how you prefer to work) you can view either fully expanded, reduced to an icon and name mode, or collapsed down to a single column of icons (Figure 1). This minimized icon-only view replaces the hinged tab method for stowing away palettes of previous versions. You can pop out any full panel with a single click on its icon.
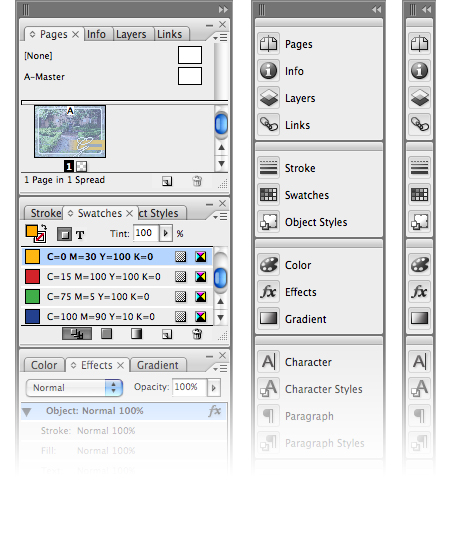
Figure 1. New docked panel interface can be viewed fully expanded (left), in a compact icon-and-name mode (center), or a minimized icon-only view (right).
The well-designed icons are, for the most part, an elegant solution for achieving the elusive balance between accessible controls and available screen space. The dock is highly customizable, and you can create, arrange, and organize multiple docks on the right or left sides of your workspace. There is one irksome drawback to the new interface: only one full panel at a time is visible when the dock is in icon-and-name or icon-only mode. Clicking another icon closes any open panel automatically (even if the panels are in separate docks), and there’s no preference available for changing this behavior. You can tear off panels and panel stacks from the minimized dock, letting you have multiple panels open simultaneously (Figure 2), but I’m hoping for an update that resolves this shortcoming.
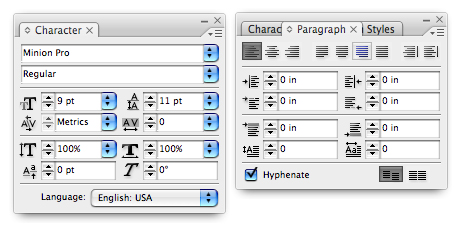
Figure 2. A free-floating panel (left) and panel stack (right) detached from the dock.
InDesign My Way
There’s nothing to complain about with the improved Control panel in CS3, however. Increased functionality, flexibility, improved controls, and customization options provide one-click control over tasks that were either unavailable in previous versions or buried in the old palette’s menu. Users working on large displays will appreciate that the Control panel adds more contextual options as screen space allows. When working with text, for example, additional paragraph-related options now show up when the palette is in character mode, and vice-versa. Customizing the Control panel to suit your own needs is now possible from the panel menu, where you can turn off any unwanted options. Rotate and Flip controls have been added to the Control panel, along with a Proxy image that indicates the rotation or reflection of a selected object and provides a contextual menu option to clear all transformations. Also added to the Control panel are options for text wrap, object distribution, table cell insets, Table Style and Cell Style drop-down menus, and controls for opacity, drop shadow application, and access to the new Photoshop-style Effects (Figure 3).

Figure 3. New options available from InDesign CS3’s much-improved Control panel.
Another new feature that first debuted in Photoshop is menu customization. You can toggle on or off the visibility of any application or panel menu item, and color-code menu items to better organize and find frequently used commands (Figure 4). These settings can be saved as sets and included as part of a custom Workspace. This is a great way to quickly configure the application to suit a given task — text formatting, layout and design, or pre-press preparation, for example.
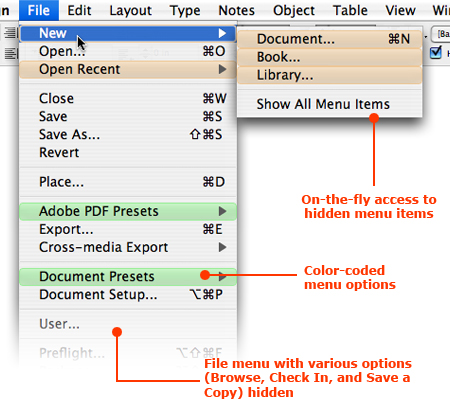
Figure 4. Photoshop-style menu customization migrates to InDesign in the new version.
My favorite UI improvement in CS3 is the Pages panel, which now displays page thumbnails for both document and master pages in either medium, large, or extra large sizes. The palette also scrolls as you move pages around within it — a feature that was sadly lacking from previous versions (Figure 5).
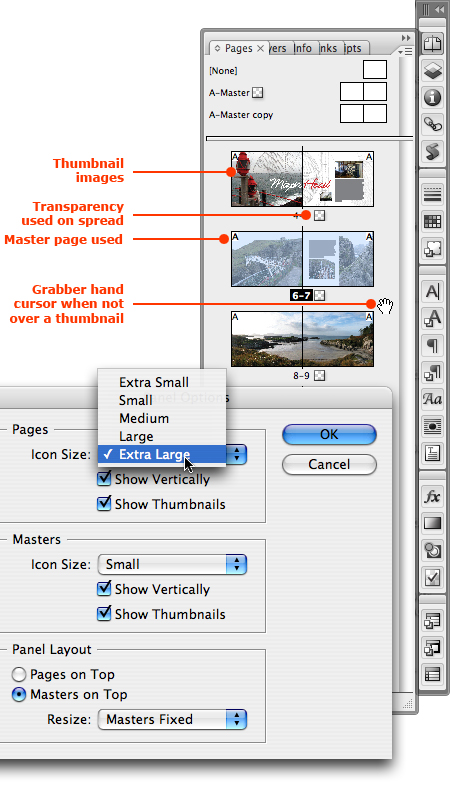
Figure 5. Greater visual feedback and functionality have been added to the Pages panel, including auto-scrolling when moving pages.
CS3 for Designers
Once you’ve acclimated yourself to the new interface and customized it to your linking, the big question is: What’s in the new version for me? At first glance, InDesign CS3 may not appear to include the kinds of eye-popping, must-buy feature additions of its predecessors. However, behind its polished new veneer are countless, less obvious changes that range from small, elegant touches (double-clicking an image frame to switch between selecting the frame and its content) to sweeping workflow transformers (placing native InDesign files inside other InDesign files).
The flashiest of these new features is the Effects panel that replaces the Transparency palette and brings Photoshop-style effects directly into a layout. In-document effects in previous versions were limited to drop shadows and feathering. InDesign CS3 adds familiar Photoshop effects such as Inner Shadow, Outer Glow, Inner Glow, Bevel and Emboss, and Satin (Figure 6). These effects can be applied individually or in combination to any frame, shape, image, or stroke, and to fully editable text. The all-or-nothing Feather option from CS2 and earlier is now called “Basic Feather”; much better feathering is available with the new Directional Feather and Gradient Feather options. You control these settings in the Effects dialog, which is similarly Photoshop-like and includes that application’s familiar rotary Angle dial and the option to set a Global Light to keep effects consistent.
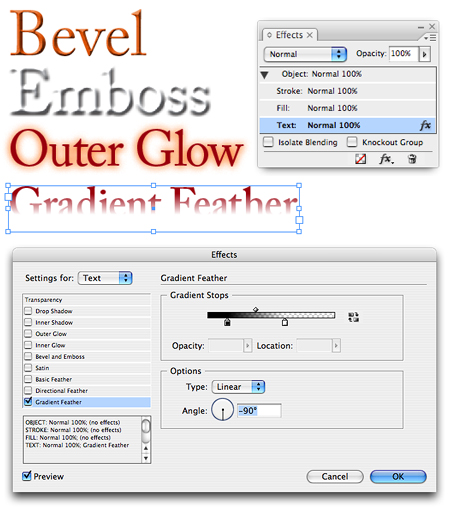
Figure 6. New Photoshop-style Effects available for objects as well as live, editable text are controlled with the Effects panel and Effects dialog.
For my money, the more important and useful transparency update in CS3 is that separate settings can be applied to the fill, stroke, and text of any single object. If you want a frame with a dark fill that uses a multiply blend mode, contains opaque white text, and has a drop shadow applied to just the stroke, you no longer need to create three separate objects to accomplish that, as you did in previous versions (Figure 7). Unfortunately, this level of independent transparency control does not extend to tables, but even with that limitation, this is a much-needed addition that lets you be creative and still work efficiently.

Figure 7. A single text frame with a drop shadow applied only to its stroke, a gradient feather and Multiply blend mode applied to its fill, and no transparency at all applied to the text.
Speaking of efficient design, the Nested Styles of InDesign CS and the Object Styles of CS2 are joined in CS3 by Table Styles and Cell Styles. If you’re already familiar with Teacup Software’s excellent plug-ins for this functionality, you’re ahead of the game. Adobe bought that technology and built it into CS3. Now, one-click formatting of Tables is nearly as easy to set up as a Paragraph Style or Object Style. Tables have more peculiarities than either of those (cell inset spacing, strokes, alternating fills, header and footer rows, etc.), so building a Table Style requires up-front planning and effort, but once established, you can apply the style to multiple tables by either clicking the style name in the Table Styles panel (Figure 8), or dragging and dropping the style name from the panel over the table in your layout (another nice new touch in CS3 that also works with Object Styles).

Figure 8. Same table, different styles. Table Styles in CS3 allow settings for header and footer rows, body rows, and left and right columns, while Cell Styles incorporate Paragraph Styles, fills, inset spacing, etc.
Complex tables with merged cells and customized multi-row headers may not lend themselves to 100% automation through Table Styles, but just the ability to save all attributes of a cell — inset, stroke, paragraph style, alignment, etc. — as a style will speed up the creation and modification of such tables.
Table and Cell Styles also provide the key to another productivity boost: placed spreadsheets that maintain links to their source document (for example, an Excel file), can be edited in the external file, then updated in InDesign with the table formatting preserved. For designers working on large financial documents and annual reports, this will be a very welcome new feature.
Page-layout efficiency is taken up a notch in CS3 with a powerful pair of new options. The multi-file place feature loads your place cursor with multiple images, text, spreadsheets, PDFs, etc. You can cycle through what’s to be placed with the arrow keys and use the Escape key to discard the currently previewed image. A number in the cursor counts down the remaining files to be placed, and each file’s type (text, image, vector/PDF) is indicated with a small icon (Figure 9).

Figure 9. The new, multi-file “place gun” loaded with three files: a Word document, Photoshop image, and an Illustrator graphic. Multimedia content (video, audio, and Flash) shows only as an icon — there’s no preview thumbnail.
The other half of this powerful one-two page-layout punch is the new Frame Fitting feature. Images can be automatically sized to fit, positioned, or cropped to your specific settings when placed into frames with these Fitting options assigned to them (Figure 10). Fitting options can be included as part of an Object Style to further speed up their implementation.

Figure 10. Frames can be pre-fit by applying Frame Fitting Options such as cropping and positioning, as well as how placed images will fill the frame.
Creative collaboration and workflow efficiency are both facilitated by the addition of a simple idea with enormous potential: placing native InDesign files inside other InDesign files. With this new feature, projects can be broken up into parts of a page. One designer can be formatting a sidebar while another works on a half-page ad, and a third designs the overall layout, which will include both. As each designer updates his or her portion of the layout, the links in the main layout can be updated like any other placed file.
When a document that contains a placed InDesign file is opened, missing font and link warnings appear for both the “host” file and the placed files (Figure 11). Likewise, when preflighting and packaging a file that contains other InDesign files, the fonts and images of the placed files are also checked and collected. There’s tremendous potential for this seemingly small — and unexpected — new feature. It’s similar in principle to the Composition Zones of QuarkXpress 7 (which I confess I have not used) but seems more simply and flexibly implemented.
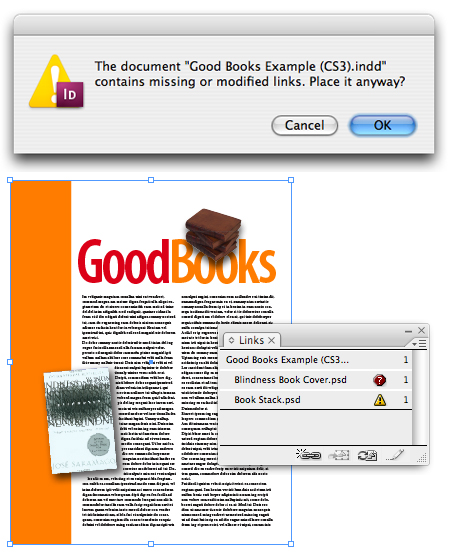
Figure 11. Font and link warnings, and corresponding missing and modified icons in the links palette, are displayed for all placed InDesign files.
There are many other, smaller features that designers will appreciate in CS3. For instance, master page items now have dotted frame edges to differentiate them from document items; drop cap settings now include an Align Left Edge option; re-linking all incidents of a placed image at once is now possible; step-and-repeat operations can be previewed before they’re applied; styles can be arranged into logical folders in their respective panels; nested styles include a Repeat option so style changes can be looped as often as necessary from a single pattern; and the Find Font feature can now change fonts in paragraph style definitions.
Not Pretty…Just Pretty Powerful
If the above features are the sizzle, InDesign CS3 serves up the steak in the form of powerful new automation and text-processing features that whittle down repetitive tasks and provide an impressive level of flexibility.
The best example of this is Text Variables. Date stamps (“created,” “modified,” “output,” etc.), document length (e.g., page 1 of x), and running heads can be set up to gather information or text based on specific criteria, then add that text or data to a page with any desired formatting applied to it (Figures 12 and 13). As conditions change (modification date, number of pages in the document, re-flowed content, and so on), the variables in a file update accordingly. For the updates to appear on the page, you’ll have to refresh the document view by toggling between normal and preview mode, or by re-sizing the document in the window.

Figure 12. Running Header text variables use styles applied in the document, and where they appear, to determine what populates the variable placeholders you insert.

Figure 13. Variable placeholders for a book folio on the master page (background window), and populated by the appropriate text on the document page. Note that the “Mac IIci” sub-head within the body copy is automatically inserted where the <Starting Sub-Head> variable is on the master, as it is the first instance of the Sub-Head paragraph style on the page.
This is a long-standing feature request — especially among people who work on catalogs and books — and it’s good to see it added at last. One limitation that could be a source of frustration is that variable text doesn’t wrap like regular text. If it can’t fit within a given amount of space on a single line, the variable text and everything that follows it will become overset. By their very nature, variables — such as “aardvarks through abalone” in a running dictionary header, chapter titles in a book folio, and date stamps — tend to exist within a finite area of space, but the lack of variable text wrapping is an unfortunate constraint.
Search Anything
Find/Change has been so transformed in this version that it may as well be a new feature. All Find/Change operations can now be saved and made available from the new Query pull-down menu. Master pages, hidden layers, and footnotes can be included (or excluded) as part of any Find/Change criteria, and find operations can now include locked layers and stories, but changes can’t be made while they remain locked (Figure 14).

Figure 14. New options in the Find/Change dialog for including or excluding locked layers, locked stories, hidden layers, master pages, and footnotes.
InDesign CS3 also adds three entirely new types of Find/Change functions (Figure 15), including GREP (also known as regular expression searching).
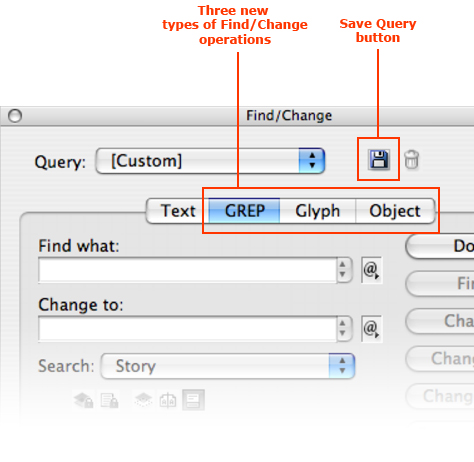
Figure 15. Three new options – GREP, Glyph and Object — have been added to the find/Change dialog in CS3, along with an option to save queries for later use from the Query pull-down menu.
With GREP, there’s very little you can’t search for, change, or re-arrange by using wildcards that match patterns in text. These searches can perform simple text clean-up (changing dashes to em dashes, or removing trailing spaces), or they can find and format every e-mail address in a document based on the syntax of an e-mail address, or convert all U.S. currency formats (dollar symbols and decimals) to Euros (Euro symbol and commas) while leaving the specific numbers unchanged. These are just a few examples; much more is possible. There’s a learning curve to mastering GREP, but its inclusion in InDesign increases the text-processing power of the application immeasurably. [Editor’s note: For a how-to on GREP, see the April/May 2007 issue of InDesign Magazine.]
More intuitive, but no less powerful, is the new object search capability. Any attribute that can be assigned to an object in InDesign can now be searched for with Find/Change. You can, for instance, search for every yellow text frame with an orange stroke, or every graphic frame with a text wrap, multiply blend mode, and rounded corners, and replace all with any modified or additional object attributes.
Number Crunching
Numbered List functionality in CS3 is also dramatically expanded to allow for non-consecutive, multi-level lists across stories and across documents in a Book. Numbering for sub-lists can be dependent on the numbering of the larger list in which they appear (i.e., 1a, 1b, 1c), which is ideal for outlines. Static text can be added before or after the number generated for the list (i.e., Question 1 or Image 2), and caption numbers for tables and figures can also be associated with a list and automatically numbered in sequence.
Be warned, however. The dialog box for setting up Numbered Lists (Figure 16) is not for the timid. The features are superb, but the interface is an overwhelming, unintuitive barrage of settings.
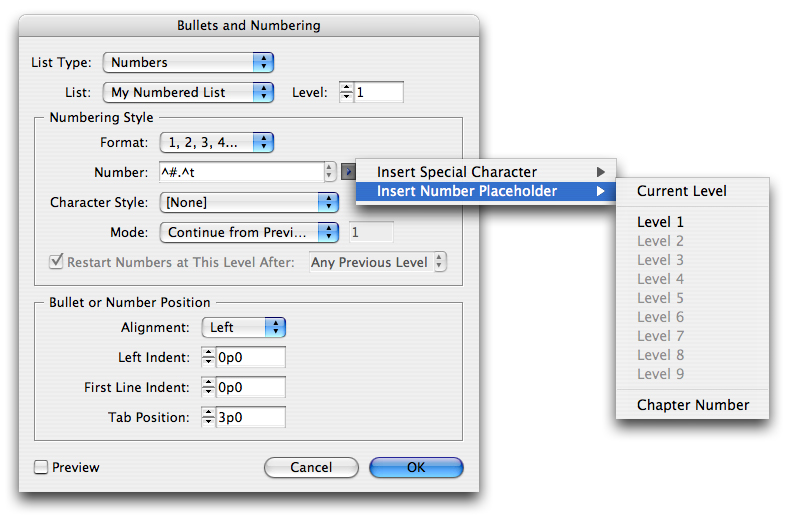
Figure 16. One of InDesign CS3’s most powerful features, Numbered Lists, is controlled by one of its most cryptic and intimidating dialog boxes. Click on the image for a larger version.
For Keyboard Addicts
Another supercharged feature is QuickApply. Introduced in CS2 as a way to access and apply styles by typing in a few letters of the style name, CS3’s QuickApply brings that functionality to menu items (including panel menus), text variables, table and cell styles, and scripts. With all that to search through, the resulting list of options from typing in a few letters can be so long that it takes the “quick” part out of QuickApply (Figure 17). Fortunately, there are key combinations — “m:” for menu items, “s:” for scripts, “v:” for variables, and so on — that filter the results to a more useful list, and there are options for restricting what QuickApply searches by default.

Figure 17. CS2’s QuickApply options have been expanded to include menu items, scripts, text variables, and all styles in CS3. QuickApply searches can be filtered on the fly or by setting limits on what is included in the search.
Print to Web
With Macromedia’s Web products brought under the Adobe tent and bundled into the Creative Suite Design Premium edition, it’s to be expected that some new Web features would make their way into InDesign. GoLive is gone from the Suite, and the Package for GoLive feature has been replaced with two new options. Export to XHTML/Dreamweaver (a poor name choice, as Dreamweaver isn’t required to work with the exported file) exports either an entire document or just the current selection as tagged XHTML. Lists that use the bullets or numbering features are mapped to unordered lists and ordered lists, respectively, and InDesign tables are exported as HTML tables. Image conversion is bare bones (GIF or JPEG only), but there is a useful option to keep images formatted — in other words, cropped and sized with strokes and effects applied (Figure 18).

Figure 18. The new Cross-media Export menu includes XHTML output of InDesign content (but not layouts), including image export and conversion settings, and options for creating or assigning Cascading Style Sheets.
This is by no means a push-button, layout-to-Web-page solution. Page layouts are discarded altogether, resulting in an unadorned HTML file, and certain special characters aren’t translated into proper HTML entities. The true usefulness of this feature can only be tapped into with good use of CSS to format the exported content. During export, you can choose CSS options and assign them to an external CSS file. While not everything it could be — and hopefully will become in future versions — this is an encouraging start toward easier cross-media workflows.
Another option, Export to XHTML/Digital Editions, creates files compatible with Adobe’s still-in-development Digital Editions eBook reader/manager.
Little Things That Mean a Lot
Beyond the large-scale changes, there are countless small features, enhancements, and fixes. Here’s a partial list:
- The little “Make all settings the same” chain icon has been added to text wrap panel and text frame options dialog.
- Items in the Links panel can be sorted by type.
Double-clicking a frame’s handle fits the frame to its content. - Alignment features now include options for aligning to the page, spread, or page margins.
- Master pages can be loaded from other InDesign documents, and master pages can be synchronized across documents in a book.
- Glyph sets can be saved and shared.
- The 100-document limit on the Book feature has been lifted.
- Holding down the shift key when dragging and dropping text applies the “destination” formatting to the text being moved.
The Price of Improvement
The days when the switch from QuarkXpress to InDesign was a process with a minimal learning curve are officially a thing of the past. The benefits of features like text variables, GREP searching, numbered lists, and QuickApply come at a small cost in ease of use.
InDesign was a mature product in its fourth version (CS2) and is now even more robust and complex. That’s great for veteran users who are comfortable with the application’s conventions and need only contend with the latest changes. For newcomers, however, approaching this feature-rich new version for the first time could prove intimidating. Even the many users who will leapfrog CS2 altogether and upgrade from InDesign CS may find two versions worth of major changes a lot to absorb. The next UI changes Adobe implements for InDesign should go deeper than panels and docks and down into some of the more cryptic dialog boxes to make the controls as simple to use as the features are powerful.
Is All of This Worth It?
It’s to be expected that as InDesign matures, its new versions will be less revolutionary and more evolutionary, but this upgrade still successfully walks the line between the two. It delivers powerful new time-saving features, a streamlined and customizable interface, large-scale improvements to existing functionality, and a great many small, useful touches.
As a new stand-alone purchase (not an upgrade and not part of a Suite), InDesign CS3 retails for $699. With an upgrade price of only $199 from InDesign 2.0, CS, or CS2, there’s little doubt that the upgrade is worthwhile. There’s more than enough here to satisfy even the most cautious and frugal purchasers.
As part of a Suite configuration, it’s a $399 upgrade to the Design Standard edition, or $599 for the Design Premium edition, which also includes Flash, Dreamweaver, and the Extended version of Photoshop CS3. For those with deeper pockets, upgrading to the Master Collection (which contains the print, Web and video products from all other editions) from any previous Suite edition will cost $1,999.
CS2 users will find that such features as Table and Cell Styles, attribute-specific transparency settings, and object searching are worth the price on their own. If you’ve skipped CS2 altogether and are still using CS, your perseverance has paid off, but you’re also out of excuses. It’s time to upgrade.
This article was last modified on January 18, 2023
This article was first published on April 20, 2007
Commenting is easier and faster when you're logged in!

Recommended for you

GREP of the Month: Superscripting Suffixes
Automatically convert all your numerical suffixes to superscript when applying a...
How to Use the Curvature Pen Tool for Easier Drawing in Illustrator
Learn about Illustrator's better pen tool that takes the hassle out of drawing p...

CreativePro Conversations: Paula Scher
David Blatner chats with Paula Scher—the incomparable designer and partner at Pe...