
Remembering Page Position with Object Styles
After reading David Blatner’s tutorial, you’ll apply a slew of object styles to your page with one click. Sample files included.


This article appears in Issue 24 of InDesign Magazine.
InDesign’s object styles are key to saving time and making your documents more consistent. A single click in the Object Styles panel can apply a host of formatting to one or more selected objects. For example, you can assign a fill color, a stroke style, text frame insets, graphic frame fitting options, and about a hundred other settings to frames and paths. But there’s one thing object styles can’t do, and it drives me crazy: You can’t use object styles to apply page geometry—the position of an object on the page. Applying page geometry could be helpful in a wide range of documents. For instance, you could tell InDesign that every time you assign a “footer” object style to a text frame, it would jump to the bottom of the page in exactly the correct position. Or you could assign a sidebar style and have the object move to the side margin. But alas, you can’t do it. So why am I even bringing it up here? Because there is a way around the limitation. The workaround is based on a simple fact: Although you can’t assign page geometry for a freefloating object, you can assign it for an anchored object! Let’s take a quick look at how to use this trick to create a slider along a numeric indicator. The goal is to create a set of object styles that, when clicked, will move the slider to exactly the correct position on the line.
1. Create the Pieces
Before you build any object styles, let’s build the pieces of the puzzle. Here, I’ve created a temperature gauge and a separate object that will act as the slider/indicator. I made these in InDesign using gradients and the Effects panel, but you could make the slider and indicator in Illustrator or Photoshop and import them.

2. Draw a Text
This workaround relies on the indicator being an anchored object, and you can’t have an anchored object without a text frame. So here I’ve drawn an empty frame. Note that it must be positioned on the page, or on the pasteboard with at least a small portion of it touching the page. However, it doesn’t really matter how large the text frame is; make it big enough for the anchored object now, but you’ll be able to shrink it later. 
3. Anchor the Line in the Text Frame
You can anchor any object (or more than one object, if you’ve grouped them first) into a text frame by selecting it with the Selection tool, using Edit > Cut to move it to the clipboard, switching to the Type tool, clicking in the text frame, and choosing Edit > Paste. The result is technically an inline object—a frame or line (or group, or whatever) that InDesign places as though it’s a single character in a story. In this case, you place the indicator object into the text frame as the only character in the story. 
4. Convert to Anchored
Switch back to the Selection tool, click on the inline indicator line, and then choose Object > Anchored Object > Options. The Position pop up menu is set to Inline; change it to Custom. The dialog box is now filled with confusing options. (For the in-depth scoop on those options, see Pariah Burke’s article in the October/November 2005 issue of this magazine.) Here’s all you need to do this time: Set the X Relative To and the Y Relative To pop-up menus both to Page Edge, make sure Prevent Manual Positioning is off, and click OK. Setting these to Page Edge tells InDesign to place the object relative to the page itself, no matter where the text frame is. 
5. Place the Object Where You Want It
After you clicked OK, the anchored object flew outside the text frame (probably to the upperleft corner of the page). But because you Prevent Manual Positioning disabled in the last step, you can now use the Selection tool to drag it anywhere. Here, I’ve dragged it to the beginning position on the slider. I’ve also made the text frame (which holds the anchored object) really small so it’s less distracting. You could drag it off into a page corner, too—just as long as it’s still on the page somewhere. 
6. Save the Position as an Object Style
While the anchored object is selected on the page, open the Object Style panel and choose New Object Style from its flyout menu (or Option/Alt-click on the New Object Style button). Give the object style a descriptive name—I used “0% position” to indicate where on the slider the line sits. Click the Anchored Object Options pane in the list along the left side (or press Command/Ctrl-zero). You don’t need to change anything, but I wanted you to see that the page position—where you dragged the object to—is recorded here. Now click OK to save the new style. 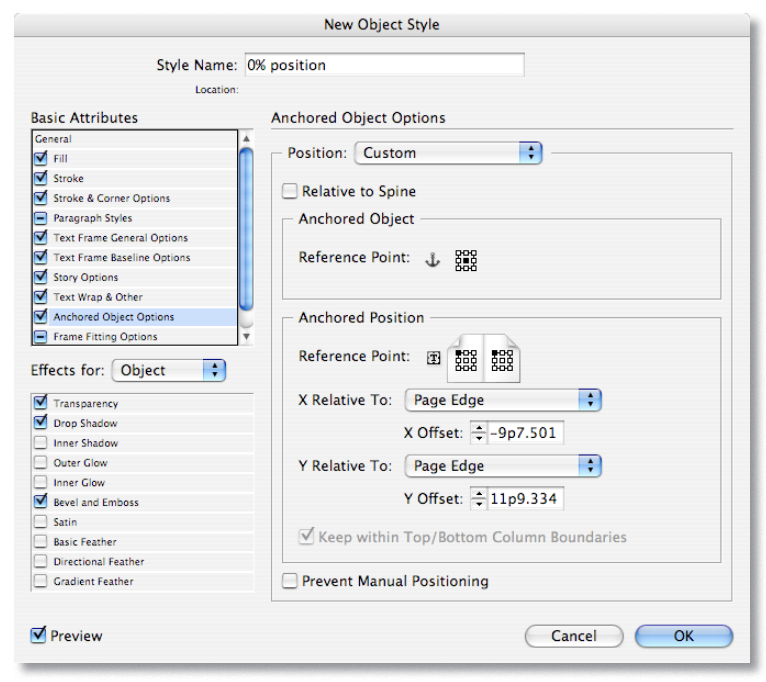
7. Make More Object Styles
Move the anchored object to another location—here, I’ve held down the Shift key and dragged it to the right until it’s at the 100° position. Save this position as a new object style, then repeat (move then save style) until you have all the positions you want. If you make the object styles out of order, don’t fret: You can drag object styles up and down in the panel to reorder them. 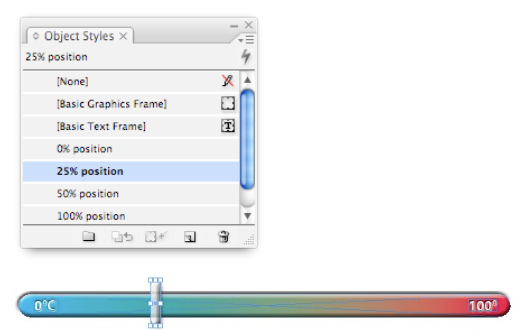
8. Change the Position
After making your object styles, apply them one at a time to the object to see it move around. When I do this, I often find that I made a mistake on one or more of the object styles. Fortunately, you can easily remedy this: Apply the style that has a mistaken location, position the object where it should be (you’ll see a + sign appear next to the style name in the panel), then choose Redefine Style from the Object Styles panel flyout menu. 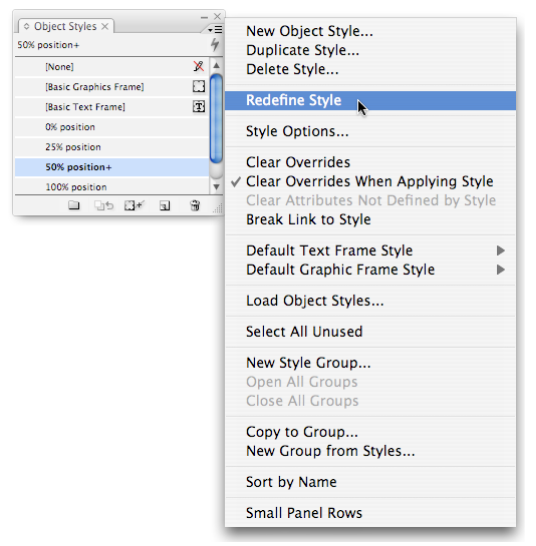
9. Give Yourself Clues
The primary downside to setting up your objects and object styles like this is that you may later forget that the document was built this way (or someone else working on the document will be confused). But if you choose both View > Show Text Threads and Type > Show Hidden Characters, you can see clues to how the document was created (the dashed line indicates where the object is anchored, the Yen symbol indicates an anchored object is present in that frame). You can also add notes in non-printing text frames (on non-printing layers, or turn on the Non-printing feature in the Attributes panel). These notes will remind you or your colleagues how the file was created. 
Commenting is easier and faster when you're logged in!

Recommended for you

Top Tips From CreativePro Week 2019
Erica Gamet shares a dozen of the coolest tips and tricks she learned at Creativ...

CreativePro Video: How to Use Camera Raw in Photoshop
In the following CreativePro video, Michael Ninness shows us how to use Camera R...

Spaced out dots…
I love my dots, but want more from InDesign when it comes to dots. Let's space o...