

In the previous installment of this column, I talked about the first generation of scalable, digital desktop fonts, the so-called single-byte fonts that contained only a couple hundred characters or so. This time we dive into the deep end of the pool: double-byte fonts, big character sets, and awkward font navigation tools. Our unlikely life preserver is Unicode, an international standard that applies a unique identification number to every character and ideogram in all the world’s languages. This provides a universal mechanism for all computers and applications to communicate with each other.
In this column, I’ll address just one aspect of the revolution: how Unicode affects the fonts you use and your ability to find the characters you need.
Characters and Glyphs
OpenType and TrueType fonts both use Unicode. At last count, the Unicode standard comprised more than 100,000 unique I.D. numbers. It’s possible to set type in most of the world’s major languages using a single, huge font. Because international operating systems (Windows and the Mac OS) use Unicode as well, cross-platform text communication is seamless.
OpenType and TrueType fonts can contain about 65,000 characters, although most are much smaller. But no matter how many characters a font contains, finding a way to access them all efficiently using a keyboard is a challenge.
Complicating the picture is that some characters have several forms. A capital T, for example, can have multiple appearances, such as the following, which are from the Adobe Arno Pro family. They range through roman, italic, small cap, display, swash, and bold.

Each of the T’s above is represented by a unique-looking glyph, but for font-encoding purposes they represent the same character, so they have the same Unicode number. If I send you an electronic file that contains a swash T, even if you don’t have a font with that glyph, at least you’ll see a T that you can read properly.
The Language of Unicode
This next part is hard for my math-challenged brain, so let’s get it over with quickly. Unicode characters are numbered using a base-16 system called hexadecimal, which uses both numerals and letters to express numeric values more compactly. In hexadecimal, our familiar numbers 0 through 15 look like this:
0 1 2 3 4 5 6 7 8 9 A B C D E F
In hexadecimal, good old number 16 looks like this:
10
Yes, this is the stuff of brain cramps. But since the assignment of numbers to characters within a font is arbitrary in any font format, it doesn’t matter whether you have to remember that the number for a division sign (÷) is 247 or its hexadecimal equivalent 00F7. When you get past character number 255 you have to reckon with hexadecimal notation. By convention, Unicode numbers are always expressed with four digits, even if the first ones are zeroes.
Escape from Exposition: Let’s Get to Work
For everyday work, the Mac continues to rely on its original character-access system, which uses keystroke combinations involving the Option and Shift keys to set characters with I.D. numbers 255 and below. Windows continues to use its Alt-I.D.-number typing scheme. Neither of these strategies addresses Unicode numbers. Likewise, neither allows you access to those “blocked” characters in even the simplest Type 1 font.
The original Mac and Windows character-access techniques don’t allow you to get at all of the characters in even a small, single-byte font. Some characters are available only on one platform or the other, as shown below.

To get at those blocked characters or those with I.D. numbers higher than 255 (or the Unicode equivalent, 00FF), the action recommended by most Help systems is to use Windows Character Map, Mac OS’s Character Palette, or glyph palettes in programs such as QuarkXPress or Adobe InDesign. Here you have to browse visually, scrolling through hundreds of characters to find the one you’re after.
It’s a tedious method, though you can learn, for example, that the Unicode number for a minus sign is 2212. (You can also go to www.unicode.org for a searchable list.) But what can you do with this knowledge? Windows has the better idea here.
The Windows Approach
Windows and Windows applications use an approach similar to its old Alt-I.D. access scheme. To set a character by Unicode number, you type its four-digit Unicode I.D. and then type Alt-x. The I.D. number is converted into the character you’re after. Although Unicode numbers are always shown with digits and capital letters, you can usually use lowercase letters. (In fact, if you have the Caps Lock key engaged, the technique won’t work.) You can type the numbers from wherever you want, not only from the numeric keypad.
An invaluable tool is Character Map. In Windows XP, it’s found in the Start menu, under All Programs. In Vista, it’s buried inside the All Programs/Accessories/System Tools folder. Add it to your Quick Launch toolbar so it’s easily accessible.
Windows Character Map is an indispensable tool for plumbing the depths of your fonts’ character sets.
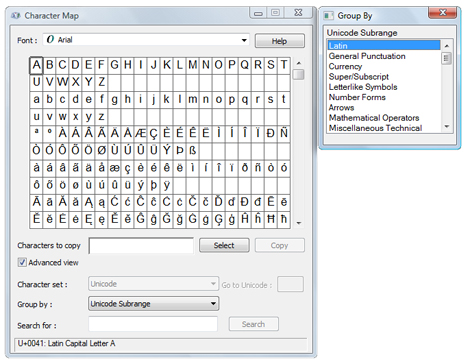
There are two basic ways to use it. First, you can choose Unicode in the Character Set field and All in the Group By field. This shows you all the characters in a font. Now you can use the Search For field to find characters using their plain-English names, such as “minus” or “ligature.” When you’ve found the character you want, its Unicode number appears in the field at the bottom of the window. You can later use this number in the Go To Unicode field to see if a character is in a specific font. Having found the character you want, double-clicking it makes it appear in the Copy field. Click Copy, and you can paste it into your document.
You can also set Character Map’s Group By field to Unicode Subrange, which lets you see subsets of the font’s character set, where you can conduct a visual search.
Windows’s Alt-x technique works in most Unicode-savvy applications, with one glaring exception: Adobe’s Creative Suite, including InDesign and Illustrator. In these programs, your only access to characters beyond the basic 228 is to go fishing in their Glyphs palette. Having found what you want, add it to a custom glyph set for faster retrieval in the future.
To build a custom glyph set, select New Glyph Set from the Glyphs palette, give your set a name, and click OK. Then when you find a glyph you’ll want to use again later, just select it in the Glyphs palette, choose Add to Glyph Set… from the Glyphs palette menu, and select the set of your choice. Glyphs you record there can be from any combination of fonts; just choose View Glyph Set to go right to your custom glyph stash.
A workaround is to select a character in your Adobe document and use the Find/Replace tool to specify the replacement character by Unicode number. You can also leave a compliant application, such as Word, Word Pad, or Text Edit running, set your Unicode character there, and paste it into your Adobe program.
Creating the All-Unicode Mac
As in Windows, on the Mac you can install language-specific keyboard layouts, which reassign the meanings of keystrokes to match those of keyboards used in, say, Armenia. Apple has implemented Unicode access by creating a specific keyboard layout just for accessing characters by Unicode I.D. number. Unfortunately, you lose the ability to use any Option and Shift-Option keystroke combinations you may have memorized.
To get under way, first open System Preferences (from the Applications folder) and select International from the Personal settings. Click the Input Menu tab, and you’ll see a dialog box like this:

Put a check mark next to “Show input menu in menu bar.” This is not visible by default.
Now check Character Palette and Keyboard Viewer at the top of the scrolling window. These tools will appear in the Input menu. Next, scroll down to your language (or nationality) of choice and make sure it’s checked, as well as any other languages you use. Do the same for “Unicode Hex Input.” Then close the panel.
At the right end of your menu bar you’ll see the Input Menu icon, probably as a flag associated with your chosen language. If not, open the menu and click on your preferred language and its flag will appear as the menu icon. This gives you the normal keyboard behavior you’re used to. Switching keyboard layouts changes the menu’s icon, so you’ll always know where you are.
If you select “Unicode Hex Input,” something new happens. Trying to access characters using Option and Shift-Option commands no longer works. Instead, you type these characters by holding down the Option key while typing their Unicode numbers. At the tap of the last number (or letter), the character will appear on screen. If you want to go back to using your old character-access techniques, choose your preferred language again in the Input menu. You can mix and match keyboard layouts within a document, and the Mac will remember what text was created with which. When you put your cursor in text created using a specific keyboard layout, the OS will automatically switch to that layout. The Keyboard Viewer will automatically shift its display according to the keyboard layout you’ve chosen.
As on Windows PCs, Adobe has a different idea for the Mac, so the above scheme doesn’t work in any Creative Suite applications. The workarounds prescribed earlier for the PC work on the Mac, too. These include using Find/Change to insert characters by Unicode number; copying Unicode text from an open word processor, where its easier to set; and using custom glyph sets using InDesign’s Glyphs palette, to save collections of hard-to-access characters.
Tracking Down Characters on the Mac
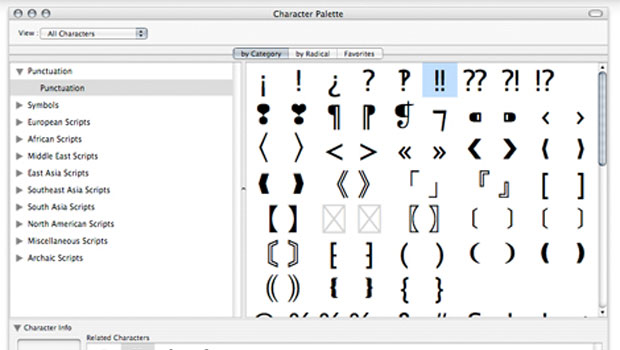
The Mac’s Character Palette, like Windows Character Map, reveals the Unicode numbers of specific characters. It too can search by name. But it also shows which of your installed fonts contain any character you’re after.
To do this, first click Roman or All Characters in the View field. Then expand the window by clicking on the labels Character Info and Font Variation. Picking a category of characters narrows your search. When you find the character you want, click on it, and the bottom part of the window will display it as it looks in all the installed fonts that contain it.
A search for double exclamation marks in the Mac Character Palette displays which installed fonts contain the target character.

Useful Unicode Numbers
It’s unlikely that you’ll need to use large numbers of characters that are identified only by Unicode number, but knowing the ID numbers of a handful can save you a lot of time. Here’s a list of common ones that I’ve learned over the years:

Note that some of these characters exist in virtually all text fonts — they just weren’t accessible before Unicode came along. Others will require larger fonts installed by your operating system for just such purposes, such as Windows’s Arial and Mac’s Lucida Grande.
The Fail-Safe Position
Well-behaved, Unicode-savvy applications will do a remarkable thing if you call for a character by its Unicode number but that character isn’t in the font you’re using. The application will find and use an installed font that contains the character you specified. If the substitute typeface resembles the one you’re using, you may not notice the substitution on screen, so be careful. The switch will be far more obvious in print.
This article was last modified on August 13, 2021
This article was first published on November 16, 2009
Commenting is easier and faster when you're logged in!

Recommended for you

Free WhatTheFont for the iPhone
WhatTheFont has long been available online for people who need to identify a cer...
TypeTalk: A Bodoni Is a Bodoni Is a Bodoni?
TypeTalk is a regular blog on typography. Post your questions and comments by cl...

TypeTalk: How to Attract Attention With Pull Quotes
A pull quote is a key phrase, sentence, quotation or excerpt that is taken, or p...