


Reproduced with permission of Planet Quark
The Easiest Multiple Undo
A feature new to QuarkXPress 6 and 7 is Multiple Undo, and it’s implemented in a way that’s much more intuitive than the way it’s done by other applications. At the bottom left of the project window are two curly arrows (Figure 1). One takes you back one Undo. The other takes you forward again. You can click them multiple times to return to various states, or click and hold on them to choose a recent change from its list of up to 20 previous changes you made to your layout.
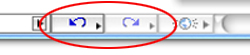
Figure 1.
Guide Manager: Set a Grid of Guides
QuarkXPress 6 and 7 (and 4 and 5 with Quark’s free Guide Manager XTension) include a Guide Manager (Figure 2) in the Utilities menu. Under its Add Guides tab you can place guides either vertically or horizontally, or both. They can be applied to the current page or spread, or all pages or spreads. You can control how many guides to add, how they’re spaced, and whether their location relates to the edge of the page, the margins, an arbitrary amount of inset, or an absolute position.
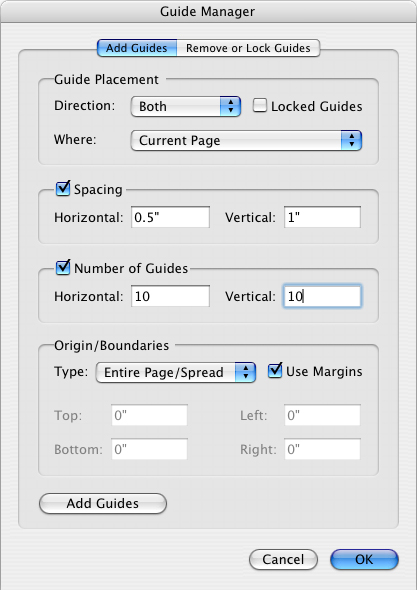
Figure 2.
Print Vector EPSes Smoothly on Inkjets
QuarkXPress 7 will print your imported vector EPS files smoothly on a non-PostScript printer (such as your desktop inkjet), if you turn on Generate Preview in QuarkXPress> Preferences> Application> EPS. For the smoothest output, be sure to select the EPS picture box and choose Item> Preview Resolution> Full Resolution (or Control-click/right-click the picture box and select it from the contextual menu that appears). If you later close and reopen the document and want the smoothest output from a non-PostScript printer, double-check to be sure that Full Res Previews is enabled in the View menu.
Change a Project to Single Layout
If you have a Project in QuarkXPress 7 that has only one Layout, and you want to get rid of the extraneous Layout tab at the bottom of the window, you can convert the Project to Single Layout Mode. Choose QuarkXPress> Preferences> Project> General and tick the Single Layout Mode checkbox.
Enable Ligatures Anywhere
In previous versions of QuarkXPress, if you enabled ligatures in preferences, all text throughout a document would display ligatures. In QuarkXPress 7, you can turn ligatures on and off for any selected text. Just click the checkbox labeled Enable Ligatures in the Character Attributes tab of the Measurements palette.
Space/Align Tricks in QuarkXPress 7
In QuarkXPress 7, the Space/Align feature has been dramatically enhanced. To quickly get to where you can space or align items, press Ctrl/Command-, (comma). This will display the Space/Align tab on the Measurements palette, where you can space or align to other items, or even to the edge or center of a page. Notice that the icons show how the items will be aligned.
To repeat a Space/Align command using your most recent settings, just press Command-Option-/ (Mac) or choose Apply Last from the Item> Space/Align menu, or from the contextual menu that appears when you right-click or Control-click with several items selected.
Preview in Grayscale, CMYK, and More
QuarkXPress 7 has an amazing ability to render your layout in whatever color space you like. The Grayscale option (View> Proof Output> Grayscale) is particularly handy for previewing how your entire layout will print in grayscale. The other built-in profiles include RGB, CMYK, CMYK and Spot, and more. You can create your own, or import profiles provided by your output provider, by choosing Edit> Color Setups… Output…
TextLink: Link Text Boxes the Way YOU Want To
The Linking and Unlinking tools in QuarkXPress 7 haven’t changed since they were invented many years ago. But Quark’s free Quark XPert Tools Pro adds a new TextLink palette that provides several — in my view — essential improvements.
For example, let’s say you have two text boxes with text in them and you want to link the second one to the end of the first one. QuarkXPress won’t let you do that, but TextLink will (Figure 3). Just click on the first box, then on the first button in the palette, and then on the second box (Figure 4).
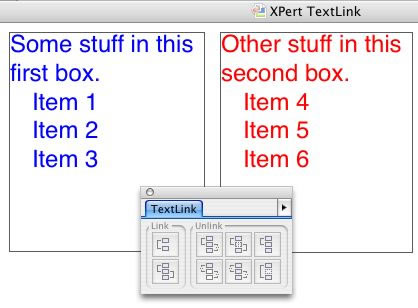
Figure 3.
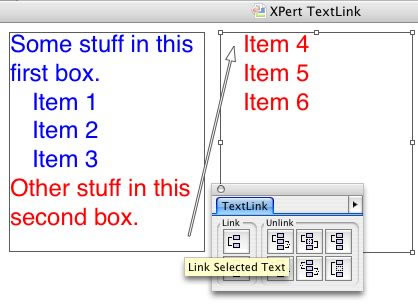
Figure 4.
The second box becomes linked to the first box, and the text in the second box is added to the end of the text in the first box.
Now let’s say that you have several linked text boxes (Figure 5) and want to unlink them, but without disturbing the text in the boxes — in other words, leave all the text where it is, but unlink the boxes.
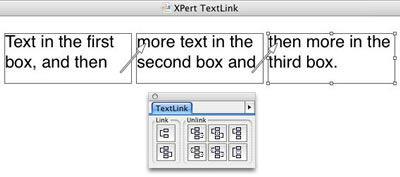
Figure 5.
You can’t do that in QuarkXPress. But with TextLink, you just select all the text boxes and click the bottom center button. All the boxes are now unlinked and they retain their text (Figure 6).
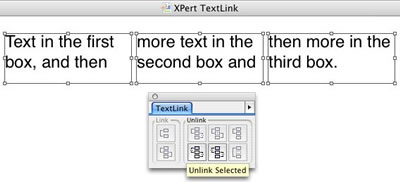
Figure 6.
The other unlinking buttons offer variations:
Top row:
The first button breaks the link at a point between two boxes, so that the box(es) before and after the break retain their text.
The middle button does the same thing, but the text divides wherever the text insertion point is.
The third button makes a duplicate of the selected text box, with its content intact.
Bottom row:
The left button breaks the link between all the boxes in the chain. All the text is sucked into the first box.
The middle button unlinks all the boxes, but they each keep their content (as in the example above.)
The right button removes the current box from the chain, and deletes the box and its content.
The TextLink palette has just one option, available from its side menu: Keep Paragraph Formatting (Figure 7).
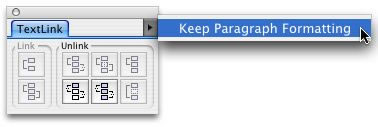
Figure 7.
This option affects how paragraphs appear if they are broken when the boxes are unlinked: drop caps, first line indents, rule above/below, etc. Sometimes you’ll want this turned on, but often not.
TextLink is just one of the 15 handy XTensions included in Quark XPert Tools Pro, available as a free download from their website.
This article was last modified on January 9, 2022
This article was first published on November 21, 2007
Commenting is easier and faster when you're logged in!

Recommended for you

Harnessing the Power of Text Variables and IDML
Learn how Jeff Potter built a system for harnessing the power of text variables...

Quark To Make First Public Demonstration Of Quarkxpress 7 At Seybold Chicago 2005
Seybold Chicago, produced by MediaLive International, Inc., today announced that...

Designing for the Color-Blind
This article is courtesy ColourLovers.com. In the U.S. 7% of the male population...