
QuarkXPress How-To: Add Dashing Design to Lines and Frames

Tired of using the same line and frame styles in every piece you lay out? Did you know that you can edit those worn-out styles and create entirely new styles in QuarkXPress using the Dashes & Stripes feature? Once you’ve expanded your palette with new dash and stripe line styles, you can enhance your next page layout with a fresh new look by applying them to your lines, paths, and boxes, as shown in figure 1.
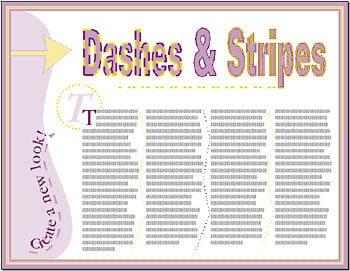
Figure 1: The Dashes & Stripes feature in QuarkXPress lets you expand the choices you have for line and frame styles.
In this article, you’ll get an inside look at the powerful and flexible Dashes & Stripes feature by creating a new dash line style and a new stripe line style. Then, you’ll learn how to save your styles, so you can apply them to lines, paths, and boxes in your current document, and copy them into other QuarkXPress documents for further use.
Creating a Custom Dash
Dashes are dotted or broken-line PostScript patterns. Although you could just edit an existing dash style, it’s easier to create and edit a copy, which the Dashes & Stripes feature lets you do.
To do so, choose Edit > Dashes & Stripes. In the resulting dialog box, choose All Dashes And Stripes from the Show pop-up menu to display all of the dashes and stripes available in your document. Next, select Dash Dot and click the Duplicate button to display the Edit Dash dialog box, shown in figure 2.
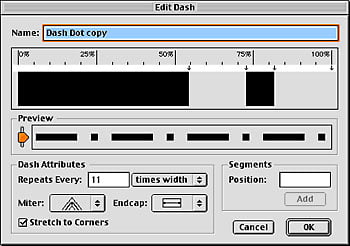
Figure 2: The Dashes & Stripes feature lets you create a new dash style, edit an original style, or duplicate and edit an existing style.
Adjust the line segments. After you enter a name for your new style in the Name text box, use the available options to experiment with its new look. For example, to shorten the first dash segment, click on the first arrow just below the horizontal ruler and drag it to the left; or, drag the arrow to the right to lengthen the segment.
To create a new dash segment (you can have up to five segments), click on the ruler where you want the segment to start and then drag the arrow left or right to size it. Or, you can use the Segments area to add a new segment by entering a specific percent value in the Position text box and then clicking the Add button. You can also reposition a segment by placing your cursor over it and dragging it left or right. Similarly, you can delete a segment by simply clicking and dragging it off the ruler in an upward or downward motion.
Check your work. The Preview bar gives you a good idea of how your custom dash style will look. Move the slider up or down to see how the dash will look thicker or thinner, respectively. This is a low-resolution preview of the Postscript dash, so your printed results will look better than what you see in the Preview area.
Create some repetition.
In the Dash Attributes area, the Repeats Every option lets you specify the width of the repeating dash segment in the pattern. When you choose Times Width (the default setting), the pattern’s length is determined by the thickness of the line or frame. As the line weight increases, the pattern becomes longer with fewer segments. As the line weight decreases, the pattern becomes shorter with more segments. If you don’t want the distance between the segments to change, choose Points from the Repeats Every pop-up menu to specify an absolute width value.
Pay attention to detail.
Select a Miter setting to determine what the dash pattern does when it runs into a corner, as it will when you frame a box or text converted to a box. Your Miter choices are a sharp corner, rounded corner, or beveled corner.
The Endcap option lets you specify how the end of each segment in the dash pattern appears. The Projecting Square and Round styles extend beyond the edge of the segment. The Stretch To Corners check box is selected by default and tells QuarkXPress to adjust the Repeats Every setting just enough to make the pattern reach the ends of the path or from one corner of a framed box to another corner. It’s usually best to keep this option selected, unless you really don’t like the results you’re getting. Click OK in the Edit Dash dialog box when you’ve finished editing your new dash style, but don’t click Save in the Dashes & Stripes dialog box just yet.
Tip: In addition to the PostScript dashes and stripes styles, there are several other frame styles, such as Ornate and Yearbook, which can be edited in the Frame Editor. However, these frame styles are low-resolution bitmaps that will produce poor results in high-resolution printing.
Creating Custom Stripes
Stripes are solid-line PostScript patterns. To create a new stripe, select Double from the list in the Dashes & Stripes dialog box, and then click Duplicate. In the Edit Stripe dialog box, shown in figure 3, rename the new style. Next, use the arrows along the vertical ruler to resize the stripe segments. Now, click on the ruler to add more lines to the stripe pattern; or, type a value in the Position text box to add a line segment at a specific location. The Preview and Miter options work here as they do in the Edit Dash dialog box. When you’ve finished editing your custom stripe style, click OK. Then click Save to close the Dashes & Stripes dialog box.
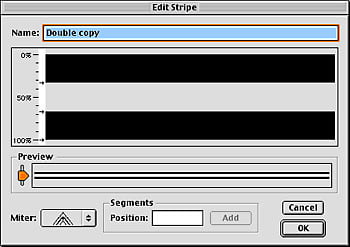
Figure 3: You can resize and reposition line segments in a stripe, as well as add new segments to it.
Appending Dash and Stripe Styles
Once you create or edit a dash or stripe style and save it, it remains with the document. However, you can append dashes and stripes styles to other documents; and if you copy a formatted item with a custom dash or stripe and paste it, or drag it, into another document, the style will be added to the Line Style and Frame menus.
Applying Dashes and Stripes
There are several ways to assign a dash or stripe to a line, path, or box. The first step is to select the object. To access the Line Style menu (from the Style menu), you can select a line with either the Item tool or Content tool, but you must select a text path with the Item tool. Boxes and other shapes can be selected with either the Item tool or Content tool to access the Frame option (from the Item menu).
With the object selected, use the Style menu to access the Line Style, Arrowheads, Width, Color, and Shade submenus to apply and format your dash or stripe. Or, use the Measurements palette to select a style and width for the line or stripe, and use the Colors palette to select a color. Probably the easiest method, though, is to access the Line tab or Frame tab in the Modify dialog box (Item > Modify), where you can set all the attributes for the dash or stripe, including the gap color.
Just like style sheets, if you edit a dash or stripe style, QuarkXPress updates every item in the document formatted with that dash or stripe to reflect the changes made to the style. An item doesn’t have to be selected for it to be updated.
How Dashing!
As we’ve shown you in this article, the easiest way to create new dash and stripe line styles is to play with the controls in the corresponding dialog box, accessed via the Dashes & Stripes option. We think you’ll now agree that dashes and stripes are enormously flexible design elements that will make the next pages you design quite dashing (pun intended)!
This story is taken from “Inside QuarkXPress” (Element K Journals).
Creativepro.com readers can subscribe to Element K Journals at a discount. Click here to learn more.
This article was last modified on January 11, 2022
This article was first published on January 10, 2003
Commenting is easier and faster when you're logged in!

Recommended for you

CreativePro Week Sneak Peek: When To Use CC Libraries and When Not To
Learn when your workflow would benefit from working with an image that's been ad...

Locking Objects For Easier Aligning
A quick tip on how to make any object the "key object" when aligning.
InDesign CS Tips: Creating Layout Standards
This story is taken from “The Adobe InDesign CS Bible.” To buy this...