
Photoshop How-To: Eliminate Barrel Distortion Caused by Camera Lenses

This story is taken from “Inside Photoshop” (Element K Journals).

Creativepro.com readers can subscribe to Element K Journals at a discount. Click here to learn more.
Many snapshots taken with cameras that have zoom capabilities suffer from barrel distortion. Because barrel distortion makes the outer areas of your image rounded, it’s most apparent when there’s a straight edge in the image, near the frame. This tends to make your image lose its perspective. It’s similar to the effect you would get when you look into a funhouse mirror. Although unavoidable when using a camera, you can eliminate distortion in your images using Photoshop.
A Barrel of Fun
In this article, we’ll go over a few different approaches that you can take to eliminate barrel distortion. First, we’ll explain more in depth what barrel distortion is. Next, we’ll go over one of the easiest methods you can use to eliminate it, focusing on the Free Transform tool and the Pinch filter. Then we’ll go over Photoshop’s solution to barrel distortion using the Perspective feature of the Crop tool. And finally, we’ll take a look at a free, downloadable plug-in that can actually fix your image for you.
What’s Barrel Distortion?
Basically, barrel distortion causes images to look as if they’re spherized from the center of the image out, or fat in the middle. Take for example the building shown in figure 1. Notice how the edges of the building appear to be curving outward from the center of the image, making an otherwise erect building look rather bloated. So, if you’ve noticed that your photos have been a little too well rounded, take a look at how to lessen the load.

Figure 1: Because of the round shape of a camera lens, photographic images are often affected by barrel distortion.
A Smooth Transformation
The first technique that we’ll use to eliminate barrel distortion in our image involves a few tweaks here and there. To follow along, open an image in Photoshop that you want to adjust. In the Toolbox, click the Full Screen Mode With Menu Bar button. Now, go to the Layers palette and make sure that your image isn’t on the Background layer. If it is, double-click on the layer; then in the resulting dialog box, click OK. The layer will be renamed Layer 0 and it will no longer be locked.
Now it’s time to make our adjustments. Select Free Transform from the Edit menu. Then, while hold-ing down the [command] key ([Ctrl] in Windows), drag each point on your bounding box in order to straighten out your image, as shown in figure 2. Once you’re happy with how the image looks, double-click on the image inside the bounding box to apply your changes.
Although the Free Transform tool will eliminate most of the barrel distortion, you may find that the image still looks a tad bit round. So, to clean it up a little bit more, choose Filter > Distort > Pinch. In the resulting Pinch dialog box, shown in figure 3, drag the Amount slider to approximately 4%. Use the Preview window to decide on the perfect amount of pinch to apply, and then click OK. At this point your image should look picture perfect, like ours shown in figure 4.

Figure 2: You can use the Free Transform tool to adjust the position of your image.

Figure 3: Reduce the bloating in the center of your image with the Pinch filter.

Figure 4: By adjusting the edges and center of your image, you can quickly eliminate barrel distortion, while preserving the perspective of your image.
A Croppy Fix
Because barrel distortion is a common occurrence, Photoshop has included a Perspective feature with the Crop tool that can correct the problem. However, this feature isn’t very user friendly. To see what we mean, again open an image to work with. This time, select the Crop tool from the Toolbox. Using the tool, select the entire image or just the portion that you want to use. Next, select the Perspective check box in the tool options bar. Now drag the top corner points out and the bottom corner point in to adjust the image, as shown in figure 5.

Figure 5: You can try to use the Crop tool’s Perspective feature to adjust barrel distortion in your image, but there’s no preview to show your changes.
This is where the problems arise. When using the Crop tool you’re basically winging it because there’s no preview of your changes. So you may be fixing the image or you may be making it worse. To see what you’ve done, click inside the bounding box. This applies your adjustments. If you’re one of the fortunate souls, your image will look better. Although this isn’t the best method, with a lot of practice you can use the Crop tool to make slight barrel distortion corrections. If you want more control over the entire process, steer clear of it altogether.
A Mathematical Approach
The last technique that you can use to eliminate any barrel distortion involves a plug-in. Panorama Tools is a freeware plug-in for Photoshop. To download it, go to https://home.no.net/dmaurer/~dersch/Index.htm and follow the instructions on the Web site.
Once you have the plug-in installed, open your image in Photoshop. Then choose Filter > Panorama Tools > Correct. In the resulting dialog box, shown in Figure 6, select the Radial Shift check box. Then click the Options button directly to the right of it. In the Radial Shift Options dialog box, shown in Figure 7, enter a value of 0 for all of the colors under the letters C and A. Now we have to set the D and B values so that they equal 1, but in order to eliminate the barrel distortion the B setting must be negative. Because the level of distortion varies in every image, start with a value of –0.015 for all of the colors listed under B. Then enter the D value for each color (1.015) making the final sum 1. Click OK, and then click OK again to apply the effect. Your image will automatically be straightened.
The secret behind the plug-in is quite complex. Much of it is based on mathematical adjustments, where certain pixels are moved slightly and others remain in their original position. But if you stick to the B + D = 1 formula and make slight adjustments, you can easily eliminate barrel distortion.

Figure 6: You can use Panorama Tools to correct distortions within an image.
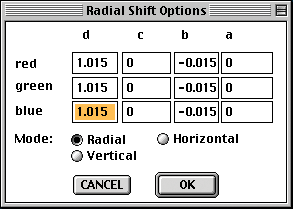
Figure 7: By following a simple mathematical equation, you can adjust the pixels within your image.
Straight Up, Now Tell Me
Overall, you can use any of these techniques to correct warped edges caused by barrel distortion. For the ultimate control, you’re best off taking advantage of Panorama Tools. But be warned-the plug-in is a bit finicky and may crash your system if it isn’t happy with the settings you input. The Crop tool’s Perspective feature is okay for slight distortion adjustments. However, if you want to preview your adjustments this is not the best approach. If you’re looking for decent results, without a lot of hassle, learning how to use a new plug-in, or guessing what your adjustments will look like, stick with the Transform tool and the Pinch filter.
Generally, you’ll find that distorted images aren’t ideal and need to be corrected. However, there are times when a little distortion can make an image really pop off the page. One way to add visual impact to otherwise flat imagery is by giving it extreme barrel distortion, as shown on our cover image. To see how this effect is created, refer to the sidebar, “A Warped Sense of Sight.”
This story is taken from “Inside Photoshop” (Element K Journals).
Creativepro.com readers can subscribe to Element K Journals at a discount. Click here to learn more.
This article was last modified on January 3, 2023
This article was first published on October 4, 2002
Commenting is easier and faster when you're logged in!

Recommended for you

The Digital Art Studio: Illustrator’s New Crop Image Button
The 2017 release of Adobe Illustrator added a new feature you can use to permane...

The Digital Art Studio: Quick Fixes #1 (Square Art)
This is the first in a series of articles on quick fixes you can apply to photos...
Review: Canon EOS M
Shutter noise in E flat major I photograph musical events in my community, speci...