
Photoshop How-To: Creating Art from Scanned Flowers

This story is taken from “Inside Photoshop” (Element K Journals).

Creativepro.com readers can subscribe to Element K Journals at a discount. Click here to learn more.
Since the origination of Photoshop and other digital mediums, artists have been creating digital masterpieces. Now, with Photoshop 7.x, you can push the limits of digital art even further by taking advantage of the application’s unique painterly brushes and patterns. In this article, we’ll show you how we created a floral painting from scans of actual flowers and a combination of paintbrushes and blending modes. Although this technique can be time-consuming if you choose to do a highly detailed image, it’s well worth it if your main objective is to create one-of-a-kind digital paintings.
We’ll begin this technique by going over how to scan in your flowers while preserving their dimensionality. Next, we’ll go over how to remove the background from each scan. Once that’s complete, we’ll show you how we created our floral composition by combining the separate flowers. Then, we’ll show you a few different painterly approaches you can use to add texture and vibrant colors to your piece.
A Flatbed of Flowers
Before beginning this tutorial you’ll need to gather a variety of flowers. Don’t worry too much if the flowers are a little damaged or aren’t in perfect condition because we’ll eventually be painting over them. You’ll also need a piece of acetate to place on the surface of your scanner so that you don’t get any sticky pollen on the glass (and if you do, see “Under the Desktop: Planning for Scanning” for tips on cleaning you scanner).
Once you have everything together, keep the stems and leaves on some flowers, and remove the flowers and a few leaves from others. You’ll want to do multiple scans of each flower so that they can easily be incorporated into the composition. Then, lay the flowers out on your scanner. Don’t worry about putting them in any particular place on the scanner bed; just make sure that they aren’t overlapping so your selection process will be minimal later. Then, place a box lined with white paper on top of the scanner bed giving the flowers a white background.
Note: If you don’t have a box, your scans will have a black background. This is fine as well, though, it may be more difficult to remove the black background from your scans.
Scan in plenty of flowers so you have several different images to choose from when creating your composition. Figure 1 shows a few of our original scans. When scanning, set the color mode to RGB and the resolution to 300 ppi. Don’t bother doing any color correction at this point.
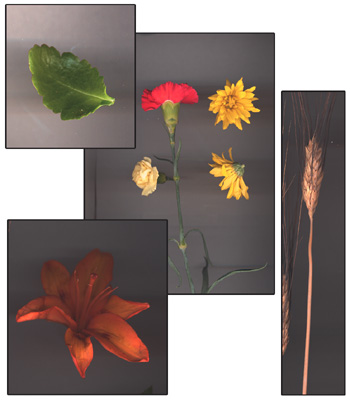
Figure 1: Scan in your flowers to place into your collage by putting them directly on the scanner bed.
Make your Frame
Once all of your scanning is complete, open a new RGB document in Photoshop at 300 ppi. It can be any size that you want. Then, if your rulers aren’t showing, choose View > Rulers. Now, drag guides out from the ruler and position them at about one inch away from your document’s outside edges. Go to the Layers palette and fill your background with a soft hue of green. Then, create a new layer by clicking the Create A New Layer button in the Layers palette. Name the layer Oval Fill. Using the Elliptical Marquee tool, draw an oval spanning from where your guides have created a rectangle and fill the selection with a light cream color, as shown in Figure 2. Now your picture’s frame is complete.

Figure 2: Create a basic frame in which to house your flowers.
Add the Flowers
Now it’s time to create the composition. Before you begin, you may want to create a few sketches so that you aren’t wasting a lot of time cleaning up flowers that won’t ultimately be used. Once you have an idea of how you want your final image to look, open the scans of your flowers in Photoshop. Then, using the selection tool of your choice, select the flowers and drag them onto your new document. By doing so, each image will be placed on its own layer for easy compositing.
Note: When selecting the flowers, you may find it easiest to eliminate the background using the Background Eraser tool.
Become a Digital Florist
Now with each flower and leaf on its own layer, position them roughly where you want them to be. To speed up the collage process, try making copies of your flowers and repositioning them around the composition. Also use the Free Transform command to adjust the size and positioning of each element. When you’re happy with the layout of your image, save your document. Our final composition is shown in Figure 3.
Note: To tidy up your Layers palette, link all of the layers containing your floral elements. Then, choose New Set From Linked from the Layers palette’s pop-up menu.

Figure 3: Place your flowers onto the document to create your final composition.
Apply a First Coat
Before you start painting, make a new layer in the Layers palette and set the layer’s blending mode to Hard Light. Next, you have to create a custom brush with a texture applied to it. To do so, click on the Paintbrush tool in the Toolbox. Then, select the Stipple Dense 26 Pixels brush from the Brush pop-up window in the tool options bar. If the brush isn’t there, click on the arrow icon in the Brush Preset Picker and load the Natural Brushes. Now, go to the Brushes palette (if the palette is hidden, choose Window > Brushes) and click on the word Texture listed under Brush Presets. Then, select Streaks from the Pattern Picker, as shown in Figure 4. If the pattern isn’t showing, choose Patterns 2 from the pop-up menu to load it. Leave the remaining settings at their defaults.

Figure 4: Create a custom texture brush in the Brushes palette.
Now, select the Eyedropper tool from the Toolbox and sample a color from your actual flowers to paint with. Then, reselect the Paintbrush tool and paint over areas of your image that are the color you sampled, as displayed in Figure 5. Select a new color from your image and continue painting with that color. Paint darker and lighter hues over your middle tone colors for added texture, as displayed in Figure 6.
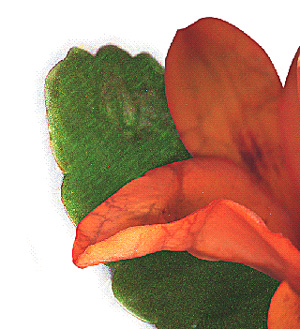
Figure 5: Using a color sampled from your actual scanned flower, paint over the image with your custom brush.

Figure 6: Build up the colors as you paint for more texture and a painterly look.
Add a Second Coat
Once you’ve painted over all of your flowers, make a copy of the painted layer by dragging it onto the Create A New Layer button in the Layers palette to brighten your colors up, as shown in Figure 7. If, at this point, you want to tone the colors down a bit, just lower the copied layer’s Opacity setting.

Figure 7: Brighten the colors of your painted layer by making a duplicate of it with the same blending mode.
Get Creative
Your painting is pretty much complete at this point. However, if you want to add to the painterly look of the image, try applying the Watercolor filter, as we did for the image shown in Figure 8. You can also create a third layer and use a different type of brush to paint in more color and detail to your image. And lastly, for added depth try applying a Light Effects filter to the image, as demonstrated in Figure 9.

Figure 8: For an entirely different brushed look, apply the Watercolor filter to your finished painting.

Figure 9: To add an element of depth, apply the Lighting Effects filter to your image.
One-of-a-Kind
By combining scans of actual objects and digital paints, you can create beautiful, unique pieces of art. When creating your composition, try experimenting with different blending modes, lighting effects, and paintbrushes to create your own style.
Copyright 2003 Element K Journals
This article was last modified on January 3, 2023
This article was first published on March 21, 2003
Commenting is easier and faster when you're logged in!

Recommended for you
Using Bleed for Print Design
Based on an article originally published in the DesignGeek e-zine. One of the fi...

InDesign Eyedropper Tool Tips
Sometimes it’s the little tools that we overlook when working in a particu...

How to Shoot Raw Photos on Your iPhone (and Why You’d Want To)
You don’t need a DLSR camera to reap the benefits of the raw image format.