
Photoshop How-To: Combining Shapes
Photoshop’s Custom Shapes palette contains a number of very useful objects. You can increase the usefulness of many of them by combining two or more shapes. And you can save these shapes for future use.
Step 1: Open a new document in Photoshop. The image I worked with is 400×400 pixels, but you can work with any size. (And since we’re working with vectors, you can design small, knowing that the shapes will resize perfectly and without loss of quality to any size at all.) In this example, we’ll convert a 10-point star shape to a 40-point sunburst.
Step 2: Select the Custom Shape tool in the Toolbox. In the Options Bar, open the Custom Shapes palette by clicking on the triangle to the right of the sample shape. In the upper-right corner of the palette, click on the triangle to open the palette’s menu.

Step 3: At the bottom of the menu are a number of sets of custom shapes, installed by default with Photoshop. For this example, let’s load Shapes. In the box that opens, click Append to add the shapes to the palette rather than replacing the default set.

Step 4: In the Custom Shapes palette, select 10-Point Star by double clicking on it. In the Options Bar, we want to set the tool to create “work paths” rather than shape layers or pixel-filled regions.

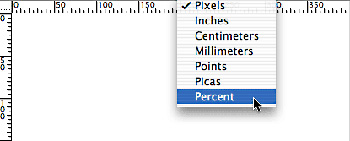
Step 5: So that we can get exact alignment when adding symbols, press Command-R (Mac) or Control-R (Windows) to show the Rulers. Now right-click or, for Mac users who have a one-button mouse, Control-click on the Ruler and select Percent from the pop-up menu. (Indeed, not only can you set the Rulers to Percent, Mac users with a two-button mouse can right-click to open contextual menus. Cool, eh?)
Step 6: Position the cursor at the 50%/50% mark – the exact center of the image. Hold down the Shift and Option keys (Mac) or the Shift and Alt keys (Windows). Drag toward one of the corners of the image. The Shift key will maintain the width-to-height ratio of the shape to the original (“constrain proportions”). The Option/Alt key enables you to drag from the center. If you’d like, you can drag vertical and horizontal guides from the Rulers to the 50/50 mark to make it easier to identify. Using the menu command View> Snap To> Guides (selected by default) makes it a breeze to be accurate.
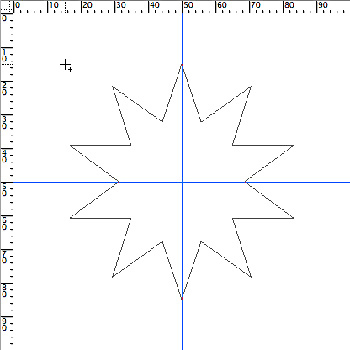
Step 7: Use the menu command Edit> Transform Path> Rotate. In the Options Bar, enter 45 for the angle of rotation. Hit the Return or Enter key to accept the value in the filed, then hit the key again to accept the transformation.

Step 8: In the Options Bar, make sure that the Custom Shape tool is set to add to the existing work path (see the insert in the following Image). Again from the center of the image, drag another star, this time of a slightly different size.

Step 9: Rotate the path another 45 degrees and add a third star, at a different length. Repeat the rotation and add a fourth star to the path. The path is complete.

Step 10: Use the menu command Edit> Define Custom Shape to create the custom shape, which will be added to the Custom Shape palette.
Here are some additional simple shape combinations, using only those shapes available to you in Photoshop 7.

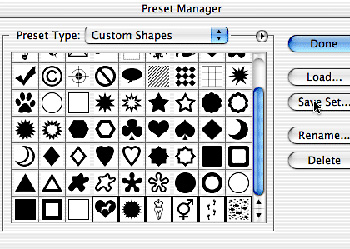
Note: Remember that your custom shapes aren’t really safely saved until you save them in a set. You can do that through the Custom Shapes palette or through Edit> Preset Manager. In the dialog box, switch to Custom Shapes in the pop-up menu. Shift-click on your new shapes to select them and from the Preset Manager menu, choose Save Set.

Tip: Don’t save your third-party and custom shapes, styles, Actions, brushes, etc. inside the Photoshop folder. Should you ever need to (gasp!) re-install Photoshop, having a separate folder (or folders) keeps them safe.
This story brought to you by the National Association of Photoshop Professionals (NAPP). Copyright © 2003 KW Media Group. Photoshop is a registered trademark of Adobe Systems, Inc.
This article was last modified on January 3, 2023
This article was first published on August 5, 2003
Commenting is easier and faster when you're logged in!

Recommended for you

CreativePro Tip of the Week: Make Illustrator Do the Math for You
This CreativePro Tip of the Week on making Illustrator do the math for you was s...

CreativePro Tip of the Week: Creating Guide Layouts in Photoshop
Ever need to create a set of regularly-spaced guides in a Photoshop document? Or...

The Digital Art Studio: Patching Text without the Fonts
How do you fix a typo when you don’t have the correct font? After my beloved stu...