

Photoshop includes multiple ways to automate tasks, but the tricky part can be knowing what they are and how to use them. Here’s a brief introduction to actions, scripts, and data-driven graphics to speed up the repetitious parts of your Photoshop workflow and save more time for being creative.
Using Actions
An action is a recording of one or more steps that you can play to apply again as a sequence of steps to other images or batches of images. There are several ways to use actions, including:
- Built-in actions
- Recording your own actions
- Conditional actions
- Third-party actions
Built-in Actions
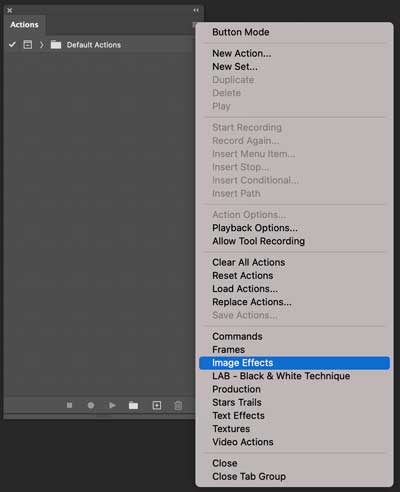
When you open the Actions panel (Window > Actions), it contains a Default folder that includes some starter actions.

Each name describes its action. Select an action and then click the Play button at the bottom of the panel to run it.
You can find more actions that come with Photoshop by going to the Actions panel menu.

Recording Your Own Actions
When you need a custom action to perform a repetitive task, you can record an action yourself. Here are the basic steps.
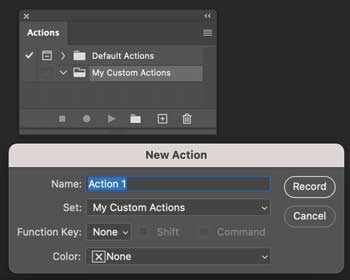
- Make a new set for your custom actions by clicking the folder icon at the bottom of the Actions panel.
- Make a new action by clicking the new action icon to the right of the folder icon. Name your action and assign it a function key if you like.
- Perform the steps you want to record.
- Stop the recording.
For a deeper look at recording your own actions, see Everyday Actions for Photoshop.
Creating Conditional Actions
When you set up actions to perform various steps on different types of images, you can make a third action as a conditional action to analyze the image and determine which of the actions gets used.
- Make a new action.
- Go to the Actions panel menu and select Insert Conditional…

- In the Conditional Action dialog, set the criteria for If Current, set the action to play if the image meets the criteria, and set the alternative action to play if the image does not meet the criteria.
- Stop recording if you haven’t already. (Recording isn’t necessary for inserting a condition.)
Third-party Actions
Third-party Photoshop actions are available through the Adobe Exchange. Filter by popular tags and sort by price. When you find one you want to try, acquire it and follow the instructions to access it. From the Actions panel menu, select Load Actions… and navigate to it.

Scripts
You don’t have to be able to write a scripts in order to use them. Photoshop has some built-in scripts (File > Scripts) including this one to delete all empty layers.
Adobe also curates third-party scripts that you can use. Some of these scripts can help you create cool effects. For example, go back to the Adobe Exchange and search for Comic Kit and download it.

1. Draw out guides to the center of the canvas.
2. Make sure snap to Guides is enabled.
3. With the Pen Tool, draw a path from the center to beyond a corner.
4. Cut the path.
5. Make a new layer and paste the path (the pasted path appears as a vector mask).
6. Choose Edit > Fill. For Contents, select Pattern. It doesn’t matter which pattern is selected, but check Script and set it to Speed_Lines_ex.
7. Select Zoomline Sunshine 1 and adjust as desired.
8. Delete or hide the vector mask for the effect to show.
Data-driven Graphics
If the term “data-driven graphics” sounds too geeky and intimidating, just think of it as swapping out similar content in a template. For an example, we’ll take a runner’s bib and automate the creation of multiple bibs.

Before making your variables, check the rules for naming them.
Rules for Naming Variables
- Variable names must begin with a letter, an underscore, or a colon.
- Variable names cannot have spaces or special characters (Exceptions: underscore, colon, period, and hyphen)
Define the Variables
- Go to Image > Variables > Define…
- In the Layer dropdown menu, navigate to the Myra Ferguson layer.
- For the Variable Type, select Text Replacement, and name the variable runner.
- Select the 1080 layer, select Text Replacement, and name the variable number.
- Select the team layer, select Pixel Replacement, name the variable team, and select the method as As Is.
Create the Data Sets
- Change the dropdown menu from Define to Data Sets.
- Click the New Data Set button.
- Select the team variable, click Select File…, and navigate to the team file to use.

Add Data Sets
A data set is a collection of content to swap. Make a new data set for each participant.
- Click the New Data Set button.
- Select a variable name.
- Change the content for Value.
- Check Preview to see the updates.

Import Data from an External Source:
- After the variables are defined, create a spreadsheet with a column for each variable.
- Make the data either text or a path to a file to replace. (TIP: If you place these files in the same folder as the .csv file, then you only need to add the name of the file.)
- Save the data as a .csv file.
- Click Import… and navigate to the .csv file. If you don’t see the file, make sure the .csv filetype is selected.
- Keep Encoding set to Automatic and check Use First Column For Data Set Names. Check Replace Existing Data Sets if you don’t want to keep previously entered data.
- Click the Data Set arrows to preview each set.
Output Data-driven Graphics
After defining variables, creating data sets, and clicking OK, the template looks like it did when we started. To create all of the different bibs, we’ll need to export them.
- Go to File > Export > Data Sets as Files…
- Select the output folder.
- Select either All Data Sets or an individual Data Set.
- Set the File Naming, File Extension, and Compatibility.
This article was last modified on April 20, 2021
This article was first published on April 20, 2021
Commenting is easier and faster when you're logged in!

Recommended for you
How to Make a Rubber Stamp Effect in Photoshop
You can turn just about any artwork, logo, or text into a rubber stamp by follow...

How to Remove a Head in Photoshop
I was once asked by a newspaper to produce images of a range of celebrities, sho...

How to Draw Cables in Photoshop
Drawing cables need not be a complex or time-consuming process. Using a combinat...