


This article appears in Issue 134 of InDesign Magazine.
PDF is the output format of choice for print, web, and a multitude of distribution methods, and it’s the format that gives us the reliable, high-quality output that we all depend on for our day-to-day work. If you think about it, the amount of time we spend in Acrobat working on PDF files probably places a close second to the workhorse applications that we use to create the content in the first place. We use Acrobat to open PDF files and sometimes manipulate them, but we often overlook the powerful features that it has to offer.
Well, put on your seatbelt, and get ready to learn about some of the most powerful and useful features for creating and working with PDF files!
Creating Custom Tools
One of the biggest problems when working in Acrobat is trying to find the tool you want, when you want it. And, in many situations, you may find yourself bouncing from one tool to the next to achieve the desired result. The good news is that Acrobat allows you to create your very own set of tools that you can customize to fit the way you like to work.
Start by clicking the Tools tab, in the upper-left of the Acrobat interface. Scroll down to the Customize category, and choose Create Custom Tool. A dialog box appears where you can choose the features for your custom tool (Figure 1). The name “custom tool” is a bit of a misnomer since what you’re creating is really a collection of multiple tools that can be accessed in a single location.
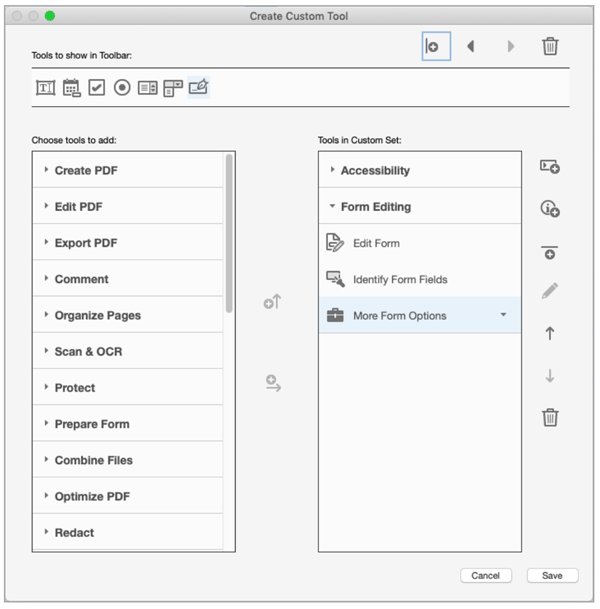
Figure 1. You can create a customized collection of tools in the Create Custom Tool dialog box.
The list on
the left displays all of the available tools that you can include in the custom tool. Find the category you want, select a tool, then either click the Add to Toolbar icon (looks like an up arrow) or Add to Custom Set button (looks like a right arrow). The items you add appear in the toolbar across the top of the document window when the “tool” is chosen. Add to Custom Set will appear in the Tools pane on the right side of the Acrobat window when you choose your custom tool.
You can organize the features of your custom tool into sections, control their order, and add instructional text. When you’re finished, click the Save button and give the tool an appropriate name. The tool now appears in the right pane of Acrobat (Figure 2).
Figure 2. The Custom tool in the right pane after creation
Organizing Pages
In many workflows it’s necessary to rearrange, add, and delete pages to produce the final PDF. Consequently, one tool that I’ve come to love in Acrobat is the Organize Pages tool. After choosing Organize Pages in Acrobat’s right pane (Figure 3), you can simply drag pages to rearrange them, delete individual pages, or insert pages from other sources. You can even open two PDF files, choose Organize Pages in both files, and drag and drop pages between the two files! When working with particularly large files, Organize Pages gives you the ability to easily split the file into smaller chunks by size, number of pages, or bookmarks. If you often work with multi-page PDFs, Organize Pages is sure to become one of your favorite tools for tweaking and finessing PDF files in Acrobat.

Figure 3. The Organize Pages interface in Adobe Acrobat
Using the Content Pane
Due to its obscure nature, I’m willing to bet that few people have ever even opened the Content pane in Adobe Acrobat. This is a shame because the Content pane can come in very handy. It gives you an individual list of every single item on each page of a PDF file. The Content pane appears in the set of Navigation panes to the left of the Acrobat interface, but you won’t see its icon there by default. To make it appear, simply right-click on the strip at the left side of Acrobat and choose Content from the list. The Content pane is organized by page so you can quickly navigate to a particular page, and then click an object to highlight it on the page.
If you’ve ever tried to edit a PDF, you know how difficult it can be to select an item on the page. Fortunately, the Content pane makes easy work of this job because each item in the pane correlates to an object on the page. If you delete an item from the Content pane, it will be deleted from the page.
The Content pane also makes it easy to extract objects from a PDF file. For example, let’s say you wanted to extract a graphic or logo. Locate the object in the Content pane, right-click it, and choose Save Selection As. You can also right-click an object and choose Edit. This first time you do this, you might need to visit Acrobat’s preferences to choose your desired applications for editing images and page objects.
The Content pane can also give you a “look under the hood” of your file. Right-click an object in the Content pane, and choose Audit Space Usage. Acrobat displays a dialog with a list of objects in the file and how much space those objects occupy in the file (Figure 4). This can be useful when you need to reduce the file size of a PDF.

Figure 4. Audit Space Usage displays statistics of how much space objects occupy in a PDF file.
Zooming Like Other Apps
It’s no secret that Acrobat looks very different than other Adobe applications. From its interface to its behavior, it’s just, well… different. But in some ways, it’s actually more similar to the apps we know and love than you’d expect. Consider zooming, for example. Many Acrobat users feel frustrated with its seemly limited zooming options. Hidden in Acrobat’s tools, however, are a couple of much more powerful and intuitive zoom options that more closely resemble the behavior in Photoshop, Illustrator, and InDesign.
Right-click anywhere on the toolbar at the top of the Acrobat interface, and choose Show Select & Zoom Tools > Marquee Zoom (Figure 5). This adds the Marquee Zoom tool to your toolbar. Now with that tool selected, click and drag around the area you want to zoom in on—and you’re done!
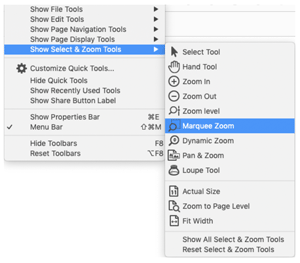
Figure 5. Making the Marquee Zoom tool available in the toolbar in Acrobat
Another useful zoom tool you may want to try is the Dynamic Zoom tool. You can access it with the same right-click method as the Marquee Zoom tool. With this tool, simply click and drag up to zoom in, drag down to zoom out. You may even want to add these zoom options to your custom tool (see the “Creating Custom Tools” section earlier).
If you prefer keyboard shortcuts, you can zoom the same way as you do in InDesign: Hold down Command/Ctrl, press the spacebar, and click or drag to zoom in. Add the Option/Alt key to zoom out.
Creating PDFs from Your Phone
Whatever happened to the paperless office? Even in this digital age it seems like I’m constantly being given a physical copy of a document when what I really want is a digital one. Like most folks, I haven’t had a scanner connected to my computer for a long time. I could, of course, take a picture of these documents and convert them to a PDF using Acrobat, but that involves a lot of steps. Fortunately, Adobe has provided us with a very powerful mobile application called Adobe Scan to capture photos as PDF files with the click of a button.
To get started with Adobe Scan, download it from the Apple or Google store. Launch the application, and point your phone at the document you want to capture. Adobe Scan automatically takes a picture when it’s satisfied with the composition, and then runs text recognition on the file so that the resulting PDF is searchable. If you’re signed into Creative Cloud using your Adobe ID, the app will automatically upload the PDF to your Document Cloud account. How cool is that?
Let Preflight Do the Work
Those of us who work in the world of print are familiar with the term preflight, which usually describes the analysis of a file to determine if it is ready to be sent to a print service provider. Acrobat’s Preflight panel is quite powerful for checking and fixing common printing issues, but it has many other uses too. For example, did you know that Acrobat’s Preflight feature can:
- Flatten all of the form fields in a document
- Verify compliance with PDF standards
- Remove metadata
- Create bookmarks from headings
- Convert fonts to outlines
- Fix many accessibility issues
- Convert RGB files to CMYK (including converting four-color black to 100% black ink)
These are just a few common uses; the list goes on and on. Many of these are called fixups, and they’re really easy to use. For example, let’s say you want to convert all the text in your PDF to outlines. Open Acrobat’s Preflight panel (Figure 6). You can find it by typing “preflight” in the search field at the top of the tool sets bar on the right side of the document window. When you type “outline” in the search field at the top of the Preflight panel, it suggests a PDF fixup called Convert Fonts to Outlines. Double-click it, and Acrobat will ask you where to save your new PDF. A moment or two later, the document is converted and saved, and every bit of text is now an outline.

Figure 6. The powerful goodness found within Acrobat’s Preflight panel
Everyone’s workflow is different, but I recommend perusing the Preflight panel list to see other items relevant to your projects. It could save you a ton of time and trouble in the long run. For more information, check out this article or this Adobe help doc.
Scrolling Smoothly
Did you ever notice that sometimes when you’re reading a PDF, you can seamlessly scroll from one page to the next while seeing the bottom of one page and the top of the next page at once? But other times, as you’re scrolling, the view suddenly jumps to the next page before you’re finished reading the current page? Acrobat includes a setting that enables you to control this behavior regardless of which method you prefer. Choose View > Page Display > Enable Scrolling if you like being able to scroll while you’re reading without the annoying jump to the next page. If you prefer more of a visual break between pages, toggle off Enable Scrolling.
Saving in Other File Formats
It’s a harsh reality that all too often you need to create or update information in a project and the source file is nowhere to be found. Fortunately, Acrobat gives you some powerful ways to extract content from a PDF file. Simply go to the Tools tab and choose Export PDF (Figure 7). The list of available output formats includes Word documents, spreadsheets, PowerPoint files, images, webpages, and many more. The Images option exports all images in the PDF to separate files.

Figure 7. The Export tool in Acrobat provides numerous choices for extracting content from a PDF file.
Exporting to Microsoft Office formats yields surprisingly good results. Even if the PDF was not originally created in the Office applications, the resulting Word, Excel, and PowerPoint files are completely editable and accurate in their reproduction. Even header and footer information are added appropriately in Word documents and recurring elements are placed on a master slide in PowerPoint. The amount of time you can save by using this feature is amazing!
Extracting Content from a PDF
Another lesser-known feature of Adobe Acrobat, is the ability to extract specific objects from a PDF and save them as individual files. For example, you can select an image or other object with the Selection tool, and then, while the object is highlighted, right-click and choose Save Image As. In the dialog box, you can choose a location for the new image file and a file format (JPG or TIFF).
Even more powerful than that is the ability to extract a table from a PDF file. That’s right: Using the Selection tool, you can click and drag a marquee around the table that you want to extract. You’ll know you did it correctly if you see a blue box around the area. Then, right-click the selected area and choose Export Selection As, select Format > Excel Workbook (or Word, XML, CSV for that matter), and click Save (Figure 8).

Figure 8. Select a table in Acrobat, and then choose Export Selection As to save the table as an Excel file.
Open the resulting Excel file and voila—you have a fully editable version of the table in Excel (Figure 9)!

Figure 9. The fully editable Excel file
Adding Keyboard Shortcuts
If you’re like most users, you probably think that Acrobat doesn’t allow you to customize keyboard shortcuts. Technically, you’re right, but Acrobat does have a hidden feature that enables you to access tools, panes, and commands using powerful keyboard shortcuts that are disabled by default. Simply go to the General section of the Acrobat Preferences window and enable the “Use single-key accelerators to access tools” checkbox. Now, just use the shortcut keys to access the commands you need. Such as H for the Hand tool, V for the Selection tool, S for the Sticky Note tool, or L for the Link tool. The full set of key accelerators is too long to for me to include here, but check out this page for a complete list.
Leveraging Your Document Cloud Account
Everyone who has a copy of Adobe Acrobat DC as part of a Creative Cloud subscription also has access to Adobe’s Document Cloud services that they should be taking advantage of. Included in those services is 100 GB of online storage space where you can store PDF files for access later on from any device. With any PDF file open in Acrobat, simply click the “Save files to Adobe Document Cloud” button to instantly upload a copy of the PDF file to your online Document Cloud account. Once it’s there, you can access this file from any device on which Adobe Acrobat is loaded (including mobile and tablet devices).
Even more useful is the ability to share files uploaded to Document Cloud via a URL that you can send to anyone. This is a great way to provide access to those large PDF files that are too big to send via email. Sharing isn’t limited to just PDF files though, you can zip any large file (or group of files) and share that ZIP file via Adobe Document Cloud as well. (Note: If you work for a government agency, the Document Cloud services may be disabled by your administrator.) Adobe Document Cloud is packed with amazing features. To learn more about it, check out my LinkedIn Learning Course, Acrobat DC: Using the Document Cloud Features.
Comparing Documents
Often times, I’ll receive a PDF from someone indicating that they’ve revised the file and they’re providing the updated version. That’s great, but sometimes it’s good to know exactly what changed in the file. Or maybe you’ve received a PDF and want to ensure that nothing was changed in the file. I don’t know about you, but I don’t have the time or the patience to compare documents one line of text at a time. So instead, I make Acrobat do it for me!
In the Acrobat tools, click the Compare Files tool to initiate the process (Figure 10). Acrobat will ask you to select the first document that you’d like to compare, then the second document. (Naturally, you’ll get the most reliable results if they are in fact two versions of the same document. Comparing two different documents can yield unpredictable results.)

Figure 10. The Compare Files tool in Adobe Acrobat
Click the Compare button to instruct Acrobat to compare the two documents. In the resulting file, you’ll find the two documents compared side-by-side, with comments indicating what changes have been made and what those changes were (Figure 11). If I had a nickel for every time the Compare Documents feature has saved my bacon, I’d be well… a little richer.

Figure 11. The Compare Documents feature shows comments indicating where changes were made and what the changes were.
If you want even more control over comparing PDF files, check out the PDF Comparator tool by Premedia.
Updating Fillable PDF Forms
A common workflow when building fillable PDF forms is to open an existing PDF and add the fillable fields in Adobe Acrobat. The end result is a fully functional, visually appealing fillable form that works very well in many situations. But this workflow fails the minute that your client or boss wants you to make changes to the form. Often times they’ll supply you with a new PDF asking you to add the fillable fields to that new file.
The idea of having to redo all of that work is enough to make you cry. The good news is that you don’t have to do the work all over again as long as you know this trick. Start with the original form that you created, and open the Page Thumbnails panel or the Organize Pages tool. Right-click the page and choose Replace Pages. Select the new updated PDF, and click OK. Acrobat will slide the new page in place, replacing the old one but leaving all of the form fields intact. This changes a task that could have taken hours, into something that takes a few seconds. Don’t just take my word for it: I showed this tip at the 2019 CreativePro Week conference and an attendee recently mentioned on the InDesignSecrets Facebook group how that tip has saved her tons of time.
Keep in mind that significant changes to the new form could require repositioning of fields and potentially adding new ones, but still, it’s a lot faster than the alternative. For more on creating and editing PDF forms, see my article in Issue 133.
Creating a Shared Review
Sometimes the hardest part of designing a project is getting feedback from your colleagues and the powers that be. PDF is the format of choice to obtain that feedback, of course, but the process can be a challenge. Ensuring that users open the PDF in the right program and getting them to use the appropriate commenting tools are only a few of the challenges that we face in successfully obtaining those instructions. Fortunately, Acrobat DC provides a way to create a shared review of a project by uploading a file to your Document Cloud account, and sharing a link that enables others to send their feedback.
Begin by opening the Comment tool, click the menu in the upper-right corner of the Comment pane, and choose Send for Review. The Comment pane changes to the Share pane where you can either invite specific people, get a link to the file, or send the PDF as an attachment (Figure 12).

Figure 12. Sending a shared review to coworkers using Adobe Acrobat DC
Arguably, inviting people provides the most control, but you’ll have to explore the options to see which is the best fit for you. After you enter the email addresses of the people you’d like to invite to the shared review, you can customize your invitation message and enter a due date and reminder date for the review. I love this feature because it prevents users from adding comments after the due date. Click the Send button to upload the file to your Document Cloud account and send an invitation to each recipient. After you send the invitations, you’ll find the file in your Document Cloud account under the Shared by You category. You can unshare the file at any time should you need to.
Each person will receive an email invitation to the shared review with a button to view the shared review. The recipient doesn’t even need Adobe Acrobat to join the review and make comments, nor do they need an Adobe ID. Recipients can simply join the review as a guest. The review will open in a web browser with commenting tools that can be used to make suggestions in the review.
The next time you open the PDF from your Document Cloud account, all of the comments made by the recipients will be displayed in the Comment pane. Again, at any time you can unshare the file, and once the deadline has passed, the file will no longer be accessible to any of the recipients. In the Comment pane, you can also see which users have opened the file and when the file was opened. If you haven’t given shared reviews a try, I highly recommend it!
PDF FTW
With the use of PDFs so common in our industry, the more you know about Adobe Acrobat and the PDF format, the more efficient and effective you’ll be at your job. I hope you’ve found some new tips in this article to help you achieve that goal!
Commenting is easier and faster when you're logged in!

Recommended for you

Learning After Effects
How to create attention-grabbing content with After Effects and InDesign

Page Numbering Perfection
Learn all the ins and outs of page numbering, prefixes, and section markers in I...
How to Convert Fonts to Outlines in a PDF
If you need to provide a PDF with fonts converted to outlines to your print serv...