

This article appears in Issue 95 of InDesign Magazine.
Back in the days of traditional mechanical layout, art directors and designers would use any area on their desks outside the artboard to store little bits of paper containing type, images, and so on. When they ran out of space on the drawing table, these folks would use any free spot in their work area to store extra stuff they might need later on.

Vintage pasteboard image from CreativePro.com
Now, in the world of digital, “desktop” publishing, extra bits of text and graphics are stored in the area around the electronic pages of a design, in an area called the pasteboard. While it may seem a simple concept—just an empty space around the pages in a document—understanding how to modify and work with the pasteboard can make it easier to work faster and smarter in InDesign.
Changing the Color of the Pasteboard
Like any tool, you need to have a clear view of the pasteboard in order to make the best use of it. In InDesign, you have several choices for changing the color of the pasteboard so it contrasts with the color of your pages. The first place to change the color of the pasteboard is under Preferences > Interface. Select Match Pasteboard to Theme Color, and the pasteboard will get lighter or darker as the theme color changes from light to dark (Figures 1 and 2).

Figure 1: The Light and Medium Light settings for the Color Theme create a light gray pasteboard

Figure 2: The Dark and Medium Dark settings for the Color Theme
create a dark gray pasteboard.
So choosing the dark interface will create a dark pasteboard with white pages. However, if you’re a “purist,” you may want to deselect that option, so the pasteboard stays white, no matter what color the interface is (Figure 3). Note that you can also control this same option by choosing View > Match Pasteboard to Theme Color.

Figure 3: When Match Pasteboard to Theme Color is deselected, the pasteboard is bright white.
The second place to control the color of the pasteboard is in the Preview or Presentation mode (View > Screen Mode > Preview or View > Screen Mode > Presentation). When you’re in the Preview mode, everything on the pasteboard disappears. Guides, frame edges, and nonprinting characters are hidden as well to give you a distraction-free view of your pages. To have the pasteboard change color when you enter Preview or Presentation mode, choose Preferences > Guides & Pasteboard. Select the option Preview Background: Match to Theme Color (Figure 4).
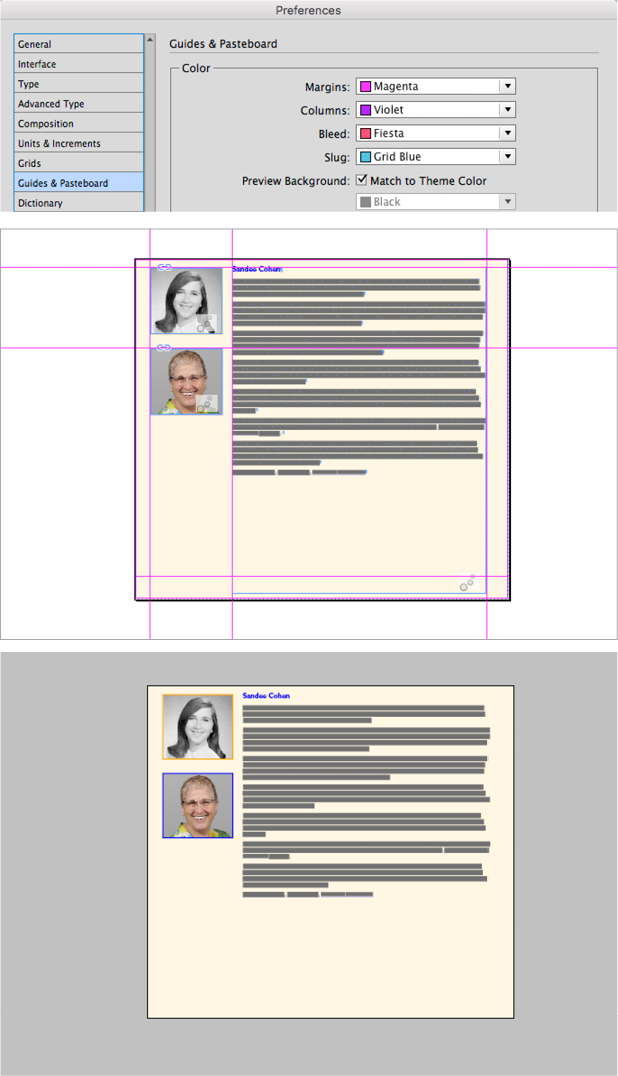
Figure 4: When Preview Background Match to Theme Color is selected, a white pasteboard turns gray or dark gray in Preview or Presentation mode.
Setting the pasteboard to match the theme color in Preview or Presentation mode gives you the best of both worlds—you can keep a white pasteboard for general work but have a darker, more dramatic pasteboard when presenting work to a boss or client.
However, if you want something truly dramatic, use the Color menu to set any color you want for the preview area (Figure 5). So instead of a boring gray, you can have a vibrant blue, neon green, or lipstick red!

Figure 5: Use the Preview Background color menu to turn the pasteboard in Preview or Presentation mode to any color you want.
The Presentation mode is similar to Preview mode—all items on the pasteboard disappear, as well as guides and frames. In addition, all tools, menus, and panels are hidden, and the pasteboard changes color. When you’re in Presentation mode, you can use the arrow keys or mouse to click and move through the pages of the document. (But you can’t zoom in or out, or modify anything on the pages while in the Presentation mode.)
What’s the benefit of using InDesign’s Presentation mode? It’s a more professional way to present your work without elements on the pasteboard and guides cluttering up your pages. Also, you’d be amazed how reluctant bosses and clients are to ask you to change a layout when it’s in a dramatic Presentation mode where nothing can be modified. It’s similar to creating a PDF, but without having to go through the actual export.
Viewing the Pages and Pasteboard
As you work, you may want to zoom in and out to see the page, spread, or the complete pasteboard. There are three keyboard commands you should memorize to make zooming effortless.
The first is View > Fit Page in Window (Command+0 on Mac or Ctrl+0 in Windows). This command zooms in or out so that all the edges of the page are visible. Also, some of the pasteboard and other pages on the spread will be visible.
The next command is View > Fit Spread in Window (Command+Option+0 on Mac or Ctrl+Alt+0 in Windows). This command zooms in or out so that all pages in the spread are fully visible. So if a document is set for facing pages, both of those pages will be seen in their entirety. Some of the pasteboard will also be seen.
A third command, View > Entire Pasteboard can be triggered by pressing Command+Option+Shift+0 on Mac or Ctrl+Alt+Shift+0 in Windows. This command lets you zoom out (or in) so that the entire pasteboard for that spread fits in the window. This command is helpful to use when you’ve lost track of an item that is sitting somewhere on the pasteboard.
Setting the Pasteboard Size
Unlike the art directors of the past, who were limited in how much room they had on their desks, you can determine how much pasteboard area you have around your page.
The default size of the pasteboard varies with the size of your document. When you create a new document, the width of the pasteboard is one page-width on each side, and the height is always one inch above and below the spread. If you need a larger pasteboard (I’ll explain why you might later in this article), go to Preferences > Guides & Pasteboard, and change the Vertical Margins and Horizontal Margins settings (Figure 6).

Figure 6: Change the pasteboard margins to increase or decrease the area of the pasteboard.
The amounts are in the same units of measurement as the units for the InDesign document, but you can enter amounts in whatever unit you want, and InDesign will handle the conversion. For instance, if the units are in picas, you can enter ” for 3 inches or 10 cm for 10 centimeters… you get the idea.
Note that this is a document-level preference, so if you have any documents open, changing the size of the pasteboard will only affect the current document. If you want more space around all new documents, simply close any open documents, and then change the preference.
Changing the page size
When you use the Page tool to change the size of a page in a document, something interesting happens. You might expect that when you make a page smaller, the pasteboard would shrink to keep the same amount of space around the page as listed in the Pasteboard Options preferences. But it doesn’t. The pasteboard stays the same! However, if you make your page larger, the pasteboard will expand to accommodate the new page size while maintaining the original amount of space around it.
Leaving the Pasteboard
We’ve all seen that dreaded alert “This value would cause one or more objects to leave the pasteboard” appear when we’ve tried to move, rotate, duplicate, or do something to an object (Figure 7).

Figure 7: Nothing can exist outside the boundaries of the pasteboard
When the results of an action would cause an entire object to move outside the pasteboard, InDesign balks and throws up that error message. Every object has to be at least partly within the boundaries of the pasteboard.
In some cases, you might find yourself in a loop where the error keeps popping up. The solution then is to press the Esc key. Then change the measurements in whatever dialog box is causing the object to move outside the pasteboard.
For instance, you might select all the objects on the page and set them to scale up 200%. This might cause objects on the edges of the selection to move outside the boundaries of the pasteboard—hence the message. (Here’s a short video illustration of what this looks like.) If this happens to you often, simply increase the size of the pasteboard. This is especially helpful when working with animations where you want an object to start well outside the boundaries of a page.
Multiple Pages on a Single Pasteboard
While most users start with InDesign as their first page-layout program, some come from Illustrator, where you can have as many pages (called artboards) as you want on a single pasteboard. InDesign’s default settings restrict you to the number of pages in a spread (usually just two). But here’s a trick to get more pages on the same pasteboard.
Start with a non-facing page document. Create as many pages as you want. The pages you create will each be on their own pasteboard. To gather pages together on one pasteboard, Shift-click them in the Pages panel to select them. Then from the Pages panel menu, deselect both Allow Document Pages to Shuffle and Allow Selected Spreads to Shuffle.
Then, you can drag each page in the Pages panel so they sit side by side on the one pasteboard. This gives you one huge spread with all the pages together in a row. To release them from the row, choose the Page tool, and in the document window, drag each page away from its neighbor. The pages won’t look separated in the Pages panel, but they will be separated on the pasteboard. You can even use the align and distribute controls in the Control panel to arrange pages precisely as you want them on the pasteboard (Figure 8).

Figure 8: Use the Page tool to arrange multiple pages on the pasteboard.
Even trickier, you can overlap the pages so that items in the overlapping areas print on both pages (Figure 9). It’s as close to Illustrator as InDesign can get! For an in-depth look at this trick, check out this article at InDesignSecrets.

Figure 9: Use the Page tool to move the document pages any way you like. Elements that overlap, like the triangle here, will print on all the overlapping pages
Slug Tricks
Master pages have pasteboards, too, of course. However, items on the master page pasteboard don’t show up on the document page pasteboard unless they’re touching a page (even a little bit), or you use a trick using a slug area.
Setting the slug area
The slug area is an area around a document that can be set to print outside the crop marks of a document. For example, you might use the slug area to store the name of the client, product, the magazine your ad is going into, insertion date, or other production information. You can add a slug area in the Bleed and Slug section when you first create a document, or by choosing File > Document Setup in an existing document (Figure 10).

Figure 10: Bleed and Slug options are accessible at the bottom of the Document Setup dialog box
Most of the time, the slug area is defined as an area at the top or bottom of the pasteboard. But it’s perfectly acceptable to set the slug area to extend all around the page.
Once you create a slug area, any item on the master page pasteboard that touches the slug area will appear on your document pages (well, the pages that are based on that master, of course). It’s like having a little library of elements sitting right next to all the pages of the document.
Like with any master page items, you cannot select them on the document page until you release, or “override,” them. To release an item from the master page pasteboard and make it editable on the document page pasteboard, Command+Shift-click (Mac) or Ctrl+Shift-click (Windows) the item.
Preflighting and Packaging
Most of the time, objects are put on the pasteboard because they are not intended to appear in the actual document. But sometimes designers place objects on the pasteboard that they do intend to use at some point in the future. So just because an object is on the pasteboard, that doesn’t mean it shouldn’t be checked by InDesign’s Live Preflight. Unfortunately, by default, InDesign doesn’t preflight objects on the pasteboard—but there’s a very easy way to change this.
Just choose Preflight Options from the Preflight panel menu, and select Objects on Pasteboard (Figure 11). Keeping this option selected ensures that objects on the pasteboard adhere to the same specifications as objects on the pages do.

Figure 11: You can set the Preflight Options to preflight objects on the pasteboard.
Packaging items on the pasteboard
Ordinarily, items on the pasteboard aren’t packaged by InDesign’s Package command. But if you’ve used the trick mentioned earlier in this article to create an oversized slug, any items inside that slug area will be included as part of the package.
This is very helpful if you are packaging a document as part of an archive for future use. You certainly don’t want to risk losing items on the pasteboard because of missing links. For more details on this workflow, see this article at InDesignSecrets.
Spread or Page Guides
Ever wonder why some guides stretch across the pasteboard and onto the page while other guides are confined to just the page area? Turns out, there’s a difference between a “spread” guide and a “page” guide.
You create a spread guide (some people call these “pasteboard guides”) by dragging the guide from the ruler and letting go when your mouse is over the pasteboard. You create a page guide by dragging from the ruler and letting go only when your mouse is over the page itself (Figure 12).

Figure 12: The spread guide (bottom) is created when the mouse is released outside the page area. The page guide (top) is created when the mouse is released within the boundaries of the page.
Spread guides are helpful if you want items to line up on all the pages of a spread or if you want to align objects that are in the pasteboard area (because Smart Guides don’t work in the pasteboard area). Page guides keep the other pages in a spread from getting cluttered with guides you don’t need.
Notes on the Pasteboard
We all agree that notes back and forth among people who collaborate on documents are a good thing, right? But sometimes they aren’t set up very conveniently. Here’s a technique for those who want to communicate with a colleague in an InDesign-InCopy workflow. InDesign and InCopy let you insert notes into the text flow only. These notes can be difficult to see at first glance. You also can’t position them next to non-text-frame elements like images. So in some cases, you might want to create notes that are always visible outside the text frame, or on the pasteboard.
The solution is to first create two object styles for a nonprinting note text frame. I like to color one frame pink for notes from the editor and the other yellow for notes from the designer—like the sticky notes you might add to a mechanical layout (Figure 13).

Figure 13: The oversized slug area (green rectangle) holds the “sticky notes” that a designer and editor can use to communicate with each other
Then edit the object styles and select the Nonprinting option in the Text Wrap & Other pane. You could also put these notes on their own nonprinting layer if you’re paranoid about something being printed that shouldn’t. These nonprinting notes can be placed on the pasteboard near the elements that need explanation.
To make these pasteboard notes visible in InCopy, you need to enlarge the slug area around the page so that it encompasses the notes. Don’t worry; it’s not going to “hurt” the document to have a large slug area. Print shops are used to people using the slug for internal notes. Besides, if you’ve set the objects to be nonprinting, the print shop shouldn’t mind it at all.
You will also need to coordinate a check-in/check-out process for these sticky notes using the Assignments panel so that everyone in the workflow can write messages. But once you get things set up correctly, you’ll have a great way to communicate across the electronic divide. For more on this technique, see this article at InCopySecrets.
Paste the Most of It
The pasteboard may look empty, but it’s full of important uses. It can serve as a location for inspiration, communication, and storage. And as you work with InDesign, you’ll come up with your own techniques for using the pasteboard. Make the most of it!
Commenting is easier and faster when you're logged in!

Recommended for you

A Free Script to Move Items to the Pasteboard (and Back)
Ever wish you could quickly slide some selected items (or everything) on a page...
Tip of the Week: Spring-Loaded Shortcuts
This little trick lets you switch tools in InDesign without missing a beat.
Going Deep with Footnotes
Whether you're explaining, referencing, or elaborating, footnotes and endnotes a...