
PageMaker How-To: Creating a Graphics Portfolio

Setting Up the Portfolio Document
After you’ve compiled the designs and the information that you want to include in your graphics portfolio, the next step is to set up the PageMaker document. Compared to the time and energy you put into your artwork, this will be easy!
Our sample portfolio is a three-page document, which includes a cover page and a two-page spread. The cover page contains 15 frames to hold the artwork images and one frame for your contact information. Pages 2 and 3 hold 10 frames along the outside edges that contain most of the artwork that’s displayed on the cover, as well as 10 “three-column” frames for the graphical information. To set this up, first launch PageMaker and then choose File > New. Next, in the Document Setup dialog box, create a Letter-sized, three-page document with 0.75-inch margins, as shown in Figure 3, and click OK.

Figure 3: Use these settings to create the portfolio document.
Creating the Cover Page
On page 1 of the document, drag down a horizontal ruler 1 inch from the top margin guide. Next, select the Line tool and draw a line along that ruler from the left margin to the right margin. Apply an 8-point stroke to the line in the style and color of your choice. Next, drag down another horizontal ruler and position it _ inch below the ruler used for the 8-point line you just created.
Now double-click on the Rectangle Frame tool in the Toolbox to display the Frame Options dialog box. If your resized graphics are larger than the 1_-inch frames you’re about to create, select the Clip Content To Fit Frame option button. If your resized graphics are the same size or smaller than the 1_-inch frames, select the Scale Content To Fit Frame option button and make sure the Maintain Aspect Ratio check box is selected. You can also choose how the images are aligned in the frames by selecting the appropriate options in the Vertical Alignment and Horizontal Alignment pop-up menus. We used the Center options for our graphics, as shown in Figure 4.

Figure 4: You can use the Frame Options command to determine how your thumbnails appear in each frame.
Now click OK to apply the changes to the Rectangle Frame tool and then draw a frame 1_ inches square, starting at the intersection of the second ruler guide and left margin. If necessary, change the frame’s stroke and fill to None.
Now that you’ve created one frame, you can use it to create the remaining frames. To do this, with the frame still selected, press [command]C ([Ctrl]C in Windows) to copy it. Then choose Edit > Paste Multiple to display the Paste Multiple dialog box. Enter 3 in the Paste x Copies text box, 1.8 in the Horizontal Offset text box, and 0 in the Vertical Offset text box, then click OK. Figure 5 shows how page 1 of your document should look thus far.

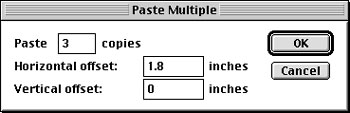 Figure 5: In a few steps, using the specifications in the Paste Multiple dialog box, the first row of frames is added to your cover page.
Now select the Pointer tool and hold down the [shift] key to simultaneously select all four of the frames. Then press [command]G ([Ctrl]G in Windows) to group them. To make three more rows of four frames each on your cover page, press [command]C ([Ctrl]C in Windows) and then choose Edit > Paste Multiple. This time enter 3 in the Paste x Copies text box, 0 in the Horizontal Offset text box, and 2.25 in the Vertical Offset text box. Then click OK. Figure 6 shows how page 1 should look at this point. Now hold down the [shift] key as you click on each row with the Pointer tool and choose Element > Ungroup or press [command][shift]G ([Ctrl][Shift]G in Windows) to ungroup the frames. (Click off to the side of the page to deselect the frames once they’re ungrouped.)

Figure 6: The Paste Multiple command allows you to quickly fill a page with evenly spaced frames.
Now select the Text tool and add the title “Graphics Portfolio” (or any title you wish) at the top of the cover page above the 8-point line. Then enter your contact information in the far-right frame in the first row.
Tip: If you need to change the frame options for the contact information frame (or any other frame), click on the frame with the Pointer tool and choose Element > Frame > Frame Options. You can then change the alignment options and inset values as needed for the text.
This article was last modified on January 3, 2023
This article was first published on August 16, 2002
Commenting is easier and faster when you're logged in!

Recommended for you

Before&After Design Tip: Infuse Life Into Your Charts
Learn how combining photographs with data can enliven your charts.

Set a Swatch to Overprint
When you fill an object or text with the default [Black] swatch at 100% opacity,...
Hiding Sound Files in an Interactive PDF
When you're creating interactive PDF files, hiding your sound files is surprisin...