
Page Numbering Perfection
Learn all the ins and outs of page numbering, prefixes, and section markers in InDesign.


This article appears in Issue 145 of InDesign Magazine.
Numbering pages is one of the most fundamental tasks every InDesign user should master. After all, just about every InDesign document longer than a one-page flyer needs page numbers—but page numbering can become complicated when you least expect it. In this article, I’ll take you through all the ins and outs of page numbering. We’ll begin with the basics of adding simple page numbers, and then tackle more advanced topics.
Laying a Good Foundation
Before we can talk about adding page numbers, we first need to get pages into our document. Every new InDesign document contains three things: a single document page, a [None] master page, and an A-Master page, all of which you can find in the Pages panel. In the New Document dialog box, there is an option to use facing pages. If you turn this on, the A-Master will contain both left and right pages, if Facing Pages is not turned on, the A-Master spread will contain only one page (Figure 1).

Figure 1. Non-facing pages (left) and facing pages (right). On the non-facing pages document, notice the A-Master spread has only one page and each document page is sitting on its own spread. On the facing pages document, the A-Master has both left (verso) and right (recto) pages.
Any photo, graphic, or text placed on the A-Master will show up on all document pages that are based on A-Master. So, if you put the logo on the right side of a facing page A-Master, the logo will show up on the right (odd) pages only. If you want the logo on both the even and odd pages, you’ll need to copy the logo and position it on both pages of the A-Master. If you’re ever unsure which master a page is using, open the Pages panel (Window > Pages) and look at the top of any document page to see the master prefix. For A-Master, you’ll see an A.
Adding and Removing Basic Page Numbers
To put sequential page numbers on all document pages, follow these steps.
Create a new document. In this example, we’re going to assume you have the Facing Pages option turned on, but page numbering works with single-sided documents, too.
Double-click the words A-Master in the top section of the Pages panel. You are now working on the A-Master, which has two pages, a left and a right.
With the Type tool, drag to create a text frame where you want the page number—for example, along the bottom of the left master page. If you want, you can type in the word Page then a space.
With your cursor still in the text frame, choose Type > Insert Special Character > Markers > Current Page Number.
You will see Page A in the text frame. The A is from the page prefix, and it’s a reminder that you’re working on a master page. Don’t worry: The A will automatically update to reflect the number of the document page you’re working on, so if you double-click page 1, you’ll now see Page 1 in that text frame. Also notice the frame is a dotted line, which indicates this is a master page item. You can’t select the frame or text just by clicking it when you’re on a document page. This is to prevent you from accidentally moving or deleting it.
Pages without numbers
Some document pages, such as a cover or an advertisement, don’t need page numbers. There are two ways to handle this. First, you can keep the A-Master page applied to these pages and remove the page number with a simple keyboard shortcut. Hold Command+Shift (macOS) or Ctrl+Shift (Windows) while you click the text frame. This creates what InDesign calls a “local override” of the master page item. Now you can move the frame; change its contents, fill color, or size; or delete it all together.
If you delete the page number frame on page 3, don’t worry. InDesign will remember that this is page 3, even though there is no visible page number, and the next page will be page 4.
The second way to remove the page number is to assign the [None] master to the page. Drag the [None] master page over the top of the document page in the Pages panel (wait until you see a black border around the intended document page), and release to apply it. (Alternatively, you can select one or more document pages in the Pages panel, and then Option/Alt-click the [None] page icon.)
Restoring page numbers
If you took the first route and applied a local override to a page number—perhaps you changed the styling or moved it to a different location on the document page—and now you want to return it to how it looks on the master page, select the text frame, then from the Pages panel menu, choose Master Pages > Remove Selected Local Overrides (Figure 2).

Figure 2. If an object from a master page has been released and modified, you can return it to the way it looks on the master and lock it back up by selecting the modified master object and from the Pages panel menu choosing Master Pages > Remove Selected Local Overrides.
On the other hand, if you deleted the page number text frame from a document page, you can bring it back by dragging the A-Master page (in the Pages panel) over the top of the document page and releasing it to reapply all of the master objects. Or go to the Pages panel menu and choose Master Pages > Remove All Local Overrides.
Align with the Spine in Mind
When you need to format page numbers or other master page content for long documents (like running headers and footers), you can set the alignment to automatically be towards or away from the spine. This allows you to use a single paragraph style for both left and right pages, for maximum efficiency.

Page Numbering in Sections
It’s very common for long documents to use different numbering styles for different sections. For example, let’s say you’re working on a training manual with a cover on page 1, an inside cover page on page 2 (both unnumbered, of course), followed by an introduction on the next four pages that you need to number as i–iv. Then from the seventh page of your document to its end, you need Arabic numerals (Figure 3). Can InDesign do that? Absolutely! We’ll use the Numbering & Section Options dialog box to accomplish this task.

Figure 3. Mixed page numbering in a long document. The first two pages are the front cover and inside cover, labeled as A and B. The next four pages are the intro (i–iv) and the next pages are pages 1–6, with a prefix of 1-. (Note that I made the numbers very large so you can see them on the page thumbnails.)
Create a facing pages document with 12 total pages.
Double-click A-Master, and add a page number on both the left and right pages, using the steps in the “Adding and Removing Basic Page Numbers” section.
Remove the page numbers on pages 1 and 2 by Command+Shift-clicking/Ctrl+Shift-clicking the text frames and deleting them.
Double-click the third page in the Pages panel to jump to it. We want to start a new section on this page using lowercase Roman numerals.
Choose Numbering & Section Options from the Pages panel menu.
Select Start Page Numbering at 1
For Style, choose i, ii, iii, iv.
Click OK.
So now we have two sections in our document: Pages 1 and 2 (the unnumbered cover and inside cover) and pages 3–12, numbered with lowercase Roman numerals (Figure 4). Next, let’s apply Arabic numbering to the pages following the introduction.

Figure 4. Our document so far, divided into 2 sections
Double-click the seventh page in the Pages panel to jump to it.
There are several ways to open the Numbering & Section Options dialog box. For now, right-click the page and use the context menu (Figure 5).

Figure 5. Right-clicking a document page is the fastest way to start a new section on it.
In the dialog box, choose Start Page Numbering at 1. For Style, choose 1, 2, 3, 4. Click OK.
InDesign will display an error message telling you that there’s already a page 1 in another section in the document (the front cover). We’ll fix that in a moment. For now, click OK.
Go back to the cover section, and double-click the first page in the document. Here, you need to set the cover pages’ numbering style to be uppercase letters. The time, use a third shortcut to open the Numbering & Section Options dialog box: Double-click the tiny triangle above the first document page thumbnail in the section (Figure 6). Of course, you won’t see the a and b on the pages, because you already deleted the page numbers on those pages. But this way, you can export the document as a PDF, and in Adobe Acrobat you can type A in the Toolbar’s page number field to jump the cover page, and 1 to go to the first page of the content (Figure 7).

Figure 6. Blink and you’ll miss it, but the tiny triangle over a document page offers a super quick way to open Numbering & Section Options.

Figure 7. Type a page number (or letter) in the Adobe Acrobat Toolbar to jump to that page in the PDF.
Wondering how to tell where a section starts and stops? Notice the little triangle above the pages +1, +3, and +7. This indicates a new section. Tip: You can double-click the triangle to open the Numbering & Section Options dialog box.
Adding section prefixes and markers
For some documents, a letter, number, or prefix code is needed before the page number, such as A-1, A-2, or 1-1, 1-2, 1-3. Each section can have its own section prefix consisting of up to eight characters. Let’s add a prefix to the page numbers in the last section of our document.
Double-click the triangle above the thumbnail for page 1 (which, in our example, is the seventh page in the document).
Type 1- in the Section Prefix field, then turn on the option called Include Prefix when Numbering Pages (Figure 8).

Figure 8. Adding a section prefix to page numbers
Your pages will now include the 1- section prefix before the page number for all pages in that section.
In many of the long documents I work on, I need to put the chapter name in the header or footer. You might naturally think of putting this information on a master page. But then you’re stuck making multiple master pages, one for each chapter name. Instead, you might choose to use a section marker. Here’s how to insert one:
Double-click the triangle above page 1 to open Numbering & Section Options again. In the Section Marker field, type in Chapter 1 — InDesign Workspace.
Notice how there isn’t a helpful checkbox you can use to tell InDesign to put in the section marker? That’s because it won’t show up automatically, you need to insert and format the section marker manually on the master page.
Click OK to close the dialog box.
Double-click the A-Master, and create a text frame at the top of the right-hand page. Then, choose Type > Insert Special Character > Markers > Section Marker.
You’ll see the word Section appear in the text frame. Select the marker and format it. Very important: Make sure the text frame is wide enough to accommodate the longest chapter name on one line. A section marker is a kind of text variable, and as such it is treated as a single character. It cannot wrap to multiple lines or include mixed formatting.
Duplicate the text frame, and move the new copy to the left page. Format and position as needed.
Your formatted section code will now appear on the top of each page. If you jump to the last section in the document, you’ll see the word Section change to Chapter 1 — InDesign Workspace.
Let’s add another section marker. Double-click the triangle above the first page of the introduction (which is currently on page i). Type Introduction in the Section Marker field in Numbering & Section Options dialog box, and click OK.
From here, you can go on to create as many chapters as needed, and automatically have the chapter names appear in the running header just by filling in the titles in the dialog box as you create each new section—without having to create multiple master pages to simply change chapter names.
Arabic Numerals Are Not Arabic
Of all the many great mysteries in the world, one of the greatest is: Why do we call our number system “Arabic” when the numbers we use in English are definitely not the ones they use in Arab nations? And we call our letterforms “Roman” but “Roman” numbers (such as iv, xlv, and so on) are certainly different than our modern system. Well, originally, our numeral glyphs were from India, and mathematicians called them Hindu numbers. However, in the Middle Ages, Arabic merchants introduced them to Europe, so the numbers became known as “Arabic numerals.” But numbers in Arabic have nothing in common with our “Western Arabic numerals,” and even those are a bit different than Iranian/Persian Farsi numerals, or Urdu/Pakistani numbers.
Page Number Tricks
Here are a few tricks you need to know when you’re working with page numbers: how to start a document on a left page, how to insert a “last page” number, and how to ensure your page numbers are always visible, for example.
Making the first document page a left-hand page
When you create a new facing pages document, page 1 (typically an odd page) is a right-hand page—what designers traditionally call a recto. You can’t drag another page to the left of this first page in the Pages panel. It will always shuffle the old right (recto) page 1 to be a left (verso) page 2 and insert the new page as a new right page, much to the chagrin of InDesign beginners.
But there is a way. Two ways, in fact! The first way is easy: Use the sectioning feature we looked at earlier to set the first page to an even number. For example, if the first page is set to page 2, it automatically becomes a verso. (Well, to be fair, in a Middle-Eastern document, which reads right to left, it’s the opposite.)
However, if you need the first page to be on the left side and it also needs to be page 1 (or any odd number), then go to the Pages panel menu, turn off Allow Document Pages to Shuffle. Now drag page 1 to the left and release when your pointer shows a small arrow pointing to the left. This will make page 1 a verso page. Then repeat the process for the rest of the document pages (Figure 9).
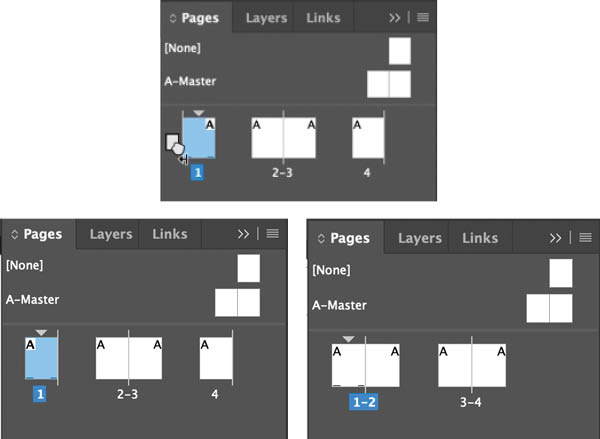
Figure 9. After turning off Allow Document Pages to Shuffle you can drag pages so that page 1 is a left page. Then drag the rest of the pages to arrange all the spreads properly.
Page x of y
In a longer document, I really like knowing at a glance how many pages are left in a chapter. Fortunately, InDesign’s page numbering can display the current page, as well as the total number of pages in the entire chapter or document. Here’s how to get “Page x of y” numbering.
In a text frame on your master page, type Page and a space.
Choose Type > Insert Special Character > Markers > Current Page Number, or use the keyboard shortcut Command+Option+Shift+N/Ctrl+Alt+Shift+N.
Type a space, then of, then another space.
Choose Type > Insert Variable > Text Variable > Last Page Number. This text variable will insert the page number of the last page in the document, and keep it updated when new pages are added or removed.
Two page numbers on one page
I created a coffee-table book, which had a full-bleed photo on every right page. Instead of having page numbers on top of the photos, the author wanted both page numbers to be printed on the left page like this: 12 / 13.
To accomplish this, you can create a text frame in a corner of the left page of A-Master, near the inside margin, and add a page number (Type > Insert Special Character > Markers > Current Page Number), followed by a space, a slash, another space, then choose Type > Insert Special Character > Markers > Next Page Number.
Next, you have to tell InDesign where to look for the next page number. Actually, you need to trick InDesign into thinking that the “next page number” is referring to the next frame in a threaded story, which continues on the right-hand page. To start, click the outport in the bottom-right corner of the page number frame. Your pointer will change to indicate you can drag to create another threaded text frame.
Drag to make another small, threaded text frame on the next page. Now, both page numbers, the current and next, show up in one text frame on the left page (Figure 10)!

Figure 10. By threading the page number text frame across the spread you can get both the current and next page numbers on the same page.
Making sure page numbers are always visible
If you put page numbers on your master page, then put a full-bleed photo or color-filled frame on a document page, the page number will be covered up. That’s because in a default document, which has only one layer, master page items that haven’t been overridden will always be underneath objects added to a document page. No amount of Arrange > Bring to Front or Send to Back will make those page numbers visible.
But you can easily change this—and get those page numbers on top of all document page content—by adding layers.
Open your Layers panel (Window > Layers), and click the Create New layer button at the bottom.
Layer 2 appears above Layer 1. Notice the layer color is red for Layer 2, and blue for Layer 1. Double-click the words Layer 2, and name the layer Master Objects. Click OK.
Double-click A-Master, and select the page number text frame. Notice the frame color is blue; that’s because it’s on Layer 1. Locate the little blue square selection indicator on the very right of Layer 1 in the Layers panel. Drag this square up to the red Master Objects layer. The selected frame highlight color will change from blue to red, indicating the frame is on the red layer (Figure 11).

Figure 11. Select a master object, which as a default is on Layer 1. Click the little blue square selection indicator on the right side of the panel and drag up to the red square. This will move the selected item to the Master Objects layer. The selection color will turn to red, and it will be on top of any object placed on the Layer 1. Don’t forget to select Layer 1 layer before moving on!
Make sure that you click the blue Layer 1 again so that all other objects created will be located on the document Layer 1.
For a demonstration of this feature, see the last half of this video.
Making Page Numbers Pretty
One cool formatting trick is to make the page number white, centered in a colored frame (Figure 12). I always create a paragraph style for my page number. This way, if I need to make a change, I can change the style, and it will update throughout the document—and if I’ve got multiple documents, combined in a book, it will update all documents when I synchronize the styles across the book.

Figure 12. Who says page numbers have to be boring?
Double-click the A-Master page.
Drag to create a text frame at the bottom left of your left page (if using facing pages).
Choose Type > Insert Special Character > Markers > Current Page Number.
Make sure the frame is the same height and width to make a square, either hold Shift as you make the frame or type in equal width and height values in W and H in the Control panel.
Fill the frame with dark blue (or another color of your choosing).
Select the A, adjust the font and size, and change the text color to [Paper].
Center the text horizontally. Select the frame, choose Object > Text Frame Options, and choose Vertical Justification – Align: Centered. The text is both vertically and horizontally centered in the frame. This is when I would create a paragraph style and make sure it’s applied to the page number.
Don’t like a square? Change it to a circle! Select the frame, and choose Object > Convert Shape > Ellipse. If the height and width are the same, you’ll get a perfect circle.
Duplicate this circle with Copy and Paste, or hold the Option/Alt key as you drag the circle to the other page (if you’re working on a facing pages document). Position it in the bottom-right corner of the right page. Your page numbers will show up on the outside corner of every page using the A-Master.
If you need to change the size, color, or font of the page number, edit the paragraph style. If you need to change the color of the circle, you’ll need to modify both circles, on both sides of the master. Even better, use an object style so you only have to make the change once to have it appear everywhere.
Combining page numbers and footer text with an adjustable space
Often, my page numbers are combined with footer information on a page. My left page might look something like Figure 13.

Figure 13. As the page numbers change, this newsletter footer needs a variable space after the date to keep the company name aligned to the right side of the column.
To set this in a single text frame along the bottom of my page, I would type Page, the page number, a vertical line (Shift+), and then the company name. That’s the easy part. But how can you get the words May Newsletter to stick to the right side of the same frame? Knowing that the changing number of digits in the page number might push the words to the right to another space, I don’t want to add tabs or multiple spaces to get the May Newsletter over to the right. Nor do I want to have to manually adjust it or make a separate text frame. Instead, I’ll use one of the most magical of InDesign’s special characters: the Right Indent Tab.
To enter it, I simply press Shift+Tab after the name of the company (or choose Type > Insert Special Character > Other > Right Indent Tab). Voilà! Any words following the Right Indent Tab will shift to the very right of the text frame and stay there, even if the text is edited or width of the frame is adjusted.
Picking Precise Pages
If you need to print specific pages of a document with mixed page numbering styles in different sections, it can be very difficult to figure out what to enter in the Range field in the Print dialog box.
For example, if you just type 2, you’ll print whichever page is numbered 2 (which would be the eighth page in the example file we created earlier in this article), or you might get an error that InDesign can’t find page 2 because you have a prefix or are using a numbering style other than Arabic.
The solution is to use absolute numbering, by adding a + in front of the number. So if you enter +2 in the Range field, you’ll always print out the second page of the document, regardless of any page numbering. Likewise, if you have the first three pages in a document numbered with i, ii, iii, you can type a print range of either i-iii or +1-+3 (which means “the first through the third page”).
Actually, sometimes trying to figure out the page numbering is just too overwhelming, so here’s a trick: Select a page or range of pages (Shift-click multiple pages) in the Pages panel, then right-click the selected pages and choose Print Spreads (Figure 14).

Figure 14. The easiest way to print a complex range of pages starts with right-clicking.
If you have a hard time figuring out the absolute page numbers (easy to do in a long document with a lot of pages), there is a preference that can help. It allows you to choose how the page numbering under the pages will show: either with their absolute page numbers or the section numbers. Choose InDesign/Edit > Preferences (Command+K/Ctrl+K) and in the General area, choose the desired view under Page Numbering (Figure 15).

Figure 15. This preference, in the General area, allows you to view page numbers as absolute page numbers (1, 2, 3) or with section numbering (i, ii, iii, 1-1, 1-2, etc.).
Tip: For even more creative ideas for page number formatting, see Diane Burns’s article in Issue #28.
Numbering Nirvana
There you have it! You now know all about adding and formatting page numbers. Even though the need to number pages is fundamental, the options can be complex. If you learn to use them correctly, however, you’ll need fewer master pages and work faster by letting InDesign do the numbering for you!
Commenting is easier and faster when you're logged in!

Recommended for you

InDesign Magazine Issue 79: Tablet App Solutions
We’re happy to announce that InDesign Magazine Issue 79 (November, 2015) is...
InDesigner: Cindy Kelley
How unwavering passion led Cindy Kelley to a full-time career in freelance desig...

InDesign Mag Issue 34: Color, Utko, Postcards, ACE, and more!
Here’s the thing: InDesign Magazine comes out once every two months. It...