


Next, I Command -click the sky channel tile in the Channels palette to load it as a selection, and create a Curves adjustment layer. Since a selection is active, the curves layer uses it as a layer mask. I then tweak the curves (see figure 4) to produce the result shown (see figure 5).
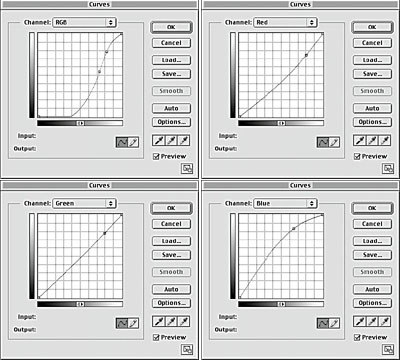
Figure 4: The curves for the sky channel.
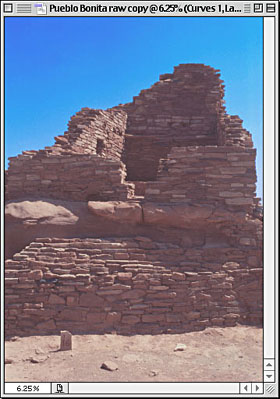
Figure 5: The result of tweaking the sky channel’s curves.
In case you’re wondering, I’ve deliberately exaggerated this correction to make a point later on. Now, I transfer this correction to the high-bit file as follows:
- Command -click the sky channel to load it as a selection
- Shift-drag the selection to the high-bit file
- Press Command-option-M to reload curves at the last-used setting.
These three steps transfer the effect of the adjustment layer to the high-bit file.
Where’s My Layer Opacity?
One of the great features of adjustment layers is that you can vary their opacity globally by using the layers palette’s opacity slider, and locally by painting on the layer mask. So it’s easy to correct the rather hideous correction I made in Figure 5 by reducing the layer opacity to around 50%. But you can’t do that on the high-bit file. Or can you?
Well, you don’t have layers, so you don’t have layer opacity. But you can get the same result by using the History brush. History is an essential feature for high-bit work, and while History states take up a good deal of scratch-disk space, particularly when you create Snapshots, they’re worth it. You set the maximum number of History states in Photoshop’s General Preferences. The default number is 20, which is fine if you’re careful about taking Snapshots at each important stage, but Photoshop 6 allows up to 100, and Photoshop 7 will let you keep track of 1000 History states (provided you have a big enough scratch disk).
History records each edit you make to the file. Snapshots store a copy of the current state in memory. Once you reach the maximum number of History states, the earliest ones start to scroll off the list, but Snapshots stick around until you close the file. You can click a History state in the History palette to return the image to that state, and you can use the History brush to brush in a different state, with control over brush opacity and (at least some) blending modes.
Here’s how I use the History palette to simulate layer opacity.
Figure 6 shows the high-bit file’s History palette after transferring the edit from the 8-bit/channel duplicate. I set the current state to the step before the curve was applied — Drag Selection — by clicking on its tile, and I set the source for the History brush to the Curves state by clicking in the column to the left of that tile.
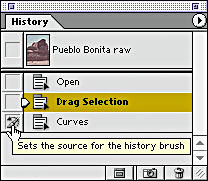
Figure 6: The History palette in which I set the source for the History brush for Curves.
Now, when I choose the History brush and paint on the image, it will paint in the curves correction. To simulate the 50% adjustment layer opacity, I set the History brush opacity to 50%, and paint in the correction, producing the more acceptable result (see figure 7).
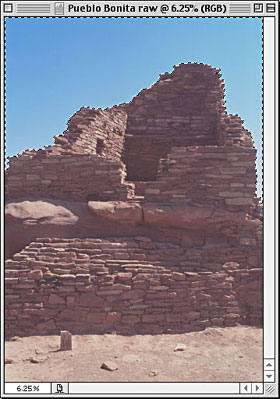
Figure 7: The correction with reduced opacity.
For more control, you can take Snapshots of two extreme states, then use the History brush with different opacities (or pressure-sensitivity on a tablet controlling opacity) to get the exact blend you want.
This article was last modified on January 3, 2023
This article was first published on March 26, 2002
Commenting is easier and faster when you're logged in!

Recommended for you

Managing Problems With Rotated Images in InDesign
Does anyone else have problems with poor previews of placed graphics in InDesign...
Using Photoshop’s Content Aware Scale and Content Aware Move
Use Content Aware Scale with Skin Protect. Click the Skin Protect laye...
Scanning Around With Gene: Five Years on a Flatbed
Editing Scanned Images Straight from the scanner with all the auto-correct featu...