

We’ve all done it. We’ve all been so involved in the creative process that we don’t realize what a disorganized mess we’re making of our layers, our studio, our dining room table. When we come up for air, the task of organizing seems almost monumental. We try to talk ourselves into skipping it. We’ll do it later or, if think we can get away with it, not at all. But nothing puts the brakes on a creative journey faster than not being able to find quickly what you need to work with. And if you’re someone like Lee Daniels, an artist whose animations pass through several programs before completion, being able to quickly and easily organize hundreds of paths into logical layers will not only preserve your sanity during the back-and-forth editing process. It will also provide you a reliable way to maintain the organization of your Illustrator files as they move from one program to another for further editing.
This article focuses on how Lee Daniels has developed a custom-tailored workflow to quickly impose order in his Layers panel when one of his complex character creations is near completion. By following along with his process, you’ll hopefully be inspired to take a few extra steps before passing your files off to another person, another application, or filing them away for future use.
Starting a new character for an animation
Illustrator and animator Lee Daniels is a very talented one-man band; Lee is the featured artist for the January #DigitalArtistSpotlight by Sharon Steuer on the Astute Graphics Blog. You can check out his work in video below from the animated webseries “Jungle Brawl.”
Jungle Brawl – Episode 2 from Lee Daniels on Vimeo.
When it comes to creating his animated videos, Lee Daniels moves fluidly between Illustrator, Photoshop, and After Effects. Illustrator is an anchor program in his workflow, as Lee counts on Illustrator not only for creating the actual artwork he later animates, but also to help him organize and keep track of every element that goes into his animation.
Lee begins his process by sketching in Photoshop. He then uses these character sketches as references in Illustrator for his signature vector artwork. If you’re creating initial sketches to use as Illustrator templates, feel free to scan pencil or pen sketches and save in PSD, TIFF, or JPEG. You can also draw directly into Illustrator using the Blob Brush, or use drawing assistant plug-ins for Illustrator, such as Astute Graphic’s Dynamic Sketch.
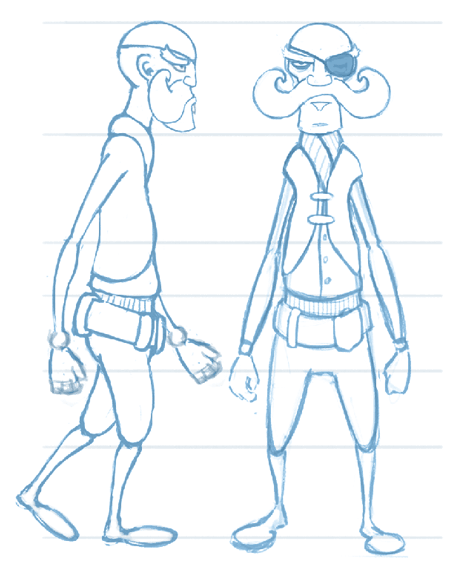
In Illustrator, instead of placing his sketch into a locked Template layer below the Illustrator objects he’ll be drawing, Lee imports and places his sketch on a layer above his main layer, sets it to Multiply mode, and locks it to use as a guide for his vector art. Lee then uses a couple of his custom Art Brushes to start drawing the character in detail.


As he re-creates his sketches with Illustrator objects he makes certain that he creates each view of the character far enough away from the others that he can easily pull his illustration apart when he later creates groupings for the animation. While in this initial stage of his creative workflow, he doesn’t worry about organizing layers, or even naming his objects and groups, but simply concentrates on getting the drawings just right. As a result, when each character is complete, the Layers panel of the Illustrator file is filled with the generic labels. The screenshots below show the initial state of his Layers panel as he develops a character sketch.


Sorting sets of objects into top-level layers
Once Lee has completed his vector illustration, he starts to organize the image in the Layers panel. Rather than try to organize elements by dragging them within the Layers panel, Lee Daniels found the quickest way to collect a bunch of objects together in the Layers panel is simply to select the objects on the artboard and group them (Command-G/Ctrl-G). So Lee next moves through his artwork on the artboard, selecting and grouping objects together that he wishes to be organized as a unit. This serves a dual purpose—in addition to clustering these elements together in the Layers panel, it also helps Lee to select the groups for later editing.
With his groups now formed, Lee goes through the Layers panel to identify each set of objects that he wishes to animate separately, and makes certain that it’s directly within the top-level layer. If any object that he wants to be able to animate independently has become nested within another group or sublayer, he drags it out so that it’s in a top-level layer.
If Lee knew that he was only going to use his image within Illustrator or Photoshop, then he could simply name the sets within his top-level layer (the sublayers, groups, and paths) and be done with his organization. However, since Lee knows that occasionally he needs to take a set of objects directly from Illustrator to After Effects, he takes a few extra steps to organize his Illustrator files into a structure that other applications can better interpret. Because neither groups nor paths can become top-level layers (and only top level layers can be distinguished in After Effects) Lee’s next step cleverly moves each set of objects in the top-level layer into its own generically-named sublayer. By doing this, every set of objects in a top-level layer will be ready for his custom naming convention, and can then be quickly prepared for exporting whenever needed.

The next task is to move each set of objects into its own sublayer. In the Layers panel Lee makes certain that he has highlighted only one top level layer (it will be blue and no other layer will be highlighted). Now he chooses “Release to Layers (Sequence)” from the Layers panel menu. The “Release to Layers (Sequence)” command won’t be available in the Layers panel menu if you’ve targeted objects instead of the layer. If you have more than one layer selected in the Layers panel, Release to Layers (Sequence) will only operate on the last highlighted layer. Once you apply this command correctly you’ll notice that each new sub-layer will be assigned a generic “Layer” name, and doesn’t inherit any custom naming that you might have applied before you ran Release to Layers (Sequence).

Working in the layers panel, Lee now begins the process of double-clicking each generically named sub-layer name to rename it. Lee’s naming convention helps him quickly locate the element he needs, such as using “H-front-hand-r” to designate H’s right hand in front view. Developing a flexible, yet short, naming conve
ntion helps him create a unique name for each of many layers. This also helps him when he later combines multiple characters so he’ll know whose head, hand, or tongue belongs to whom. Lee’s layer names need to be sufficiently descriptive to be instantly recognizable, but more importantly, they need to be memorable so that he can use the search functions in Photoshop and After Effects. On naming this way Lee says, “This part is very important when it comes to After Effect’s import and animation. Although a tedious job, it’s time very well spent.”

Exporting to Photoshop with layers intact
Although he maintains all the parts for his character organized in a single Illustrator file, Lee exports each character view as a separate PSD file. Illustrator exports only the visible layers in a file, so for each state of a character view that he wants to export, Lee hides all the sublayers that aren’t part of that particular view. For instance, if he has created several views of his character, and wants only the front view, he only has to hide those sublayers associated with the other views. Again because he’s named the sublayers with the view in the name, this is now an easy task.
In order to export the artwork with minimal boundaries, Lee resizes the artboard to the currently selected objects. The quickest way to do this is to select the Artboard tool and then choose Fit Artboard to Selection Bounds option from the Artboards pop-up menu in the Control panel (you can do this even more quickly if you assign a keyboard shortcut to the command). He then chooses File > Export, selects the PSD format, and enables Use Artboard in the first dialog. Then in the Photoshop Export Options dialog, he makes sure that Write Layers and Maximum Editability is enabled.

Tip: It might seem logical to use separate artboards within a document to organize different views of a character, its props, or even for each character. But the problem here is that layers are document-wide, so one layer might contain objects on every artboard if you’re not careful. Therefore, if you decide to use different artboards in a document to help with your organization, make sure you create a top-level layer for each artboard and switch to that layer whenever you’re working with that artboard.
In Photoshop, when Lee opens his document, it’s intact with custom-named sublayers within a single top-level Group layer. Lee uses Photoshop to add shading with the Dodge and Burn tools, and to make other minor adjustments to his character here. The detour to Photoshop works well for Lee (and other animators) not only because he can easily modify the appearance of all his elements there, but also because After Effects is optimized for working with rasterized elements. With so many vector elements in one file, taking native Illustrator files into After Effects tends to slow him down during the animation process, so Lee prefers to use Photoshop for his final prep work before exporting to After Effects.
Exporting from Photoshop to After Effects with layers
While Photoshop can understand Illustrator’s layer structure, After Effects cannot. After Effects recognizes top-level layers but can’t distinguish either sublayers, or groups. Fortunately, just as Illustrator’s “Release to Layers (Sequence)” command provides an easy path to convert groups to sublayers, Photoshop”s “Ungroup Layers” command will promote all groups one level down into top-level layers. When imported into After Effects, named layer groups that were promoted to top-level layers get rasterized into separate objects that can be animated individually. So by following a few rules when organizing his layers in Illustrator, Lee is able to take advantage of each program’s strengths as he moves his artwork from one application to another.

Final Tips
How other Adobe applications interpret Illustrator layers
If you plan to pass your Illustrator file directly to another application, be sure you know how the receiving application will interpret your Illustrator artwork. Described briefly below are a few things to keep in mind regarding how different Adobe applications interpret Illustrator layers.
Illustrator to Photoshop
When you export a file to the PSD format with Write Layers enabled in the Photoshop Export Options dialog, you may see a warning that Illustrator had to flatten some containers (Adobe’s way of referring to all the different types of Illustrator layers), so you’ll want to check your PSD file to make sure nothing was lost in the conversion.

Photoshop tries to convert every object that has both a fill and a stroke into two layers grouped inside another group, but Photoshop will keep intact Illustrator’s nested layers or groups. Photoshop can also search for layer names using the Find Layers feature in the Layers Panel that was introduced in CS6. If you don’t organize and name your layers in Illustrator the way Lee does, you’ll be forced to open groups, often several levels deep, before you can see what each group contains, and obviously, there won’t be any layer names to help you locate a character’s hand or mustache when you need it.
InDesign
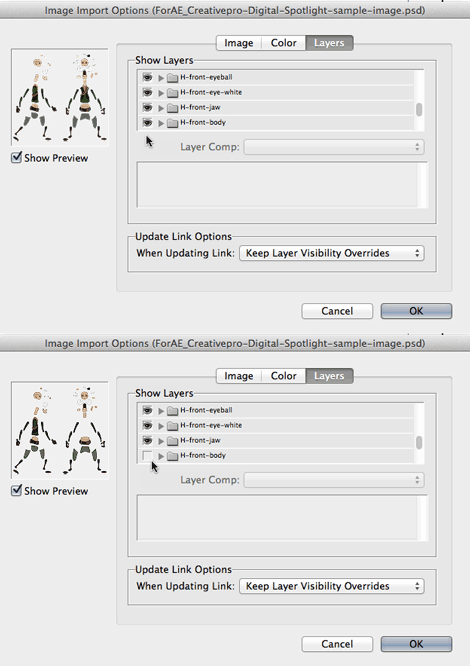
InDesign is capable of hiding and showing top-level Illustrator layers. If you enable Show Import Options in the Place dialog, you can choose which layers you want to be visible. After placing the file, you can choose Object > Object Layer Options to change layer visibility. Thus you can create variations for an image inside Illustrator, then use a single file multiple times in InDesign, showing and hiding different top level layers in each instance. You won’t have many visual clues to work with (see the image below), so the meaningful labeling and organization of layers becomes all the more important.
After Effects
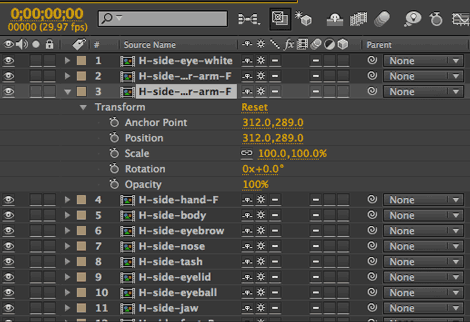
After Effects can preserve any elements on top-level layers (but no sublayers or nested groups) from either your Photoshop or Illustrator file. To directly export to After Effects, you only have to highlight any sublayers and drag them above the layers they’re on to convert them to top-level layers. Upon import, enable one of the Import Kind: Composition options, or the file will be flattened as Footage. If you have named your layers, you’ll not only have an easy time identifying the animation elements, but you’ll also be able to locate a layer in the After Effects Timeline by typing its name in a Search box—a feature similar to Photoshop’s Find Layers feature.
Lee doesn’t often import directly from Illustrator to After Effects because he finds it slows him down too much. However, if you bring a vector object directly into After Effects, you’ll be able to scale your image to any size and have details always remain crisp. So if your work doesn’t contain many vector objects (and if you want to be able to zoom in and out without having to pre-rasterize a variety of potential zoom levels) you may prefer to bring your Illustrator file directly into After Effects.
If you used the preset Video & Film f
or your Illustrator document, in addition to getting your title and action safe non-printing guides, you’ll see two special artboards. The inner one is the size of your video with the video safe guides, but the outer one is a very large artboard that surrounds the video artboard. Think of the larger artboard as the “wings” in a theater where actors, props, and scenery can be brought onto the main stage (the small artboard) when needed. You can animate these objects when they’re “offstage,” bringing them on the stage and taking them off again at will, so with Illustrator and After Effects, you’re not limited to what you can import by the size of the video you’re creating.

Flash
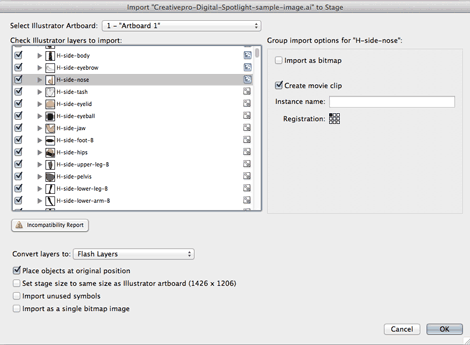
Flash can also read native Illustrator files and interprets only those objects that reside on top-level layers. As long as you’ve placed all the elements you want to animate on their own layers, you can import the Illustrator file to Flash’s stage and Flash will give you the option to create Flash layers in its Timeline. Upon import, you can designate a layer as a Movie Clip, and set a registration point for animating the object at the same time. Here is yet another dialog you may encounter where the time spent in Illustrator grouping and naming your layers will spare you time and frustration.
Managing your layers for any need
Whether you create posters, maps, advertising, or fine art, you should take the time to organize at least the basic file structure in your project. Organized files will be much easier to work with tomorrow, the next day, or the next year. It doesn’t matter if you create and name logical layers, sub-layers, and groups before you begin a project, while you’re creating, or not until you’ve finished. But you shouldn’t consider a project completed until you’ve imposed order on the chaos in the Layers panel that frequently accompanies any Illustrator artwork.
Please find Lee and his work at https://www.LeeDanielsART.com
This article was last modified on February 16, 2023
This article was first published on January 14, 2013
Commenting is easier and faster when you're logged in!

Recommended for you

Photoshop 10 Essential Tips: Working with Layers
Photoshop users have been enjoying the ability to shuffle around layers since ve...

Design How-To: Images that Break Boundaries
This story is taken from “Before & After” Magazine. Creativepro....

Combining Custom Distortions with Image Warp in Photoshop
Photoshop’s Image Warp tool is great for bending layers into any shape. Of...