

Dye-sublimation printing technology has remained essentially unchanged since its inception: The three- or four-pass process uses heat to fuse a single color of dye at a time — cyan, magenta, yellow, and (rarely) black — onto specially coated paper. The end result can be stunning — a continuous-tone print that looks like a glossy photograph. The downside of the process has been the limited selection of media types, the time-consuming printing process, and the comparatively high cost of both the technology and media: Dye-sub printers have typically cost $1,500 to $10,000, and cost per page has been $3 to $5, depending upon media size. With the high caliber of current photo-quality inkjets from Epson, Canon, Lexmark, and Hewlett-Packard at price points between $200 and $500, it’s no wonder that dye-sub printers have nearly disappeared as a class.
Enter the Olympus P-400 dye-sub printer. Priced at $999, the P-400 has the capability to print a full-size (although not 8 inches by 10 inches) glossy print in under two minutes — at a price less than $2 per sheet. And while the printer does carry baggage inherent to the dye-sub technology, Olympus has added quite a bit of flexibility to the unit in an attempt to appeal to a wider market.
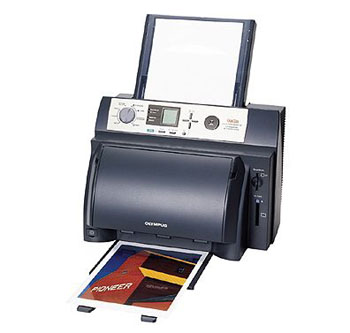
The Olympus P-400 dye-sublimation printer.
Smooth Operator
The most important aspect of the P-400 is its print quality, which is excellent. Taking full advantage of its heritage, the P-400 produces vibrant output on its heavy glossy stock. Because the printer uses dyes, you’ll see no dots when you look at the images even through a loupe. For people who want something that really looks like a traditional photo, the P-400 shines.
A common complaint with past dye-sub printers has been their tendency to produce excessively soft prints, but we saw no such softness with the P-400. A sharpening option is available in the print driver, but we rarely changed it from its default setting, preferring to use Photoshop’s Unsharp Mask filter instead.
The P-400 uses a traditional three-color (CMY) process, adding a protective coating after the dyes have been applied. Again, some people might complain about the lack of black dye (to produce true, not additive, blacks), but we found that most images — even monochrome images — printed nicely. As with any printer, a few images didn’t print as well as we would have liked, but for the most part the P-400 handily printed the images we threw at it — from 2-megapixel digital camera images to drum-scanned, medium-format chromes. And the clear laminate coating on each print is a nice touch for those who like to be able to handle their prints without fear of smudging them or otherwise causing damage.
The P-400’s maximum print area is 7.64 inches by 10 inches. As noted above, this is slightly smaller than the standard enlarged photograph size. Olympus currently offers two standard paper types for the P-400, in A4 size (8.25 by 11.7 inches) and the smaller A5 size (8.25 by 7.27 inches). The company is also selling two perforated paper packages, one for postcards (two per A4 sheet) and one for 3.5- by 6-inch snapshots (four per A4 sheet). The snapshot and postcard papers allow edge-to-edge printing, which is a nice feature (and one that is showing up in the inkjet market as well).
Pricing for 25-sheet packages is in the $20-to-$30 range (depending upon the paper type), and a 50-sheet ink ribbon has a street price of approximately $45, so the overall print cost is roughly $2 for an A4-size print. That’s a big drop from older full-size dye sub printers, which typically range from $3 to $6 per letter-size page.
Getting Connected
The printer includes USB and parallel ports for connection to a PC or Macintosh (USB only) computers, but is also equipped with separate SmartMedia and PC Card slots, allowing the creation of prints without the use of a computer. A unique "settings wheel" makes it easy to select the appropriate interface and choose the type of prints desired when using the internal memory card slots. A tiny LCD screen with 16 levels of grey serves both as an interface to the printer’s controls and as a preview screen for images on SmartMedia, CompactFlash, or Memory Stick cards. The latter two media types are readable via standard PC Card adapters available from many digital camera resellers.
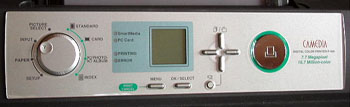
The printer’s control panel uses a handy settings wheel and comes with an LCD screen, which lets you preview images stored on memory cards.
Installation is simple. The hardest part of the process is loading the dye ribbon, but even that is relatively painless, given the easy access to the front-loading ribbon compartment.
The print driver for both the Mac and PC is sparce, although you can set the sharpening level and perform some channel-based color correction. Spooling speed depends on your system’s processor, but once spooling is complete (it took anywhere from one to three minutes to spool the file during our testing, depending upon the machine we used), it takes approximately 90 seconds to print the three colors and apply the overcoating.
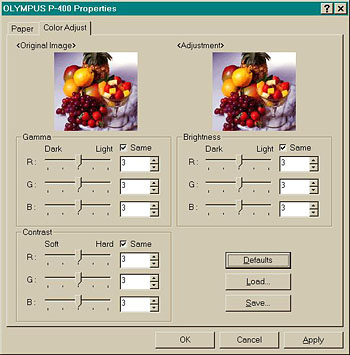
The P-400 driver provides basic image-adjustment features.
Direct Printing
Printing directly from digital-camera storage cards is easy. We used both SmartMedia and CompactFlash cards with our unit — the latter through a generic, third-party PC Card adapter — and we were pleasantly surprised at how simple it was to generate index prints and copies of images directly from the cards. The tiny LCD was adequate for identifying images, provided we were somewhat familiar with the images on the cards via the screens on our cameras.
Selecting images for printing via this mode is straightforward. If you want to print three copies each of a group of images on a memory card, the P-400 makes it simple, even down to choosing the right layout for the number of images per page. You can also apply brightness, contrast, and sharpening to images; trim image size (a pain to do with anything but the occasional image, however); and apply backgrounds and stamps — a nice feature that will get used in some pay-for-print situations and by people who want to make greeting cards and the like.
Getting index prints out of the P-400 wasn’t as quick as we would have liked: The printer has to process each image as if it were printing it full-size. During our testing, it took about 10 minutes to output index prints from a mix of thirty 2- and 3-megapixel images from our SmartMedia card, and almost 30 minutes to print the same number of images from the PC Card slot.
Olympus put a lot of effort into the direct-print feature, but for most creative professionals, this feature is of limited value for all but index prints; even then, there are plenty of shareware and commercial utilities for Macs and PCs that can batch produce index prints from folders of images. (We would have liked Olympus to add more index print and layout features to the driver or as a stand-alone application.)
It would be nice, too, if the P-400 had an all-ports active feature, so that users could print from the USB or parallel ports and a media card without having to change the input option using the settings wheel. And a few people will be disappointed that the P-400 can’t quite print at the traditional 8-by-10-inch photo format. But these are fairly minor quibbles. The only other drawback is the limited range of media: Olympus is providing no fine-art, semi-gloss, or matte-finish papers — something that companies such as Epson have done very well.
How It Stacks Up
The P-400 is the best dye-sub printer we’ve seen. Its print quality is excellent: A glossy print from this printer looks as good as a glossy print from Epson’s capable Stylus Photo 1270, and the P-400 is twice as fast at minimum than an inkjet printing at the same quality level. Compared with Epson’s $900 archival-quality inkjet, the Stylus Photo 2000P, the P-400 wins by a nose in print quality and by a long shot in print speed (at comparable print quality and size settings).
Media cost is also comparable when compared with the cost of photo ink cartridge sets and glossy papers. Our cost-per-page experience with inkjets is roughly $1.50 for the highest-quality, letter-size media types.
The things that aren’t so good about the P-400 — media inflexibility and price — will be deal-breakers for a lot of people. With inkjets, you can purchase papers with glossy, semi-gloss, and matte finishes; you can literally print on hundreds of paper types. With the P-400, you get one type. It is excellent paper, providing a print that is as good as a photograph, but it’s the only paper you get. (A semi-gloss paper, similar to Epson’s excellent Luster Photo Paper, would be an excellent addition to the P-400’s accessory kit.)
And the P-400’s $999 price is a lot of money to spend on a printer that does one thing, no matter how well it does that task. You could buy two Epson Stylus Photo 1270s for what you’d spend on one P-400.
The Final Word
Some people firmly hold that inkjet printers, though capable of producing impressive output, cannot truly match the quality of a traditional photograph, given that inkjets can’t manage true continuous-tone printing. (We tend to disagree on this point, but are willing to entertain the opposition.) For this group of user, the P-400 should prove a fine choice if they can justify its price.
Read more by Rick LePage.
This article was last modified on January 6, 2023
This article was first published on January 31, 2001
Commenting is easier and faster when you're logged in!

Recommended for you
Damn You, Art School
It takes more than a good education to succeed in a any field. It takes real-wor...

Buying a Color Printer
There’s something compelling about seeing your work in print. That holds true ev...

Scanning Around With Gene: The Horse and Buggy Printer
Type designers and graphic artists tend to fall into two categories. You either...