
Moving Text Styles from InDesign to Illustrator and Photoshop
Steve Werner dives into the details of getting your styles "to go."

This article appears in Issue 121 of InDesign Magazine.
You have a problem: You’re creating assets (either by yourself or in collaboration with others) for a project with different components to be created in InDesign, Illustrator, and Photoshop. Of course, you need to maintain brand consistency in text formatting—including fonts, sizes, color, and so on. Yes, you could painstakingly re-create the same formatting in all three programs. But if you already have the right paragraph and character styles in InDesign, wouldn’t it be much more efficient if you could somehow move those styles over to Photoshop and Illustrator?
At first blush, this might seem like an impossible task. If you’ve used all three applications, you’ve probably observed that InDesign, Illustrator, and Photoshop are not equally adept at handling text and text formatting. Yes, all three programs support some forms of paragraph and character styles. But InDesign has by far the most advanced capabilities, with 20 panels of options, including powerful features like nested styles, GREP styles, and so on. Illustrator handles both paragraph and character styling reasonably well, but many InDesign attributes (e.g., bullets and numbering, paragraph rules, keep options, line styles, etc.) are not supported. Photoshop is even more limited. (See sidebar “You Can’t Take It With You.”)
So how can we get text styles from one application to another in some reasonable form?
You Can’t Take It With You
Since InDesign has the most features for formatting text, any time you move an InDesign paragraph or character style to Illustrator, you’re going to lose something—or several things. And going from InDesign to Photoshop is an even greater step down. You can only bring in the most basic formatting from character styles, and paragraph styles can’t be brought into Photoshop at all.
The following lists will give you an idea what to expect, and what to watch out for.
Paragraph styles going from InDesign to Illustrator will lose:
- Align to grid
- Balance ragged lines
- Based on
- Bullets and numbering
- Drop caps
- GREP styles
- Hyphenation options (hyphenate across column, hyphenate last word)
- Keep options
- Last line indent
- Nested styles and line styles
- Next style
- Optical margin alignment
- Paragraph border
- Paragraph rules
- Paragraph shading
- Skew
- Span columns
- Strikethrough options*
- Stroke alignment and miter limit
- Underline options*
Character styles going from InDesign to Illustrator will lose:
- Based on
- Ligatures
- No break
- Skew
- Strikethrough options*
- Stroke alignment and miter limit
- Underline options*
Character styles going from InDesign to Photoshop will lose everything in the Illustrator list, plus:
- Export tagging
- Figure style
- Overprint
- Positional form
- Strokes
- Stylistic sets
- Tint
Using CC Libraries to Move Styles
The vehicle for moving styles between Adobe applications is CC Libraries (simply referred to as “Libraries” in Illustrator and Photoshop). Other methods, like copy and paste, drag and drop, or importing files, just don’t work when you’re going from InDesign to Illustrator or Photoshop. To learn more about CC Libraries, see “CC Libraries” in Issue #83. Also, you can read even more information about sharing text assets using CC libraries (features introduced in InDesign CC 2018 and Illustrator CC 2018) in this post.
What happens when you save content from InDesign to a CC library
Before we get into moving text styles around, it’s important to understand what happens when you save content from InDesign to a CC library. Which options are available to you depends on what you have selected. If you select a frame containing styled text, and you click on a library’s Add Content button (+), you can add the fill or stroke color of the frame, the plain text, the styles applied to the first paragraph, or the entire frame as a graphic (Figure 1).

Figure 1. Options for saving text frame content to a CC library
If you choose the option to save as a graphic, it is simultaneously stored in two formats: a snippet-like format which InDesign itself can reconstitute into an InDesign object, and a PDF for placing into Illustrator or Photoshop. The PDF makes the objects viewable and printable but not editable in those applications. So for text editing purposes, saving as a graphic is not the way to go.
When you save paragraph and character styles to a CC library for the purpose of moving them to Illustrator or Photoshop, you’ll get the best results if you specify both the font family and the font style. Otherwise, Illustrator and Photoshop will treat that information as overrides rather than style attributes (Figure 2).

Figure 2. To create character styles that will work in Illustrator and Photoshop, you need to specify both font family and font style.
Moving Styles from InDesign to Illustrator
Generally speaking, when you move content from InDesign to Illustrator, basic text attributes are handled well. Any attributes that Illustrator doesn’t support are simply ignored.
Starting the migration (getting the assets into the CC Library)
Here are the steps to get your styles from InDesign to Illustrator:
- In InDesign, format your text as usual with paragraph styles and character styles. Make sure your styles include both font family and font style definitions together, as explained above.
- In the CC Libraries panel, either select or create a library. Select the text to be brought in, and click the + sign at the bottom of the panel. Choose Paragraph Style. If all paragraph styles are not added to the library, click in each style, and add them one by one.
- Click in a character style, or more than one; then click the + sign, and choose Character Style. Repeat, if necessary, for each style.
- Select the text, click the + sign, and choose Text to bring in the text as an asset.
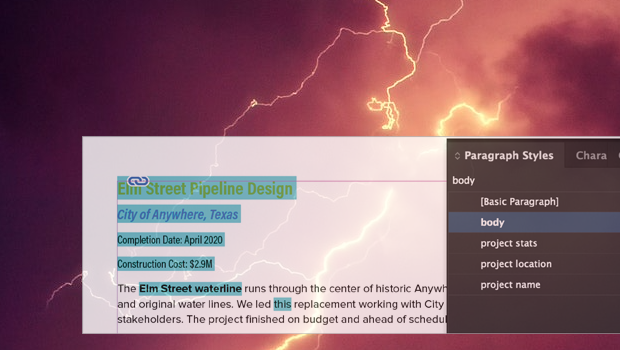
Figure 3 shows a simple document with three paragraph styles (Chapter Number, Chapter Title, and Body) and one character style (Italic) added to a CC library.

Figure 3. This simple project created in InDesign contains only three paragraph styles and one character style.
Using the assets in Illustrator
Here’s how to copy both text assets and their related styles from the library for use in Illustrator:
- In Illustrator, open the document where you want to place your new text style.
- Open the same CC Library where you saved the assets (Window > Libraries).
- Right-click on the text asset in the library, and choose Place Copy (Figure 4).

Figure 4. Choose Place Copy when importing a text asset to include the text style information.
- Drag out an Area Type frame big enough to hold the text. Because the text references the appropriate paragraph and character styles, Illustrator immediately adds the new styles to their respective panels and applies them to the text. In Figure 5, the cursor (not shown) is in the first example of the Italic character style. Notice that the correct paragraph style (Body) and the correct character style (Italic) are both applied.

Figure 5. When you include the text, Illustrator can read the formatting already applied to it, and styles are created and applied immediately.
- Sometimes things get glitchy. If Illustrator doesn’t properly apply a style, click the Clear Override command in the Character Style or Paragraph Style panel menu to remove a local override, or edit the style definition as necessary.
Adding Notes For Your Colleagues
Since the October 2018 update to CC Libraries, you can add a note to a library asset to explain to your colleagues how to use that asset. To add a note, right-click on an asset, and then choose Add Note. You can include up to 130 characters. Figure 6 shows a note to my colleague explaining that the text asset should be added first.

Figure 6. A note explaining how to use a text asset
When you just want the style, not the text
If you are using different text in Illustrator than you used in InDesign, you can just add the style(s) to your document. Here’s how:
- Open the library.
- Right-click on each Paragraph Style, and choose Add to Paragraph Styles.
- Right-click on each Character Style, and choose Add to Character Styles.
- Apply the styles to the text one at a time.
Note: In Illustrator, paragraph styles applied to paragraphs of body text sometimes lose track of the font family, font style, and/or size when you apply them from a CC library. If that happens, you may need to modify the style in Illustrator to add those attributes back in.
Moving Styles from InDesign to Photoshop
First, a word of warning. Put simply, importing styling from InDesign to Photoshop can be a real pain in the behind! Photoshop can only import graphics (remember, they’re uneditable PDFs) and character styles from InDesign using libraries. Even if you’ve carefully created paragraph styles that work perfectly in Illustrator, they will be grayed out and unavailable in Photoshop (Figure 7). This can make the process tedious and sometimes more trouble than it’s worth. And even the process of importing character styles isn’t straightforward.

Figure 7. Photoshop shows all your carefully built paragraph styles as grayed and unavailable.
Here are the steps you can use to copy character styles to Photoshop:
- Open the Layers, Character Styles, and Libraries panels in Photoshop, and choose the appropriate library.
- Right-click on a character style in the library, and choose Use in Document (Figure 8). A new layer will be added with the name of the font family.
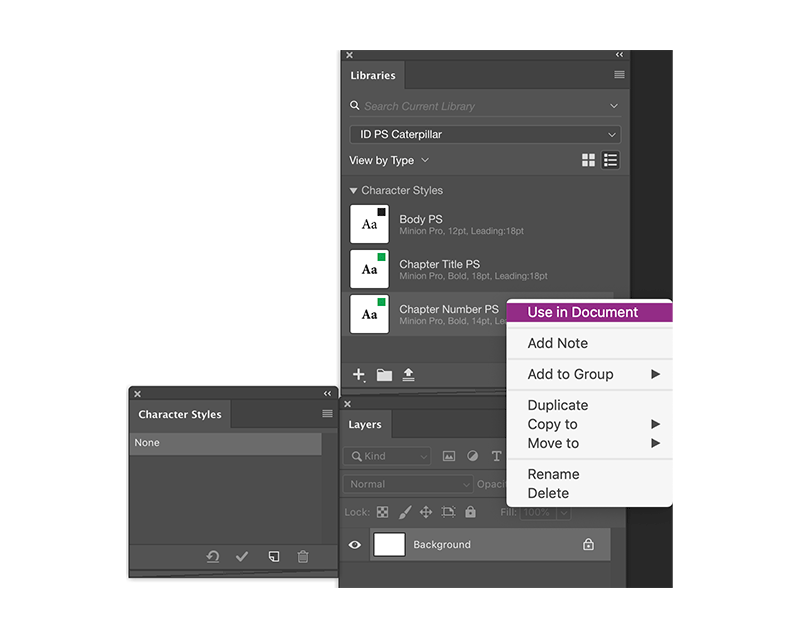
Figure 8. Right-click on each character style in the library to import into Photoshop, and choose Use in Document.
- Select the text layer that was created in Photoshop’s Layers panel (double-click on the T icon of the type layer). In the Character Styles panel, click the button to create a new character style, and then rename as desired (Figure 9). When you’re finished, the style definition should look similar to Figure 10. If you don’t want the text layer, you can delete it.

Figure 9. Select the text layer created in Figure 8, and choose New Character Style in the Character Styles panel.

Figure 10. A finished character style definition in Photoshop’s Character Styles panel
- Repeat this process for each character style you need to add to your Photoshop document.
A faster method: format first
If you don’t mind applying the formatting from a character style to all the text on a type layer in your Photoshop document, you can skip the process of creating and deleting extra layers. Simply target an existing type layer in the Layers panel, and click the style in your library. The formatting is immediately applied to all the text. You can then click the button in the Character Styles panel to create a new style based on the imported formatting; as long as the layer is still targeted, the style will be applied to the text. You can then give the style an appropriate name.
Converting Photoshop character styles to paragraph styles
If you want to convert a Photoshop character style to a paragraph style (so you can add paragraph attributes like indents), select the text formatted with the character style, and then, in the Paragraph Styles panel, click the button to create a new style, and give it a proper name. Then you’ll have to edit the style to add attributes like indent, space before/after, and alignment. I used this process to create a Body paragraph style from the Body character style (Figure 11).

Figure 11. The finished Photoshop file includes a paragraph style called Body, copied from the Body character style and edited to include first line indent and space after attributes.
To keep things from getting confused, it’s helpful to create a separate type layer for each character or paragraph style (except when you’re applying a character style to a layer that already has a paragraph style applied). In my example, I added one more character style to manually apply italic.
It’s also worth remembering that a Photoshop file uses only one color mode. So any CMYK colors included in your style definitions will be converted to RGB when you bring them into an RGB Photoshop document.
Shifting Styles
At this point in the evolution and sibling rivalry of these products, moving styles from InDesign to Illustrator and Photoshop is a mixed bag. On the positive side, Illustrator CC 2019 has made it relatively easy to import text assets and their styling from InDesign. On the other hand, Photoshop CC 2019 lacks many important features in the handling of text and text styling. The process of importing styles is cumbersome, and the results can sometimes be underwhelming. But at least now you know the process as it exists and what to expect. If you’d like to see improvements in the features for moving text styles between applications, be sure to let Adobe know at the Illustrator UserVoice page and the Photoshop Family feedback site.
Commenting is easier and faster when you're logged in!

Recommended for you

Create a Reusable Art Deco Pattern Brush in Adobe Illustrator
One of Illustrator’s greatest strengths is the ability to easily make reusable d...

Tip of the Week: Layer Shortcuts
Sign up for the InDesign tip of the week to get a new tip, roundups of new artic...
Formatting in a Flash
How do you take 50 unstyled, manually formatted Word files and turn them into a...