Menus, Table of Contents, and the Last Line Right Indent Trick
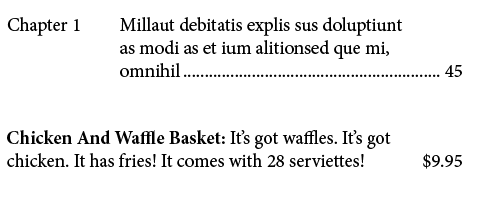
InDesign has a little-used feature that you need to know about if you ever make a menu, or a table of contents, or any kind of multi-line paragraph with a special ending. By “special ending” I mean a number, or a price, or something like that. For example, look at these two examples:

In both of these paragraphs (one from a table of contents, and one from a menu), the final line extends past what appears to be the right edge of the paragraph.
People have all kinds of methods for creating this effect, but there is only one “right” way: use the Last Line Right Indent feature. This lives next to the Right Indent feature in the Control panel, the Properties panel, the Paragraph panel and (where it matters most) the Paragraph Styles dialog box.
So, for example, here’s the table of contents paragraph:

There are five important things to look for here:
- The Left Indent is positive (1 inch, or 6 picas, in this case)
- The First Line Left Indent is Negative by the same amount: that “pulls back” the first line to what was the left margin of the frame.
- The Right Indent is positive (half an inch, or 3 picas): this forces the right side of the paragraph away from the edge of the frame.
- The Last Line Right Indent is negative by the same amount: this “pulls back” the last line of the paragraph back to the edge of the frame.
- Finally, the character before the number is not a tab — it’s a Right Indent Tab (shift-tab), which automatically stretches to the right edge.
Don’t insert Shift-returns or extra tabs, or do other crazy workarounds to create this “extended last line” effect. Instead, just use the features InDesign has hiding in plain sight!


Good to know (what I already should have known, but never realized I could and should use this way)! Still have one question though: how do you set the leader to dots when you use Shift-tab? I can do this in the Tabs panel, but then I can’t find a way to select the tab I inserted with Shift+Tab and I have to create a new Right Indent Tab to be able to ‘activate’ the leader dots. I hope I am making sense here, English is not my native language!
I just wanted to place the same question ;-)
Just put a tab behind the right indent with a filling dot :-D
Henri, that does not work when I try that, so I guess I do not completely understand what you mean. How exactly do you put a tab behind the right indent? Or are you just joking? :-s
Henri is correct and not correct… what he is describing is the old way of doing it. You make a tab stop in the Tabs panel and then drag it to the right of the margin (into the gray area).
However, you do not need to do that anymore. Instead, the right-align tab always takes the leader from the LAST tab stop. So you can make any tab stop with the dot leader, and if it is the last one, the right-align tab will use that leader
This is a wonderful tip–a real game changer! Here’s a question, though: why do some entries ignore the right indent? Most of the entries observe the no man’s land between the right edge of the entry text and the page number beautifully, but a few squeeze in a last word, crossing into that space.