

Here are 10 ways that using keyboard arrow keys can help you be more efficient in InDesign.
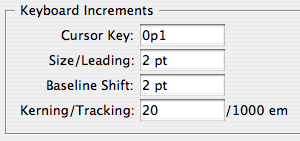
1. Move or duplicate selected objects (including guides). Pressing arrow keys moves selected objects the distance specified in the Cursor Key preference.
Adding the Option/Alt key duplicates the object.
Adding Shift increases the increment to 10x the cursor key value.
Adding Command/Ctrl+Shift decreases the increment to 1/10th the cursor key value.
You can also combine these tricks. For example, Shift+Option+Arrow duplicates the object offset 10x the cursor key value.
2. Increase/decrease values in panel and dialog box fields. This works when the value is highlighted or with a blinking cursor in the field. Adding shift increases the increment in different ways depending on the unit of measure.
For example, in the Control panel:
If your default units are picas, the arrow key moves or resizes the object by 1pt. Add shift to move/resize to the nearest pica.
If your default units are points, the arrow key moves or resizes the object by 1pt. Add shift to move/resize to the nearest 10 points.
Note that InDesign rounds off decimals into integers (which may or may not be what you want).
click ![]() , then up arrow to get
, then up arrow to get ![]()
3. Navigate through (or select) text. Command/Ctrl+Left/Right Arrow jumps to the previous/next word. Command/Ctrl+Up/Down Arrow jumps to the previous/next paragraph. Add Shift to select text. Command/Ctrl+Shift+Left/Right Arrow selects an adjacent word. Command/Ctrl+Shift+Up/Down Arrow selects to the beginning/end of a paragraph.
4. Navigate through (or select) table cells. Arrow keys move your cursor to the next cell. When you reach the end of a row or column, pressing the arrow key again loops you back to the other end of the row or column. Add shift to select cells. Press the opposite arrow to deselect cells.
5. Play with polygons. Press the Up/Down or Left/Right Arrows to change the number of polygons as you draw with the Polygon tools. Press the Right Arrow to add polygons in a row. Press the up arrow to add them in a column. Tap the Spacebar and then press Up and Down Arrows to change the number of sides of the polygon(s). Press Left/Right Arrows to increase or decrease the star inset value.
6. Navigate panel lists. When you summon the Swatches, Links, or Layers panels (with either their keyboard shortcut or by choosing them from the Window menu), you can immediately navigate through them with Arrow keys. If the panel is already open, Command+Option/Ctrl+Alt click on list, then navigate with arrows.
7. Navigate through menus. Up/down Arrows move through the available menu choices. Left/Right Arrows enter/exit submenus. Add Command/Ctrl to jump to the top/bottom of menus.
8. Change text spacing. Press Option/Alt with Left/Right Arrows to change kerning or tracking. Press Option/Alt with Up/Down arrows to change leading. Press Shift+Option/Alt with Up/Down arrows to baseline shift text.
9. Use Quick Apply. When the Quick Apply list is open, press Left/Right Arrow keys to move through the selection field; press Up/Down Arrow keys to scroll through the list.
10. Select a file to place. When you’re placing multiple graphics or text files, press an arrow key to cycle through them, and select which one to place.
A few more arrow points
When you’re in a dialog box you can tab through the controls and use the arrow keys to select different radio buttons. For example, when you open the Numbering and Section Options dialog box, you can use the down arrow to switch from Automatic Page Numbering to Start Page Numbering at.
![]()
Shift into High Gear: As noted above, you can press Shift in some cases to increase the increment of change when you use an arrow key.
Adding Shift changes:
- percentage values by 10%
- angles by 5 degrees
- columns by 5
- tabs by 10 pts or 1 pica (depending on your default units)
Power Zoom: You can click and hold with the Hand tool to invoke Power Zoom. Drag the red rectangle and release the mouse button to move to a different part of the document. If you want to change your magnification level too, use the arrow keys. Up or Right Arrow increases the size of the rectangle (increases the visible area). Down or Left arrow decreases the size of the rectangle (zooms in closer).
This article was last modified on March 22, 2021
This article was first published on December 30, 2008
Commenting is easier and faster when you're logged in!

Recommended for you

How Do You Know if There are Notes in an InDesign Document?
The Notes panel is an amazing way to add comments to a document; too bad it hide...

PDF Industry Guru Ted Padova Authors Nitro PDF Desktop User Guide for ARTS PDF
ARTS PDF, the award-winning and category-leading developer of PDF tools for PDF...
Musings on the New Technologies
I just got an invitation to attend my high school reunion. (I won’t tell y...